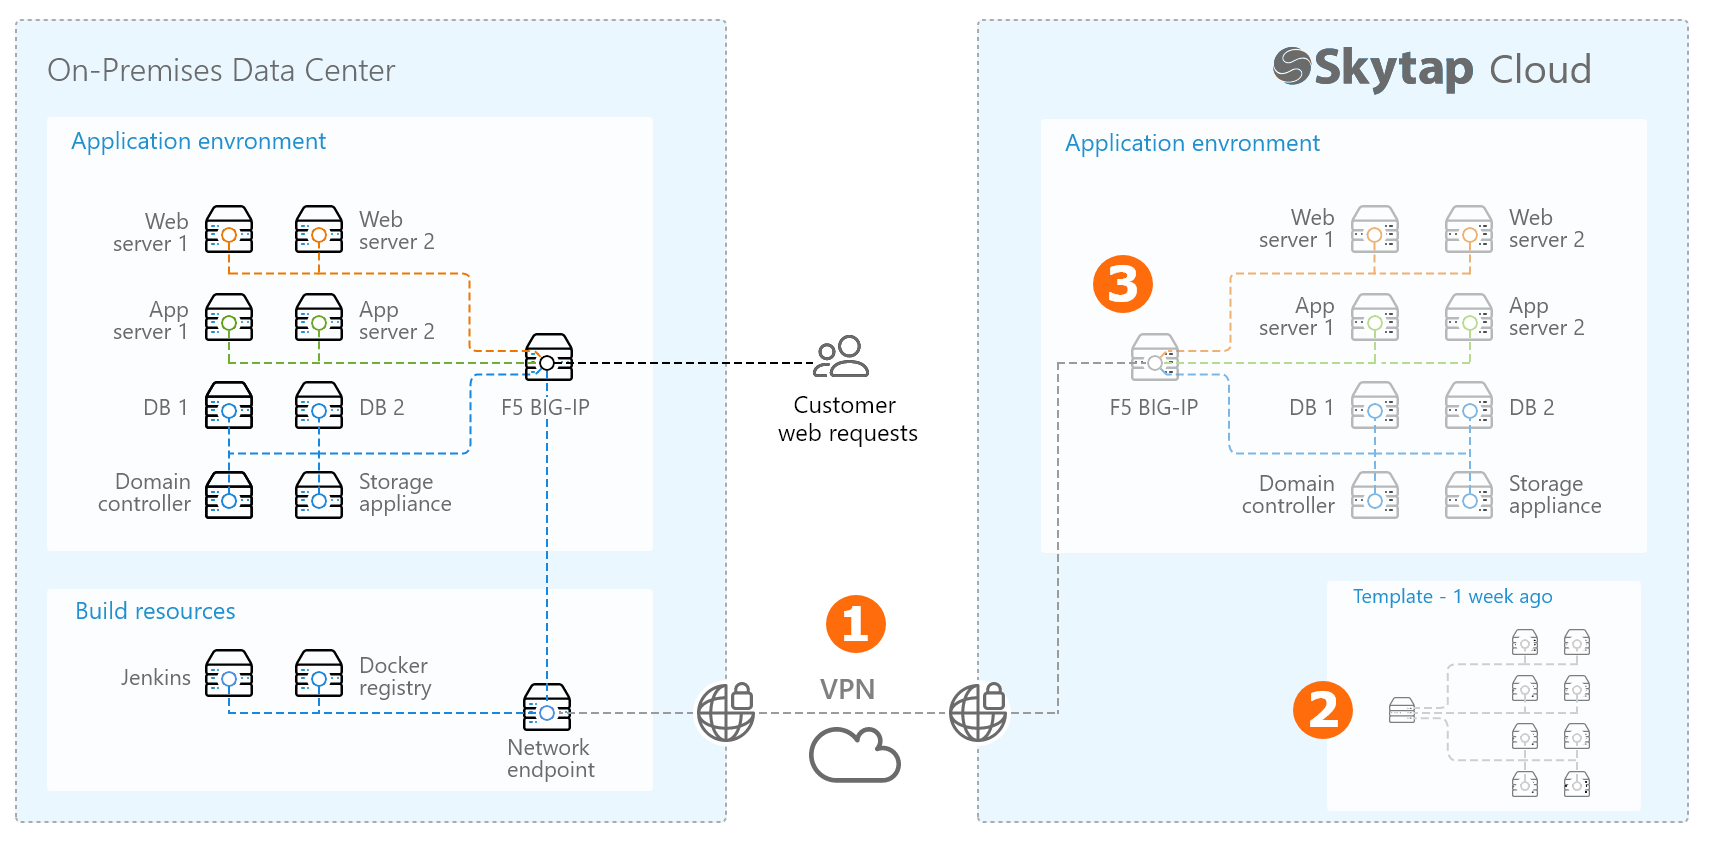
Disaster recovery reference architecture: On-premises data center to Skytap – cold recovery
The following diagram shows a high-level overview of a disaster recovery workflow in Skytap.
In this example, Skytap is a cold, off-site disaster recovery location for an application running in a corporate data center. For an overview of the various disaster recovery scenarios, see Disaster recovery reference architectures.
This disaster recovery workflow uses several Skytap features:
-
Create a VPN or Private Network Connection between your on-premises network and your Skytap account.
After a one-time set up, this connection lets you securely send updated build files, operating system patches, and other assets from your corporate network to one or more virtual environments in Skytap.
For more information, see Overview of Private Network Connections and VPNs.
-
Create a template of your on-premises application stack in Skytap.
-
Use our import tools to bring your Power LPARs, x86 VMware VMs, and x86 VMware vApps into Skytap.
During this process, your VMs are uploaded to a Skytap region. Each VM retains everything installed on it, including the operating system, installed applications, containers, etc.
After the VMs are imported, you can further configure the environment to replicate your on-premises application stack, down to the IP address and hostname assigned to each VM.
For more information, see Overview: Importing VMs and vApps into Skytap and Editing environments and networks.
-
After your environment is fully imported and configured, save it as a read-only template.
This becomes your golden template for creating a new, working environment in a disaster recovery scenario. For more information, see Saving an environment as a template.
-
Share the template with any Skytap users who will need access to it during disaster recovery.
Add the template to a project, and give access to any users who need to view or create environments from the template. Users can have different levels of access, depending on their project role.
Give the project an easily identifiable name, such as Disaster recovery resources.
For more information, see Sharing resources with projects.
-
-
Periodically update the copy of your application stack in Skytap.
On a schedule based on your business requirements:
- Create an environment from your read-only template.
- Connect the new environment to the VPN or Private Network Connection, and deploy operating system patches, application updates, and other changes as needed. Use your standard configuration management tooling (Ansible, Puppet, etc.) to update the VMs that had been suspended with the latest operating system and application updates.
-
Attach a public IP address to the network appliance in the environment and perform a “smoke test” of the recovery environment. Use your standard test process to validate that the application works as expected and that it functions properly as a disaster recovery environment.
- If your disaster recovery plan includes recovering data from a separate, more-frequently updated data store, remove any unneeded data from the Skytap virtual machines. This helps reduce the storage space consumed by the Skytap template.
-
Save the updated environment as a new template.
Give the template a unique and discoverable name, such as ApplicationName_DR_2018_04_01.
- Add the new template to the project you created earlier. Validate that the project members have the appropriate level of access to create environments from the template.
During disaster recovery cutover
Follow your organization’s documented disaster recovery procedures to:
- Create an environment from the most recent template.
- Connect the new environment to the VPN or Private Network Connection, and deploy operating system patches, application updates, and other changes as needed. Restore data, if needed.
- Attach a public IP address to the network appliance in the environment.
- Update your DNS service to direct traffic to the Skytap public IP address.
For other disaster recovery examples, see Disaster recovery reference architectures.