Using the Skytap automation pack for Visual Studio Team Foundation Server
The Skytap automation pack for Visual Studio Team Foundation Server (or TFS automation pack) enables easy integration of your Skytap environments with TFS to run Continuous Integration and Automated Testing workflows using Build-Deploy-Test (BDT) concepts in TFS. BDT is the workflow engine that ships with TFS that enables a developer or tester to:
- Build application code.
- Deploy application components.
- Define and choose the test environment where the application will be deployed.
- Define and deploy automated tests for the application.
- Collect results and other diagnostics data during test runs.
Once defined, this BDT workflow can be repeated multiple times by members of the development team.
The automation pack is available for download here. For instructions about installing and using the pack, see below.
How to set up and use the Skytap automation pack for Visual Studio Team Foundation Server
This article does the following:
- Guides you through the prerequisites for using the TFS automation pack.
- Shows you how to install the TFS automation pack.
- Walks you through setting up a test environment in Skytap that is ready for use in TFS.
- Provides an example BDT workflow with TFS automation pack.
Prerequisites
There are a few prerequisites you must have to run a Skytap-integrated BDT workflow, as listed below:
Team Foundation Server 2012
You need to have TFS 2012 installed. This can either be on-premises or in Skytap itself. For the purposes of this article, we assume TFS is installed on-premises. As part of TFS install you should have the following components of TFS also installed:
- Build Controllers – This is a distributed component of TFS that helps run a build as defined in your build definition. You can have it installed on a machine in the same location as your TFS server. At a minimum, you need it configured with two agents. For more information about installing the TFS Build Service, see http://msdn.microsoft.com/en-us/library/ee259687.aspx
- Test Controllers – This is a distributed component of TFS that helps deploy and execute tests as defined in your BDT. You can have it installed on a machine in the same location as your TFS server. For information on setting up test controllers in lab environments, see http://msdn.microsoft.com/en-us/library/hh546460.aspx. For setting up test controllers and test agents to manage tests with Visual Studio, see http://msdn.microsoft.com/en-us/library/hh546459.aspx.
VPN connection to Skytap
For your TFS server to communicate with test environments in Skytap, you should have a VPN connection to Skytap configured. For more information, see Vpns and Private Network Connections.
If you have TFS installed in Skytap itself, then you don’t need a VPN. Connection between TFS and test environments in this case is created using ICNR. For more information, see Networking between environments.
Skytap automation pack for TFS
The automation pack enables you to employ Skytap in your BDT scenarios. You can download the pack here. The pack has 2 components:
SkytapLabDefaultTemplate.11.xaml– A template workflow for TFS BDTs that lets you define the build, deploy and test tasks. It integrates with Skytap to create, start, stop, suspend, save, and delete the test environments. It also uses Skytap automatic networking to dynamically connect your test environments to your TFS environment, whether it’s on-premises or hosted in Skytap. This template workflow needs to be checked-in to theBuildProcessTemplatesfolder in your project.SkytapCLI.exe– The component that drives actions requested by the BDT workflow in Skytap, using the Skytap REST API. SkytapCLI.exe needs to be installed on the TFS build controllers in the “C:skytap” directory. You can provide a default set of Skytap credentials that can be used for all user requested BDT runs using the automation pack. You can do this by adding those credentials to theSkytapCLI.exe.configfile, as shown below: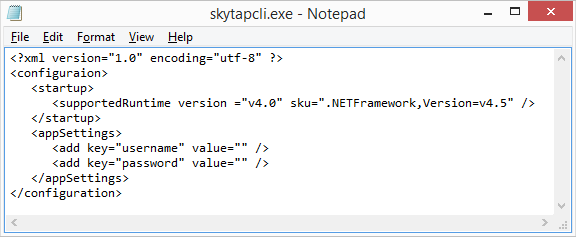
You can override these credentials when you define the BDT.
Target test template in Skytap
You designate the Skytap template as the test environment for your application. Each run of a BDT creates a fresh environment out of this template and performs tests against it. To prep this environment, you must perform these two steps:
- Define the topology of your test environment. This includes the hardware specifications of the VMs (such as CPU, RAM, and disk size), any software that needs installation, and any networking needed by the application. For a guide on making these changes to a VM, see Customizing your environment.
- Convert your Skytap environment into a ‘TFS Environment’. You’ll need to use Lab Manager in Microsoft Test Manager 2012 to define your Skytap environment as a TFS test lab. This is explained in the How to set up your test environment section, below.
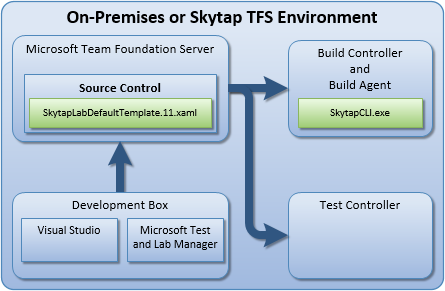
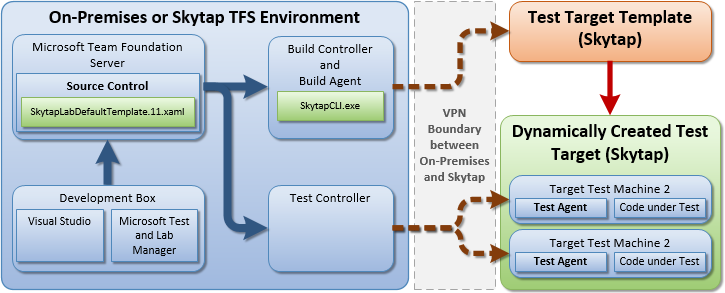
Once the prerequisites are in place, your on-premises infrastructure look something like the figure below:
How to set up your test environment
This section details how to create a virtual Skytap environment that represents the topology of your test environment and designate it as a TFS test environment. You can use Skytap to:
- Create an environment.
- Add the desired VMs to it, either starting from public templates or by importing your own VMs.
- Configure the hardware associated with each VM.
- Provision the networks and connect them to the VPN connection back to your on-premises network.
Once the environment is modified, convert it into an environment that TFS can recognize.
Convert the Skytap environment into a TFS environment
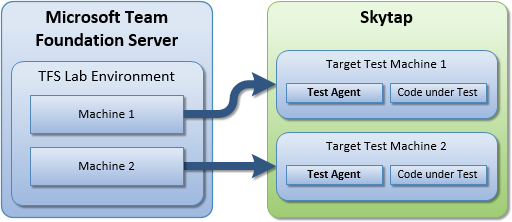
This step is needed so that the required agents can be installed and other tweaks can be made to the test VMs, such that TFS can recognize them as VMs when BDTs are run. The relationship is depicted in the conceptual diagram below:
The following steps guide you in creating this relationship using Lab Center components of Microsoft Test Manager 2012.
- Your test environment in Skytap must be running for you to create a TFS environment from it.
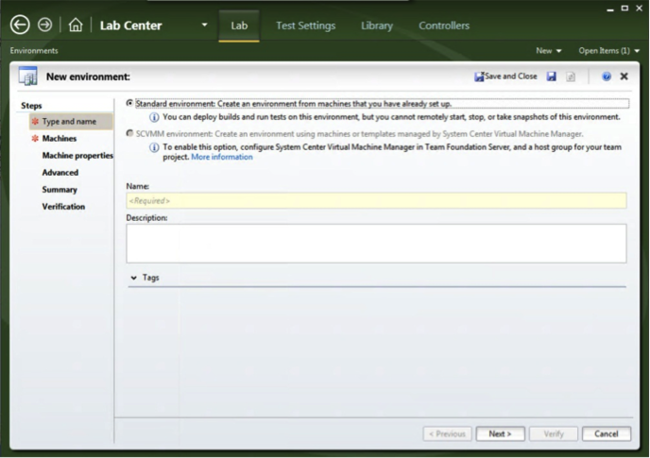
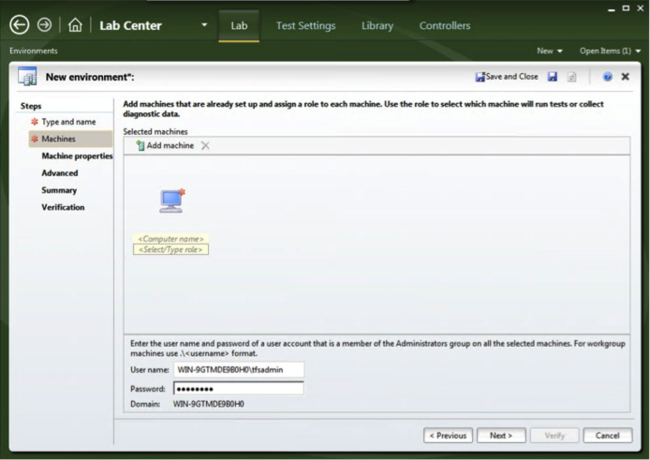
- Open up Lab Center and create a new environment. Standard environments in Lab Center enable connection and deployment of the TFS Test Agent to any addressable machine. We use this to preconfigure the test target machines in Skytap.
- In the Machines section, start adding the VMs that are in your test environment. Use the IP addresses automatically provided for each of your machines to add them in to this UI. This address is available from the environment page containing the VM.
- TFS requires that both the target test machines and the test controllers are able to address each other by name. Since the controller and test machines could potentially be in different domains, we implement a workaround to achieve this; add the following entries into the host files (
%systemroot%system32driversetchosts)- The client that is running Microsoft Test Manager needs a hosts file to see all of the test target machines.
- Entries in the hosts file of test controller for all the target test machines.
- Entries in the hosts file of the target test machines for all the test controllers.
- TFS also requires a shared account on all of the test controllers, build controllers and test agents. This should be a local account on all machines with the same user name and password combination. The account should also be a member of the local administrators group on all of those machines.
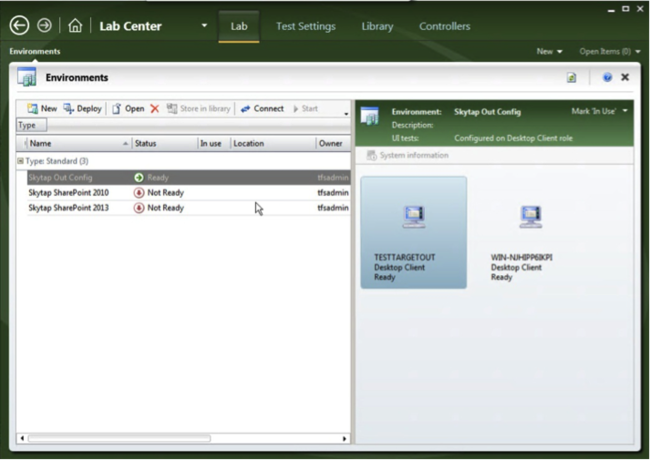
- Microsoft Test Manager goes through its setup process and convert the Skytap environment into one that can be managed by TFS.
- Once the TFS lab environment is in the ready state, which means that all machines are configured correctly, save the Skytap environment as a template (see Saving an environment as a template). This template is used by the automation pack during the BDT workflow to create the TFS environments in Skytap.
At this point you’re ready to create run BDTs.
Define a BDT in TFS
You may be familiar with the steps to create and deploy BDTs in TFS using Visual Studio and Microsoft Test Manager. We use the same steps to illustrate how to create and run BDTs using the automation pack under the hood.
A developer or tester can create a BDT definition based on the template provided as part of the automation pack. The only difference is that instead of using default lab template you use SkytapLabDefaultTemplate.11.xaml as the ‘Build process file’ . This template preserves the same UI and workflow as existing BDT templates. It also allows the user to enter the information needed for the integration. Here’s a brief description of Skytap fields that you can enter in this UI. Only two of these values are required.
SkytapLogin– Your login id for Skytap. If you choose to use a centralized Skytap user, define that inSkytapCLI.exe.configon the build controller.SkytapLoginKey– Your password or API key, if token based API authentication is turned on for your account.SkytapSaveASTemplateOnFail– True directs the automation pack to save the test environment as a template in Skytap, in case there are failures encountered in the BDT run.SkytapTemplateIDTestTargetTemplate(Required) – Template ID of the of the ‘golden’ test environment that was created in Skytap and registered as a TFS Environment.SkytapVPNIDForTFS(required) – VPN ID of the VPN connection between Skytap and your on-premises network. You can get this ID from your Skytap administrator.SkytapConfigIDRunningTFS– This field is useful if your TFS server is running in another environment in Skytap as opposed to running on-premises. In this case you need to provide the ID of the environment that the TFS server resides in. In this scenario, this field is required andSkytapVPNIDForTFSisn’t required.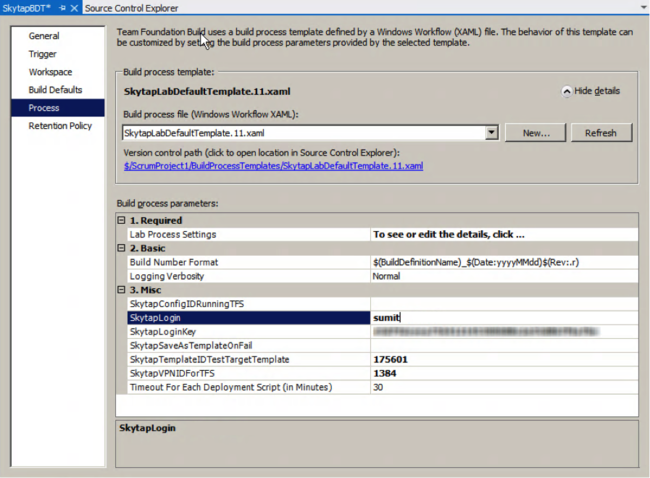
Run the BDT
In this section, you see how an automation pack enabled BDT runs. In terms of workflow, that the steps are no different from a vanilla BDT supported by TFS. However, during the workflow, the automation pack takes the necessary actions to enable the BDT to use environments in Skytap. These illustrations show a sample application and some sample test cases for the application. Below is a schematic view of the entire BDT process using the automation pack.
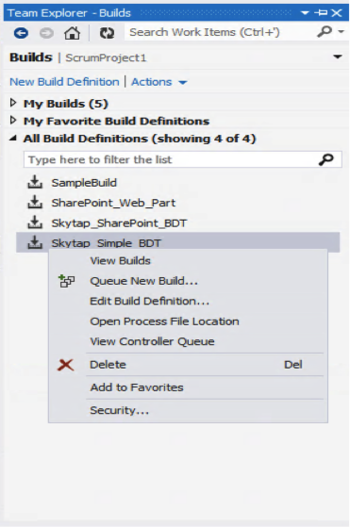
Start a BDT
You can set up the BDT to be executed as part of any check-in, or trigger a build manually. In this illustration we have triggered a manual build that starts the associated BDT that we have defined.
Automation pack in action
The build logs show the automation pack in action, where it dynamically creates the test environment in Skytap and uses auto-networking capabilities to connect to a TFS over a VPN connection. The screenshot of Visual Studio on the developers machine shows the BDT in action.
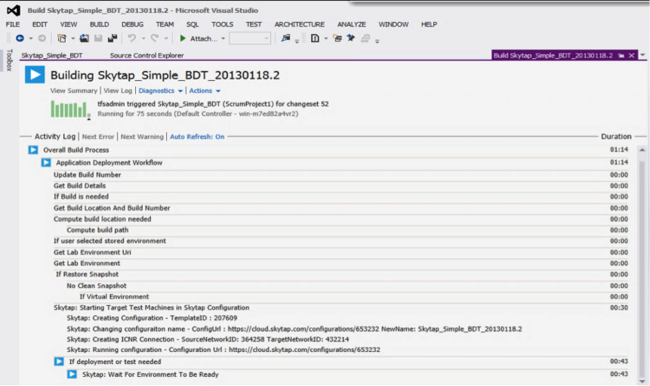 As a result of BDT, the test environment is dynamically created in Skytap from the template we had defined previously. The test environment is renamed with the build number of the build that triggered its creation. This makes it easy to identify the environments that correspond to particular BDT runs. The deployment of the application and tests taking place are shown below. When the tests are complete, the test environment is automatically deleted. If there are failures, the test can be saved as a template for further investigation.
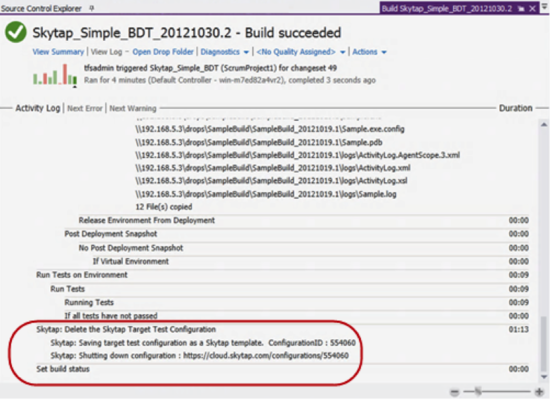
Results
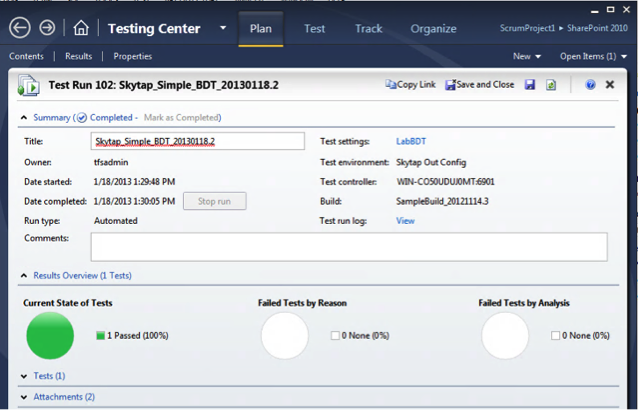
After the BDT run finishes, you can see the logs right in Visual Studio on your developer box and also see the results of tests and other diagnostic data you collected, in Microsoft Test Manager.
If you have any questions about these scenarios, contact support@skytap.com.