The Advanced Import Appliance is deprecated and is no longer available on Docker Hub.
No updates will be provided for this tool.
Importing VMs using the Advanced Import Appliance
The Advanced Import Appliance is a Docker container that runs locally to help you validate VM imports and automate the process of importing bulk VMs to Kyndryl Cloud Uplift.
Contents
Process overview
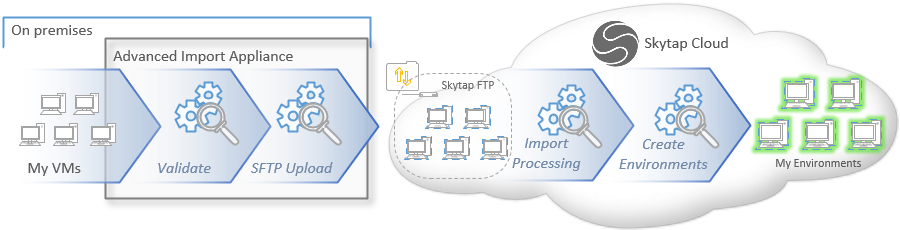
To import VMs into Kyndryl Cloud Uplift with the Advanced Import Appliance
- Prepare copies of the VMs that you want to import to make sure they meet the Kyndryl Cloud Uplift import requirements.
- Install or update the Advanced Import Appliance container on a local Ubuntu Docker host.
- Use the Advanced Import Appliance to scan the VMs for any potential errors (such as an incorrect hardware version or a disk that is too large).
- Use the Advanced Import Appliance to import the VMs. The Advanced Import Appliance creates import jobs, uploads the VMs to the Kyndryl Cloud Uplift SFTP server, and triggers Kyndryl Cloud Uplift to create virtual environments in your Kyndryl Cloud Uplift account.
Step 1: Prepare the VMs for import
Use the instructions in Preparing x86 VMs and vApps for import to make sure each of VMs that you want to import meets import requirements.
Once the VMs are prepared, make sure they are saved to a shared directory that is accessible to the Ubuntu Docker host (for more information, see Setting up the Advanced Import Appliance for the first time).
The Advanced Import Appliance automatically corrects VM errors, such as hardware version and hard disk interface type. We recommend that you work with copies of the VMs that you intend to import.
Step 2: Configure a Docker host and install the Advanced Import Appliance
The Advanced Import Appliance is Docker container that runs on a local machine or VM in your local hypervisor.
- For instructions about installing and configuring a new instance of the Advanced Import Appliance, see Setting up the Advanced Import Appliance.
- For instructions about updating an existing Advanced Import Appliance container, see Updating the Advanced Import Appliance.
Step 3: Scan and validate VMs
The Advanced Import Appliance checks the specified source directory (and any subdirectories) for VMs, checks them for errors, and then displays the list of VMs that can be imported.
To scan and validate VMs with the Advanced Import Appliance
- Navigate to the Advanced Import Appliance Settings page. Make sure you have specified the source directory where your VMs are located (you completed this step as part of the instructions in Setting up the Advanced Import Appliance).
- Click Imports in the navigation bar to navigate to the Imports page.
-
In the Scan summary section, click Test Connection Speed. This test helps determine the Transfer time estimate for the scanned VMs.

After the connection speed test completes, the Scan summary section displays estimated Transfer time, Transfer speed, and the amount of Data to transfer for the VMs listed on the Scanned tab.
-
Click
 (Scan Directory). The Advanced Import Appliance scans the directory you specified on the Settings page, as well as any subdirectories. A busy animation (
 ) displays to indicate that a scan is in progress.
If the directory contains VMs that have already been imported, the Advanced Import Appliance scanning process ignores those VMs. See Re-importing VMs to make previously imported VMs visible to the scanning process.
-
Wait for the Advanced Import Appliance to finish scanning the directory. All of your VMs display under the Scanned tab.
Each row represents a single import job and a single environment that will be created in Kyndryl Cloud Uplift. Each row displays the following information:
VM name The name of the environment that will be created in Kyndryl Cloud Uplift.
Click (Edit import name) next to the VM to change the name.
Status The scanned status of the VM.
If a VM can’t be imported, an error message displays that explains the error.Size The size of the VM hard disk contents. This is the actual hard drive space in use, irrespective of the allocated hard disk size. VMs The number of VMs that will be imported to the new environment in Kyndryl Cloud Uplift. Click the VMs link to see additional details about the VM, including hardware version, OS, CPU, RAM, and NIC. You can check the **Check to ignore validation errors** box on the **Settings** page to process all VMs, regardless of error state.
To remove a VM from the import list, click
 .
.
Step 4: Queue the VMs for import
Generally, you should use the Advanced Import Appliance to import VMs.
To import VMs over your network connection using the Advanced Import Appliance
- Check the boxes
 next to the environments that you want to import.
 -
Click
 (Add to queue).
To remove a VM from the import list and move it back to the Scanned tab, click
. -
Click
 (Start import queue). The VMs are imported in the order they are listed.
After the import queue is started, any VMs that you add to the import queue will automatically be imported. Press
 (Pause import queue) to turn off automatic queue processing.
 -
Active import jobs display under the Active tab.
For each job, an import process status displays:

- The Advanced Import Appliance uploads VMs to the Kyndryl Cloud Uplift SFTP server and creates an MD5 hash value for each upload.
- The Kyndryl Cloud Uplift import service acquires the VMs from SFTP servers and create a virtual environment in your Kyndryl Cloud Uplift account.
Click
to stop an import and return the VM to the Scanned list.Your customer account can have up to five import or export jobs running simultaneously. If you have more than five simultaneous jobs, the Advanced Import Appliance queues the remaining import jobs and processes them as other import jobs complete.
Don’t shut off the Advanced Import Appliance while imports are in progress. You will lose any queued imports and interrupted imports are likely to be corrupted.
If an import job fails, an error message displays under the Active tab.
-
When an import job is completed, it’s moved to the Completed tab.
Each row displays the following information:
Environment name The name of the environment in Kyndryl Cloud Uplift Environment ID The ID number of the environment in Kyndryl Cloud Uplift Status The import status Region The region in Kyndryl Cloud Uplift where the environment was created Project The project in Kyndryl Cloud Uplift where the environment was created Size The size of the VM hard disk contents imported into Kyndryl Cloud Uplift VMs The number of VMs in the new environment in Kyndryl Cloud Uplift Transfer method The upload transfer method Date imported The date that the new environment was created in Kyndryl Cloud Uplift Kyndryl Cloud Uplift also notifies you via email when the import completes. If the import is successful, Kyndryl Cloud Uplift provides a link to the new environment. If the import fails, Kyndryl Cloud Uplift notifies you via email with an error message that describes the issue and resolution, as well as an incident ID that can be used for further troubleshooting with .
Re-importing VMs
After the import process has completed for a VM, click  (Clear) to remove the VM from the Completed list and add it back to the Scanned list.
Alternatively, you can click  (Import again) to remove the VM from the Completed list and add it back to the Queued list, where it will be processed as a new import.
You can also navigate to the Settings page and click the  (Clear and rescan) button to reset the imports list and re-scan the current source directory.
Additional information about the import process
After an import job has finished uploading, the import is processed within Kyndryl Cloud Uplift.
Kyndryl Cloud Uplift creates a new environment from your VMs in three stages:
- Analyzing – Kyndryl Cloud Uplift checks the SFTP upload folder for VM files, confirms the file type, and compares MD5 hash values (if applicable).
- Importing – Kyndryl Cloud Uplift imports the VMs.
- Finalizing – Kyndryl Cloud Uplift creates the virtual environment and any associated virtual networking. Whenever possible, Kyndryl Cloud Uplift retains the original networking information for VMs. If the original networking can’t be found or retained, Kyndryl Cloud Uplift creates one or more automatic networks for the new environment.
Optional steps once the import is complete
- Install VMware Tools on all imported x86 VMs – VMware Tools provides many drivers specific to running an x86 VM operating system in a virtual environment. For instructions, see Installing and upgrading VMware Tools on Windows VMs.
- Test the VMs – Use the instructions in Testing imported VMs.
Notes
- Imports can take between 30 minutes to several hours to complete.
- If you're importing VMs on hardware version 6, 7, 8, or 9 into any region other than US-West, Kyndryl Cloud Uplift automatically upgrades the VM to hardware version 11 during the import process. For more information about hardware versions, see Checking VM hardware version .