Using the event details page to deliver the event
The event details page is the primary tool for instructors to manage a Course Manager event.
Contents
Using the event details page
To use the event details page
- If you have Course Manager Admin, Staff, or Event Manager access:
- From the Course Manager navigation bar, click Events. The Events page displays the In Progress events.
- Click an event. The details page for the event displays.
- If you don’t have Course Manager Admin, Staff, or Event Manager access, use the guest access view.
Using the guest access view
The guest access view allows an instructor to manage an event using the event details page without signing in to Course Manager.
To use the guest access view
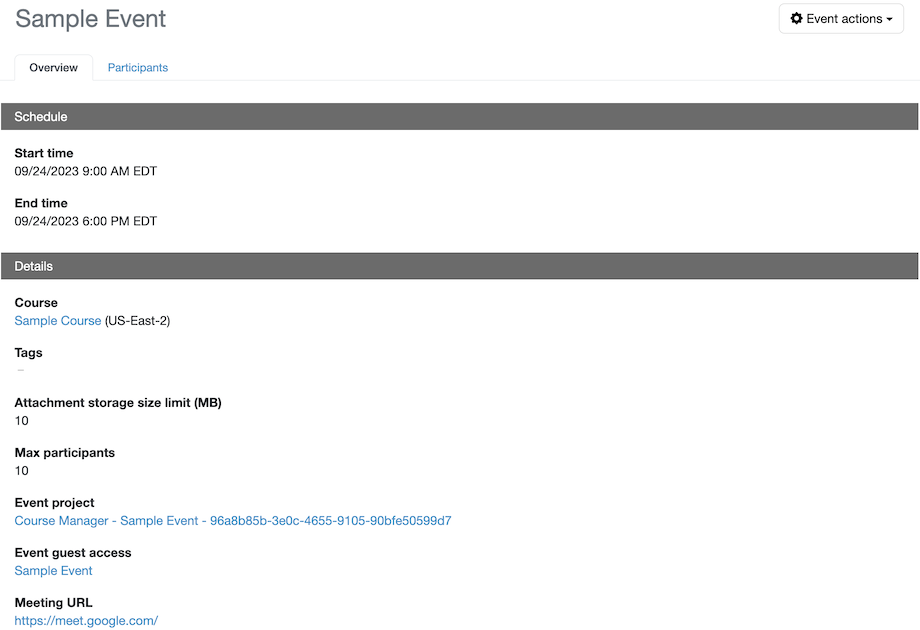
- If you have Course Manager Admin, Staff, or Event Manager access, click the link under Event guest access on the event details page.
-
If you don’t have Course Manager Admin, Staff, or Event Manager access, click the guest access link in your event invitation email.
To switch back to your Admin, Staff, or Event Manager account, click the drop-down menu next to
 at the top of the page, and then click Back to your account.
You can’t do the following from the guest access view
- Delete an event.
- View the logs for an event.
- Change the maximum number of participants for an event.
- Change the attachment storage size limit for an event.
Adding learning content to the event
For information about adding event published content, participant published content, and event attachments, see Adding learning content to an event. If you update event learning content while the event is in progress, the updates automatically display to participants on the Resources tab in the Learning Console.
Adding, editing, and removing event participants
Adding a participant to the event
For information about adding participants to an event, see Adding participants to an event.
Editing an event participant
To edit an event participant
- From the event details page, click the Participants tab.
- Click the drop-down menu next to the participant name in the Instructors or Students section.
- Click Edit.
-
Change one or more of the following:
There may be other fields to edit. For more information, see Using custom data attributes.
- First name – Add or update the participant’s first name.
- Last name – Add or update the participant’s last name.
-
Email/ID – Add or update the participant’s email (or ID if an email isn’t available).
If you add or update an email address, Course Manager automatically sends an event email invitation.
-
End time – Add a custom end time (in the event’s local time zone) to give the participant access to the lab after the event has ended.
Notes
- You can't add an End time that has already passed or is earlier than the event End time.
- If you add a custom end time for a participant, the participant's lab won't be cleaned up until after the custom end time.
- If you add a custom end time for a participant in a recurrent event, Course Manager updates the participant's end time for each class day remaining in the event. If you want to give the participant access to the lab after the event has ended without affecting the recurrent stop times for the participant's environment, add the custom end time on the final day of the event.
- For more information about how Course Manager schedules environments to stop and delete in Kyndryl Cloud Uplift, see Using event scheduling with Course Manager.
-
Published content – Add or update participant published content.
For more information about participant published content, see Adding published content to an event participant.
- Click Update Instructor or Update Student.
Adding and editing event participant metadata attributes
For information about adding and editing event participant metadata attributes, see Adding metadata attributes.
Removing a participant from the event
To remove a participant from the event
- From the event details page, click the Participants tab.
- Click the drop-down menu next to the participant name in the Instructors or Students section.
- Click Delete.
Course Manager automatically cleans up the lab environment created for this participant.
Viewing the participant lab environments for the event
Displaying the thumbnail view of all participant labs
To display the thumbnail view of all participant labs
From the event details page, click the Participants tab.
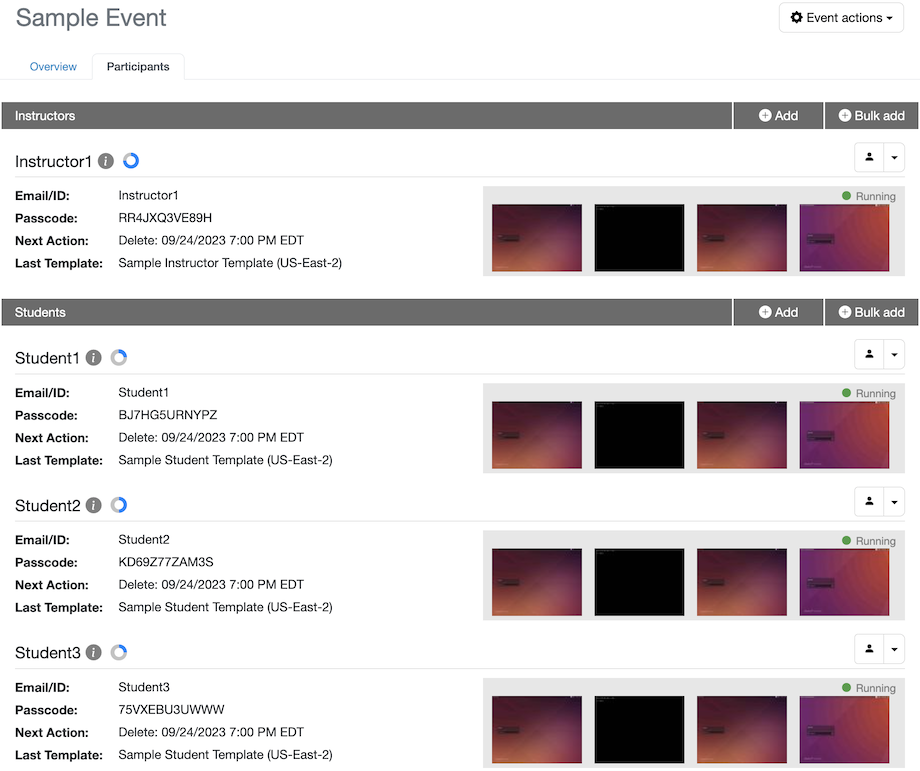
Additional information about the thumbnail view
- The thumbnail view is refreshed periodically.
- Click a VM thumbnail to collaborate with a participant in real time.
- VM thumbnails might not display if a lab environment is stopped, suspended, or not yet provisioned.
Opening a participant lab
To open a participant lab
- From the event details page, click the Participants tab.
- Click the drop-down menu next to the participant name in the Instructors or Students section.
- Select one of the following:
-
To open the participant lab link, click Open user link.
The participant link displays the Course Manager Learning Console. If Learning Console access is disabled, it displays the Kyndryl Cloud Uplift sharing portal for the lab.
- To open the Kyndryl Cloud Uplift sharing portal for the lab, click Open sharing portal.
-
To open the lab environment in Kyndryl Cloud Uplift, click Open environment.
You must be signed in to Kyndryl Cloud Uplift to open a lab environment in Kyndryl Cloud Uplift.
-
Resending lab access information
Resending the event invitation email to a participant
If you specified email addresses for participants when you added them to the event, the participants automatically received email invitations to the event.
To resend the event invitation email to a participant
- From the event details page, click the Participants tab.
- Click the drop-down menu next to the participant name in the Instructors or Students section.
- Click Resend email.
Providing lab access information from the event participant roster
If you didn’t specify email addresses for event participants in Course Manager, you can get a list of participant passcodes (if enabled) and lab links from the event participant roster, and then provide lab access information outside of Course Manager.
To provide lab access information from the event participant roster
- From the event details page, click the Event actions drop-down menu.
- Click Get roster.
- Provide lab access information outside of Course Manager.
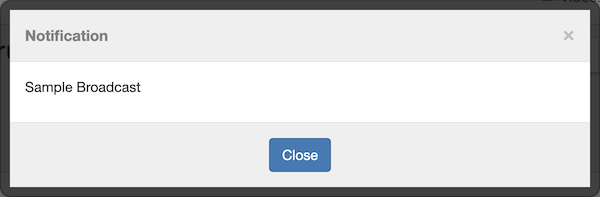
Broadcasting a message to all event participants
If the Course Manager Learning Console is enabled for the event, you can broadcast a message to all event participants.
To broadcast a message to all event participants
- From the event details page, click the Event actions drop-down menu.
- Click Send broadcast.
-
Enter the message in the Message field, and then click Send Broadcast. The message displays to all event participants who have the Learning Console open.
Reprovisioning a participant lab
You can reset a participant lab environment to its initial state, or to the initial state of another template available in the course, by reprovisioning the lab environment.
To reprovision a participant lab
- From the event details page, click the Participants tab.
- Click the drop-down menu next to the participant name in the Instructors or Students section.
-
Click Reprovision.
- The participant’s environment may be reprovisioned from a template in the course.
- The participant’s environment may be reprovisioned from a copy of another participant’s lab.
Notes
- The source list displays only the templates and other participant environments that are in the same region as the participant lab.
- Other participant environments that contain Power VMs don't display in the source list.
- Click Reprovision Instructor or Reprovision Student.
Editing or deleting the event
For information about editing an event, see Editing an event.
For information about deleting an event, see Deleting an event.
You can’t delete an event from the guest access view.
Editing event metadata attributes
For information about editing event metadata attributes, see Adding metadata attributes.
Viewing event schedules
For information about viewing scheduled actions for participant Kyndryl Cloud Uplift environments, see Viewing event schedules.
Viewing Learning Console activity for an event participant
For information about viewing Learning Console activity for an event participant, see Viewing Learning Console activity.
Viewing a summary of Learning Console activity for all event participants
For information about viewing a summary of Learning Console activity for all event participants, see Viewing the event activity summary.
Viewing the logs for the event
To view the logs for the event
- From the event details page, click the Event actions drop-down menu.
- Click View logs.
Only Course Manager administrators can view logs.
After the event
For information about cleaning up and reporting at the end of an event, see Cleaning up and reporting at the end of an event.