Managing labs
The Labs page is the primary tool for Admin and Staff users to manage Course Manager on-demand labs.
The term Lab in the Course Manager interface is configurable for your account and may be replaced by another term such as Demo.
Contents
Using the Labs page
To use the Labs page
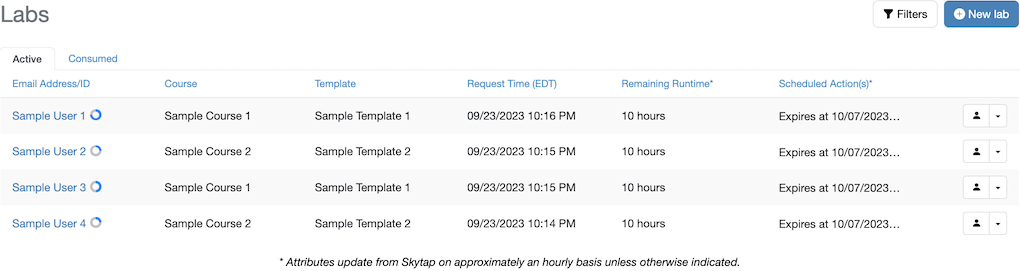
From the Course Manager navigation bar, click All Labs. The Labs page displays the Active labs.
Click a lab to view the details page for the lab.
Accessing a lab
To access a lab
-
From the Labs page, click
 next to the lab you want to access.
You can also click the Lab actions drop-down menu on the lab details page.
-
Select one of the following:
-
To open the lab link, click Open user link.
The lab link displays the Course Manager Learning Console. If Learning Console access is disabled, it displays the Kyndryl Cloud Uplift sharing portal for the lab.
-
To open an iframe that allows users to launch the lab environment or stop an environment that is already running, click Open iframe.
Notes
- The iframe can be embedded in an external system and is used in the LTI-compliant LMS integration workflow.
- Messages in the iframe can be customized in your account settings.
-
To open the lab environment in Kyndryl Cloud Uplift, click Open environment.
You must be signed in to Kyndryl Cloud Uplift to open a lab environment in Kyndryl Cloud Uplift.
-
Viewing Learning Console activity for a lab
For information about viewing Learning Console activity for a lab, see Viewing Learning Console activity.
Viewing the logs for a lab
To view the logs for a lab
-
From the Labs page, click
next to the lab.You can also click the Lab actions drop-down menu on the lab details page.
-
Click View logs.
Only Course Manager administrators can view logs.
Deleting a lab
For information about deleting a lab, see Deleting a lab.
Managing snapshots
If the request portal and snapshots are enabled in your account settings, Lab and Event Manager users can take a limited number of snapshots of lab environments and use the snapshots to provision future labs from the same course. You can promote a request portal user’s snapshot to make it available to other users with access to the course. After a snapshot is promoted, you can also add it as a template to other courses in Course Manager.
Notes
- If enabled in your account settings, Course Manager can automatically delete snapshots that aren't used to request a lab for a period of time.
- If enabled in your account settings, Course Manager can automatically send a warning email to the snapshot owner before an unused snapshot is deleted.
- For information about how to set the number of concurrent snapshots allowed for a Lab or Event Manager user, see Managing users.
To open a snapshot in Kyndryl Cloud Uplift
- From the Course Manager navigation bar, click Snapshots. The Snapshots page displays.
-
Click
next to the snapshot you want to open in Kyndryl Cloud Uplift, and then click Open environment.You must be signed in to Kyndryl Cloud Uplift to open a snapshot in Kyndryl Cloud Uplift.
To promote a snapshot
- From the Course Manager navigation bar, click Snapshots. The Snapshots page displays.
- Click next to the snapshot you want to promote, and then click Promote.
- Type a Name for the promoted snapshot.
-
Click Promote snapshot.
Notes
- After a snapshot is promoted, it doesn't display on the Snapshots page.
- Promoted snapshots are automatically added to the Kyndryl Cloud Uplift project that contains your on-demand lab templates.
- Promoted snapshots are automatically added as templates to the course they were created from.
To delete a snapshot
- From the Course Manager navigation bar, click Snapshots. The Snapshots page displays.
- Click next to the snapshot you want to delete, and then click Delete.
- In the dialog box, click Delete.
Extending a lab
You can request an unlimited number of runtime and expiration extensions for each lab environment. You can choose the duration for each runtime and expiration extension.
For information about how to set the number of runtime or expiration extensions allowed for a Lab or Event Manager user when the request portal is enabled, see Managing users.
To extend the runtime for a lab
-
From the Course Manager Labs page, click
next to the lab you want to extend.You can also click the Lab actions drop-down menu on the lab details page.
-
Click Extend runtime. A dialog box displays.
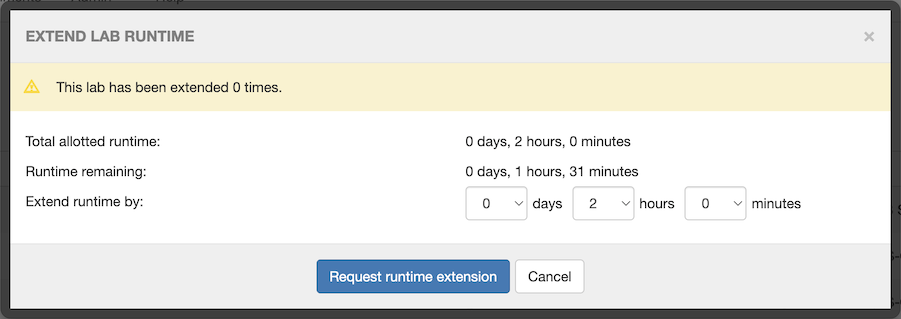
Total allotted runtime and Runtime remaining values are updated from Kyndryl Cloud Uplift when the dialog box displays and may not match corresponding values on the Labs page.
-
Select the number of days, hours, and minutes for the runtime extension.
If no selections are made, the runtime extension duration defaults to the original runtime duration configured for the lab environment.
-
Click Request runtime extension.
To extend the expiration for a lab
-
From the Course Manager Labs page, click
next to the lab you want to extend.You can also click the Lab actions drop-down menu on the lab details page.
-
Click Extend expiration. A dialog box displays.
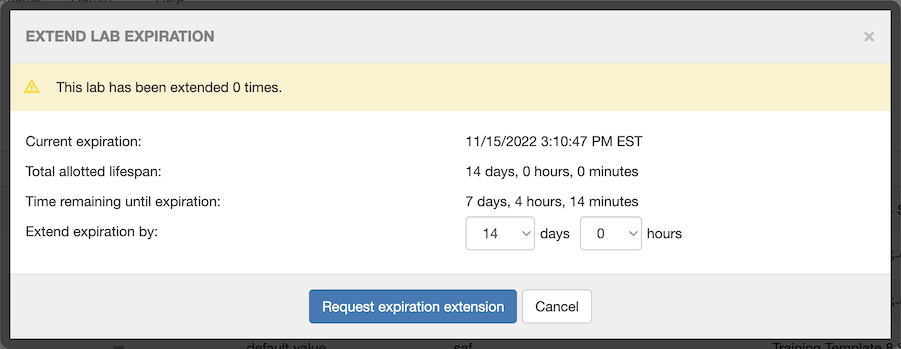
Current expiration, Total allotted lifespan, and Time remaining until expiration values are updated from Kyndryl Cloud Uplift when the dialog box displays and may not match corresponding values on the Labs page.
-
Select the number of days and hours for the expiration extension.
If no selections are made, the expiration extension duration defaults to the original expiration duration configured for the lab environment.
-
Click Request expiration extension.
Editing a lab
To edit a lab
-
From the Course Manager Labs page, click
next to the lab you want to edit.You can also click the Lab actions drop-down menu on the lab details page.
- Click Edit.
-
Add or update lab Published content.
Notes
- For more information about lab published content, see Adding published content to a lab.
- There may be other fields to edit such as customer name or lab purpose. For more information, see Using custom data attributes.
- Click Update lab.
Editing lab metadata attributes
For information about editing on-demand lab metadata attributes, see Adding metadata attributes.
Reprovisioning a lab
You can reset a lab environment to its initial state, or to the initial state of another template available in the course, by reprovisioning the lab environment.
To reprovision a lab
-
From the Course Manager Labs page, click
next to the lab you want to reprovision.You can also click the Lab actions drop-down menu on the lab details page.
-
Click Reprovision.
- The end user’s environment may be reprovisioned from a template in the course.
- A request portal user’s environment may be reprovisioned from a snapshot they created in the course.
The source list displays only the templates and snapshots that are in the same region as the lab.
-
Click Reprovision.
Sorting and filtering labs
To sort labs
- From the Course Manager Labs page, click the name of the column you want to sort. The page updates with the column values sorted in ascending order.
- To sort in descending order, click the name of the column again.
To filter lab data
- From the Course Manager Labs page, click
 (Filters) on the upper right corner of the page. The filter options display.
 - Select the values you want to filter on, and click Filter. The page reloads with the filtered values.
- To reset the filter and display all the lab data again, open the filter options and click Reset.