Editing a Manual in Course Manager
Once you add a Manual to a course, use the rich text editor on the Edit Manual page to customize your Manual.
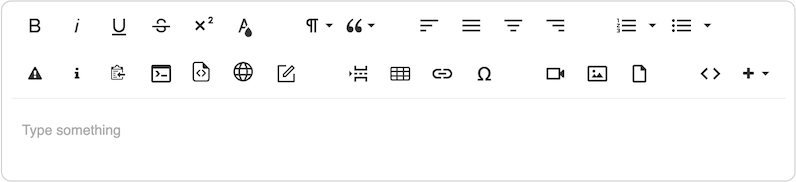
For more information about using the buttons and keyboard shortcuts in the rich text editor, click on a topic below.
Contents
Formatting text
You can apply the following formats to text using the rich text editor:
-
Bold – To use bold formatting, select the text and click
 (Bold), or just click (Bold) and begin typing. Click (Bold) again to stop using bold formatting.
 -
Italic – To use italic formatting, select the text and click
 (Italic), or just click (Italic) and begin typing. Click (Italic) again to stop using italic formatting.
 -
Underline – To use underline formatting, select the text and click
 (Underline), or just click (Underline) and begin typing. Click (Underline) again to stop using underline formatting.
 -
Strikethrough – To use strikethrough formatting, select the text and click
 (Strikethrough), or just click (Strikethrough) and begin typing. Click (Strikethrough) again to stop using strikethrough formatting.
 -
Superscript – To use superscript formatting, select the text and click
 (Superscript), or just click (Superscript) and begin typing. Click (Superscript) again to stop using superscript formatting.
Changing text color
To change text color using the rich text editor
- Select the text or move the cursor where you want to start using the new color.
- Click
 (Text Color).
 -
Choose a color from the color picker, or type a HEX Color code and click OK.

To return to the default font color, click
 (Clear Formatting) in the color picker.
Changing paragraph format
To change the paragraph format using the rich text editor
- Select the paragraphs or move the cursor to the paragraph that you want to change.
- Click
 (Paragraph Format).
 -
Choose from one of the following paragraph formats:
- Normal – Normal is the default paragraph format, which should be used for most content.
- Heading (1-4) – Headings are used to create structure for your content. There are four heading levels. Heading 1 is the most prominent heading, and Heading 4 is the least prominent.
- Code – The Code format can be used to distinguish a block as code by applying a light gray background and monospace font.
Notes
- For normal or heading formats, press Shift+Enter to insert a line break and keep the current paragraph format, or press Enter to insert a paragraph break and return to the normal format.
- For code format, press either Shift+Enter or Enter to insert a line break and keep the current code format.
- To exit code format, press Enter at the end of the last line of a section that uses the code format, and then press Enter again.
Headings are displayed in a table of contents for lab end users on the Manual tab in the Learning Console. For more information about using the table of contents, see Using the table of contents.
Inserting block quotes
Use a block quote to indicate an extended quotation.
To insert a block quote using the rich text editor
- Select the paragraphs or move the cursor to the paragraph that you want to format as a quote.
- Click
 (Quote).
 -
Select Increase from the drop-down menu.
Notes
- To increase or decrease the indentation of your block quote, click Increase or Decrease in the block quote drop-down menu.
- When you get to the end of a line in a block quote, press Shift+Enter to insert a line break and keep the block quote format, or press Enter to insert a paragraph break and return to the normal format.
Changing text alignment
To align text using the rich text editor
- Select the paragraphs or move the cursor to the paragraph that you want to align.
- Click
 (Align Left),
  (Align Justify),
  (Align Center), or
  (Align Right).
Inserting lists
To insert a list using the rich text editor
- Select the paragraphs or move the cursor to the paragraph that you want to convert to a list.
-
Click
 (Ordered List) or
  (Unordered List). To choose a different style list marker, click
  (Down Arrow) next to the list button and choose a style.
Notes
- To add additional list items, press Enter at the end of a line in your list.
- To move to a new line without adding another list item, press Shift+Enter.
- To stop adding additional list items, move to an empty line containing a list marker. Then, press Enter or click the appropriate list button again.
- To remove list formatting, select the applicable text or place the cursor within a list item. Then, click the appropriate list button again.
- To create a nested list, press Tab in an empty line containing a list marker. This line is indented and has a different list marker. After you type the nested list item, press Enter to move to the next line of the nested list. Press Enter again to remove the additional indentation and return to the original list.
Inserting a callout
Use a callout to highlight important content.
To insert a callout using the rich text editor
- Select the paragraphs or move the cursor to the beginning of an empty line that you want to format as a callout.
-
Click
 (Warning) or
  (Info).
To exit callout format, hover just below the callout block, and click
 (Break).
Inserting copyable text
Use copyable text to make it easier for lab end users to paste content from the Manual in the Learning Console into their VMs. For information about using copyable text for lab end users, see Using copyable text.
When a lab end user interacts with copyable text boxes in the Manual, Course Manager displays these actions on the lab end user’s Activity page, the event Activity Summary page, and Course Manager reports.
To insert copyable text using the rich text editor
- Select the text or move the cursor where you want to insert copyable text.
-
Click
 (Copyable Text).
Notes
- If you select multiple paragraphs and insert copyable text, each paragraph becomes a separate copyable text block.
- To exit copyable text format, move the cursor to the end of the copyable text block, and click (Copyable Text).
- To remove copyable text formatting, select the copyable text and click (Copyable Text).
Inserting a command shortcut
For information about command shortcuts, see Using command shortcuts and actions.
To insert a command shortcut using the rich text editor
- Select the text or move the cursor where you want to insert the command shortcut.
- Click
 (Command).
 -
Complete the following fields, and then click Insert:
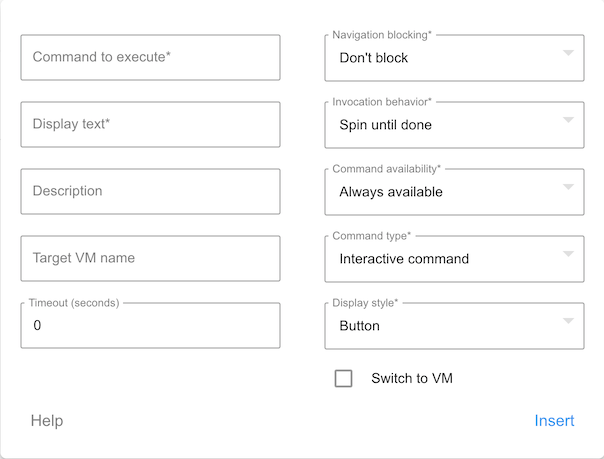
Click Help to open this help page in a new tab.
-
Command to execute – Enter the command that should be executed in the VM when the lab end user clicks the command shortcut in the Manual.
Command to execute displays in the Activity Data field on the lab end user’s Activity page and the event Activity Summary page.
-
Display text – Enter the display text for the command shortcut.
Notes
- If you select text before you insert the command shortcut, Display text defaults to the selected text.
- If you select multiple lines of text, Display text includes only the first line of the selected text.
-
(Optional) Description – Enter the text that displays when the lab end user hovers over the command shortcut in the Manual.
Notes
- If you leave Description blank, it defaults to the Display text.
- Description displays in the Activity Name field on the lab end user's Activity page and the event Activity Summary page.
-
(Optional) Target VM name – Enter the Kyndryl Cloud Uplift name of the VM to target when executing the command. To target multiple VMs that include a common string in their Kyndryl Cloud Uplift name, type the common string as the Target VM name.
Notes
- If Target VM name is blank for an interactive command, the command is executed in every VM in the lab end user's Kyndryl Cloud Uplift environment that has CMHelper available for use.
- If Target VM name is blank for a system command, the command is executed in every VM in the lab end user's Kyndryl Cloud Uplift environment that has CMSysHelper available for use.
-
(Optional) Timeout (seconds) – Enter the number of seconds to wait before terminating the command if it hasn’t yet completed.
Notes
- To disable the command timeout, set Timeout (seconds) to 0.
- If you set a non-zero command timeout, the command will terminate after the timeout period only if:
- CMHelper version 1.1.9 or newer is in use for interactive commands.
- CMSysHelper version 1.0.2 or newer is in use for system commands.
- Timeout (seconds) displays in the Activity Data field on the lab end user's Activity page and the event Activity Summary page.
- Navigation blocking – Choose from one of the following Manual navigation blocking options:
- Don’t block – Don’t block the lab end user from moving forward in the Manual.
- Block until pressed – Block the lab end user from moving forward in the Manual until they execute the command.
- Block until successful – Block the lab end user from moving forward in the Manual until they successfully execute the command.
Navigation blocking displays in the Activity Data field on the lab end user’s Activity page and the event Activity Summary page.
- Invocation behavior – Choose from one of the following invocation behavior options:
- Spin until done – Display
 in the command shortcut while the VM executes the command, but don’t display an alert dialog box to notify the lab end user whether or not the command succeeds.
 - Spin until done and notify of result – Display in the command shortcut while the VM executes the command, and display an alert dialog box to notify the lab end user whether or not the command succeeds.
- None – Don’t display in the command shortcut while the VM executes the command, and don’t display an alert dialog box to notify the lab end user whether or not the command succeeds.
Notes
- The title and content of the alert dialog box include the text from Description.
- Invocation behavior displays in the Activity Data field on the lab end user's Activity page and the event Activity Summary page.
- Spin until done – Display
- Command availability – Choose from one of the following command availability options:
- Always available – The lab end user can always click the command shortcut.
- Available until pressed – The lab end user can click the command shortcut until they execute the command.
- Available until successful – The lab end user can click the command shortcut until they successfully execute the command.
Command availability displays in the Activity Data field on the lab end user’s Activity page and the event Activity Summary page.
- Command type – Choose whether the Command to execute is an Interactive command or a System command. For more information, see Choosing between interactive and system commands.
- Display style – Choose whether the command shortcut displays as a Button or Inline link.
-
(Optional) Switch to VM – Select to display the VM that receives and accepts the command when it is executed.
Notes
- Switch to VM is available only for interactive commands.
- If you're using CMHelper version 1.1.9 or newer, Switch to VM works even if Target VM name is blank.
- If multiple VMs in the lab environment receive and accept the command, any one of these VMs may display.
-
To edit or remove a command shortcut
- Click the command shortcut.
-
Click one of the following:
 (Edit Command) to edit the command shortcut.
 (Remove) to remove the command shortcut.
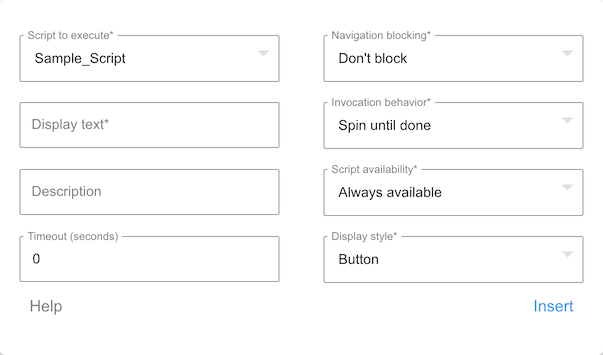
Inserting a script shortcut
For information about script shortcuts, see Using script shortcuts, script actions, and lifecycle scripts.
To insert a script shortcut using the rich text editor
- Select the text or move the cursor where you want to insert the script shortcut.
- Click
 (Script).
 -
Complete the following fields, and then click Insert:
Click Help to open this help page in a new tab.
-
Script type – Choose whether the Script to execute is a Cloud script or a Legacy script. For more information, see Choosing between cloud and legacy scripts.
Script type displays in the Activity Type field on the lab end user’s Activity page and the event Activity Summary page.
-
Script to execute – Choose the cloud script or script package that contains the legacy script that should be executed when the lab end user clicks the script shortcut in the Manual.
Script to execute displays in the Activity Data field on the lab end user’s Activity page and the event Activity Summary page.
-
Display text – Enter the display text for the script shortcut.
Notes
- If you select text before you insert the script shortcut, Display text defaults to the selected text.
- If you select multiple lines of text, Display text includes only the first line of the selected text.
-
(Optional) Description – Enter the text that displays when the lab end user hovers over the script shortcut in the Manual.
Notes
- If you leave Description blank, it defaults to the Display text.
- Description displays in the Activity Name field on the lab end user's Activity page and the event Activity Summary page.
-
(Optional) Timeout (seconds) – Enter the number of seconds to wait before terminating the script if it hasn’t yet completed.
Notes
- To disable the script timeout, set Timeout (seconds) to 0. The timeout can't be disabled for cloud scripts.
- Timeout (seconds) displays in the Activity Data field on the lab end user's Activity page and the event Activity Summary page.
- Navigation blocking – Choose from one of the following Manual navigation blocking options:
- Don’t block – Don’t block the lab end user from moving forward in the Manual.
- Block until pressed – Block the lab end user from moving forward in the Manual until they execute the script.
- Block until successful – Block the lab end user from moving forward in the Manual until they successfully execute the script.
Navigation blocking displays in the Activity Data field on the lab end user’s Activity page and the event Activity Summary page.
- Invocation behavior – Choose from one of the following invocation behavior options:
- Spin until done – Display in the script shortcut while the script is executed, but don’t display an alert dialog box to notify the lab end user whether or not the script succeeds.
- Spin until done and notify of result – Display in the script shortcut while the script is executed, and display an alert dialog box to notify the lab end user whether or not the script succeeds.
- None – Don’t display in the script shortcut while the script is executed, and don’t display an alert dialog box to notify the lab end user whether or not the script succeeds.
Notes
- The title and content of the alert dialog box include the text from Description.
 displays in legacy script shortcuts while Course Manager provisions and starts the Script Host regardless of which Invocation behavior you choose.
- Invocation behavior displays in the Activity Data field on the lab end user's Activity page and the event Activity Summary page.
- Spin until done – Display
- Script availability – Choose from one of the following script availability options:
- Always available – The lab end user can always click the script shortcut.
- Available until pressed – The lab end user can click the script shortcut until they execute the script.
- Available until successful – The lab end user can click the script shortcut until they successfully execute the script.
Script availability displays in the Activity Data field on the lab end user’s Activity page and the event Activity Summary page.
- Display style – Choose whether the script shortcut displays as a Button or Inline link.
-
To edit or remove a script shortcut
- Click the script shortcut.
-
Click one of the following:
- (Edit Script) to edit the script shortcut.
- (Remove) to remove the script shortcut.
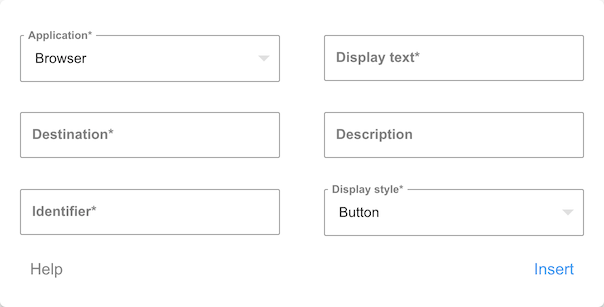
Inserting a Virtual Browser shortcut
For information about Virtual Browser shortcuts, see Using Virtual Browser shortcuts and actions.
To insert a Virtual Browser shortcut using the rich text editor
- Select the text or move the cursor where you want to insert the Virtual Browser shortcut.
- Click
 (Browser).
 -
Complete the following fields, and then click Insert:
Click Help to open this help page in a new tab.
-
Application – Choose whether the Virtual Browser connects to its destination using a Browser, SSH, or VNC connection.
Notes
- If Application is set to Browser, the Virtual Browser uses a streamlined version of Firefox to connect with the destination.
- If Application is set to SSH, the Virtual Browser uses AutoSSH to persistently try SSH connections.
- If Application is set to VNC, the Virtual Browser establishes a desktop connection to a VNC-compatible server.
- Application should be set to VNC only if Virtual Browser v10 or newer is in use.
- Application displays in the Activity Data field on the lab end user's Activity page and the event Activity Summary page.
-
Destination – Enter the destination that the Virtual Browser should connect to when the lab end user clicks the Virtual Browser shortcut in the Manual. The Destination can be external or within the user’s Kyndryl Cloud Uplift environment.
Notes
- If Application is set to Browser, Destination must be a URL.
- The following assume Virtual Browser v10 or newer is in use:
- If Application is set to SSH, Destination must be entered as
<ssh_username>@<ssh_hostname>:<ssh_port_number>. If SSH port number is omitted, 22 is used. - If Application is set to VNC, Destination must be entered as:
<password>@<hostname>:<port_number>for direct VNC connections. If port number is omitted, 5900 is used.<password>@<hostname>:<port_number><ssh_gateway_username>@<ssh_gateway_hostname>:<ssh_gateway_port_number>for VNC connections tunneled over SSH. If port number is omitted, 5900 is used. If SSH gateway port number is omitted, 22 is used.
- Before a lab end user can use Virtual Browser Manual shortcuts that use an SSH connection or VNC connection tunneled over SSH, the Virtual Browser in the user’s Kyndryl Cloud Uplift environment must ingest the SSH key.
- If Application is set to SSH, Destination must be entered as
- You can include a Manual placeholder in the Destination by inserting the corresponding placeholder code.
- Destination displays in the Activity Data field on the lab end user's Activity page and the event Activity Summary page.
-
Identifier – Enter the unique identifier for the Virtual Browser shortcut. If the lab end user has already clicked a Virtual Browser Manual shortcut or lab action with the same Identifier, they will return to the existing instance.
Identifier displays in the Activity Data field on the lab end user’s Activity page and the event Activity Summary page.
-
Display text – Enter the display text for the Virtual Browser shortcut.
Notes
- If you select text before you insert the Virtual Browser shortcut, Display text defaults to the selected text.
- If you select multiple lines of text, Display text includes only the first line of the selected text.
-
(Optional) Description – Enter the text that displays when the lab end user hovers over the Virtual Browser shortcut in the Manual.
Notes
- If you leave Description blank, it defaults to the Display text.
- Description displays in the Activity Name field on the lab end user's Activity page and the event Activity Summary page.
-
Display style – Choose whether the Virtual Browser shortcut displays as a Button or Inline link.
-
To edit or remove a Virtual Browser shortcut
- Click the Virtual Browser shortcut.
-
Click one of the following:
- (Edit Browser) to edit the Virtual Browser shortcut.
- (Remove) to remove the Virtual Browser shortcut.
Inserting a question
Use a question to allow lab end users to answer a multiple choice or short answer question in the Manual in the Learning Console. Questions can be used to assess comprehension, determine completion of lab content, or collect information. You can block lab end users from moving forward in the Manual until they answer or correctly answer a question. For information about using questions for lab end users, see Using questions.
When a lab end user answers questions in the Manual, Course Manager displays these actions on the lab end user’s Activity page, the event Activity Summary page, and Course Manager reports.
To insert a question using the rich text editor
- Select the text or move the cursor where you want to insert the question.
- Click
 (Question).
 -
Complete the following fields, and then click Insert:
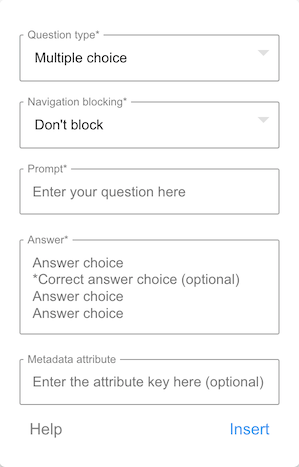
Click Help to open this help page in a new tab.
-
Question type – Choose from one of the following question types:
- Multiple choice – The lab end user chooses one from multiple answer choices.
- Short answer (exact) – The lab end user enters the answer in a text box, and the answer is case-sensitive.
- Short answer (case-insensitive) – The lab end user enters the answer in a text box, and the answer isn’t case-sensitive.
Question type displays in the Activity Data field on the lab end user’s Activity page and the event Activity Summary page.
-
Navigation blocking – Choose from one of the following Manual navigation blocking options:
- Don’t block – Don’t block the lab end user from moving forward in the Manual if they don’t answer the question.
-
Block until answered – Block the lab end user from moving forward in the Manual until they answer the question.
If you choose Block until answered, the lab end user has only one attempt to answer the question and sees the correct answer (if one exists) after this attempt.
-
Block until correct – Block the lab end user from moving forward in the Manual until they correctly answer the question.
If you choose Block until correct and the question’s answer isn’t evaluated for correctness, the lab end user is blocked from moving forward in the Manual until they answer the question.
Navigation blocking displays in the Activity Data field on the lab end user’s Activity page and the event Activity Summary page.
-
Prompt – Enter the question prompt.
Notes
- If you select text before you insert the question, Prompt defaults to the selected text.
- If you select multiple lines of text, Prompt includes only the first line of the selected text.
- Prompt displays in the Activity Name field on the lab end user's Activity page and the event Activity Summary page.
-
(Optional) Answer – Enter the correct answer (if one exists) for short answer questions or the answer choices for multiple choice questions.
Notes
- Answer is required for multiple choice questions.
- For multiple choice questions, you must list each answer choice on a separate line and place an asterisk before the correct choice (if a correct choice exists).
- If the answer to a short answer question shouldn't be evaluated for correctness, leave Answer blank.
- If a question's answer is evaluated for correctness, the correct answer displays in the Activity Data field on the lab end user's Activity page and the event Activity Summary page.
-
(Optional) Metadata attribute – Enter the attribute key for the event participant or on-demand lab metadata attribute that should be created or updated when the lab end user answers the question.
Notes
- If you leave Metadata attribute blank, Course Manager doesn't create or update a metadata attribute when the lab end user answers the question.
- If you enter a Metadata attribute:
- When the lab end user first answers the question, Course Manager determines if there is an event participant or on-demand lab metadata attribute with the same key that applies to the lab end user.
- If so, Course Manager sets the value of the existing attribute to the end user's answer. If the attribute was sensitive, Course Manager sets it to non-sensitive.
- If not, Course Manager creates a new, non-sensitive metadata attribute with this key and sets the attribute value to the end user's answer.
- If the end user attempts an answer multiple times, Course Manager sets the metadata attribute value to the end user's answer each time.
- The lab end user's Manual automatically refreshes each time they attempt an answer.
- Metadata attribute displays in the Activity Data field on the lab end user's Activity page and the event Activity Summary page.
- When the lab end user first answers the question, Course Manager determines if there is an event participant or on-demand lab metadata attribute with the same key that applies to the lab end user.
-
To edit or remove a question
- Click the question.
-
Click one of the following:
 (Edit Question) to edit the question.
 (Remove) to remove the question.
Inserting a page break
Use page breaks to break a Manual into manageable segments for lab end users. When you insert a page break in a Manual, users see the content after the page break on a new page in their Manual in the Learning Console. They can then track their progress by marking pages in the Manual as done. For information about using a Manual with multiple pages for lab end users, see Using a Manual with multiple pages.
When a lab end user interacts with pages in the Manual, Course Manager displays these actions on the lab end user’s Activity page, the event Activity Summary page, and Course Manager reports.
To insert a page break using the rich text editor
- Move the cursor where you want to insert the page break.
- Click
 (Page Break).
Inserting a table
To insert a table using the rich text editor
- Move the cursor where you want to insert the table.
- Click
 (Insert Table).
 -
Use the grid to select the table dimensions.
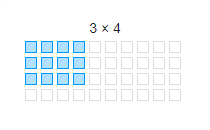
Notes
- To adjust the width of a table, click and drag the left or right edge of the table.
- To adjust the width of a column in a table, click and drag the left or right edge of the column.
To access additional design options or remove a table
- Select one or more cells in the table.
-
Click one of the following:
 (Table Header) to add a header row to the top of the table. Click (Table Header) again to remove an existing table header.
 (Remove Table) to remove the table.
 (Row) and choose an option from the drop-down menu to insert a row above the selection, insert a row below the selection, or delete the row or rows that contain the selection.
 (Column) and choose an option from the drop-down menu to insert a column above the selection, insert a column below the selection, or delete the column or columns that contain the selection.
 (Table Style) and choose an option from the drop-down menu to add a dashed border to all cells in the table or shade alternate rows of the table.
 (Cell) and choose an option from the drop-down menu to merge or split cells. If multiple cells are selected, you can merge the cells. If one cell is selected, you can vertically or horizontally split the cell.
-
 (Cell Background) to change the background color of your selection. Choose a color from the color picker, or type a HEX Color code and click OK.
To restore the default background color, click
(Clear Formatting) in the color picker.  (Vertical Align) and choose an option from the drop-down menu to apply top, middle, or bottom alignment to the selection.
-
 (Horizontal Align) and choose from one of the following drop-down menu options to horizontally align the selection:
- (Align Left)
- (Align Center)
- (Align Right)
- (Align Justify)
 (Cell Style) to change the border of the selected cells. Choose Highlighted from the drop-down menu to apply a red border. Choose Thick from the drop-down menu to apply a thick border. Choose the drop-down menu item again to remove an existing cell style.
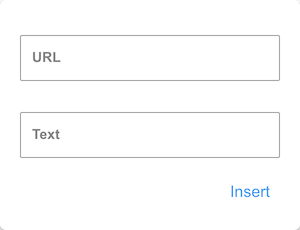
Inserting a link
For information about using links in the Manual in the Learning Console for lab end users, see Using links.
To insert a link using the rich text editor
- Select the text or move the cursor where you want to insert the link.
- Click
 (Insert Link).
 -
Enter the link URL in the URL field and the text that you want to display in the Text field. Then click Insert.
To open or make changes to a link
- Click the link.
-
Click one of the following:
 (Open Link) to open the link in a new tab.
 (Edit Link) to edit the link URL or display text.
 (Unlink) to remove the link.
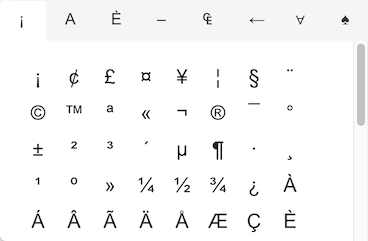
Inserting special characters
To insert a special character using the rich text editor
- Move the cursor where you want to insert the special character.
- Click
 (Special Characters).
 -
Select a category in the header row, and then select a special character.
Inserting a video
You can embed a video that is hosted on a service like YouTube or Vimeo in your Manual to create a more interactive experience. For information about using videos in the Manual in the Learning Console for lab end users, see Using videos.
To insert a video using the rich text editor
- Move the cursor where you want to insert the video.
- Click
 (Insert Video).
 -
To insert a video using the URL, click
 (By URL), paste the video URL in the box displayed, and then click Insert. To insert a video using the embedded code, click
  (Embedded Code), paste the video embedded code in the box displayed, and then click Insert.
Notes
- You can typically find the embedded code for a video by navigating to the video URL in a browser, clicking share, and then finding the embed option.
- When you insert a video using the embedded code, paste only the code that is wrapped in an iframe.
To replace or remove a video
- Click the video.
-
Click one of the following:
 (Replace) to replace the current video with a new one. You can insert the new video using the URL or embedded code.
 (Remove) to remove the video.
Inserting an image
For information about using images in the Manual in the Learning Console for lab end users, see Using images.
To insert an image using the rich text editor
- Move the cursor where you want to insert the image.
- Click
 (Insert Image).
 -
To upload an image, click
 (Upload Image), and then click the Drop image box to select an image using the file browser or drag an image into the box. To insert an image using the image URL, click
  (By URL), paste the image URL in the box displayed, and then click Insert.
Notes
- When you upload an image, the image is hosted in Course Manager.
- For more information about viewing all uploaded images in a specific Manual, see Viewing Manual attachments.
- To insert additional instances of an uploaded image without hosting multiple copies of the image in Course Manager:
- Click the uploaded image.
- Press Ctrl+C (or ⌘+C for macOS) to copy the image.
- Move the cursor where you want to insert the copy of the image.
- Press Ctrl+V (or ⌘+V for macOS) to paste the image.
To access additional designs options or replace or remove an image
- Click the image.
-
Click one of the following:
 (Replace) to replace the current image. Upload a new image or type a URL to use an image from the internet.
-
 (Align) and choose from one of the following drop-down menu options to horizontally align your image:
- (Align Left)
- (None)
- (Align Right)
 (Remove) to remove the image.
 (Insert Link), paste the link URL in the URL box, and then click Insert to create a linked image.
 (Display) and choose the appropriate option from the drop-down menu to display the image inline or break the text around the image.
 (Alternative Text), type or paste alternative text in the Alternative Text box, and then click Update to show alternative text for screen readers or if the image doesn’t load.
-
 (Change Size), type new dimensions in pixels in the Width and Height boxes, and then click Update to change the size of your image. To preserve the original aspect ratio of the image, type auto in one of the boxes.
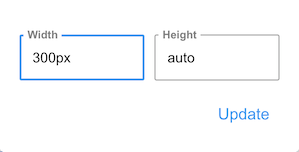
Notes
- If you replace or remove an image in a Manual, and that image is hosted in Course Manager, the image isn't removed from Course Manager as long as it is referenced in any current published Manual, any current draft Manual, or any Manual being accessed by a lab end user.
- To resize an image while preserving the original aspect ratio, click the image and drag one of the corners.
Uploading a file
For information about using files in the Manual in the Learning Console for lab end users, see Using files.
To upload a file using the rich text editor
- Move the cursor where you want to insert the file.
- Click
 (Upload File).
 -
Click the Drop file box to select a file using the file browser, or drag a file into the box.
Notes
- When you upload a file, the file is hosted in Course Manager. It is displayed in the Manual as an inline link.
- For more information about viewing all uploaded files in a specific Manual, see Viewing Manual attachments.
- To insert additional instances of a file without hosting multiple copies of the file in Course Manager:
- Select the uploaded file link.
- Press Ctrl+C (or ⌘+C for macOS) to copy the file link.
- Move the cursor where you want to insert the copy of the file.
- Press Ctrl+V (or ⌘+V for macOS) to paste the file link.
To open or make changes to an uploaded file link
- Click the link.
-
Click one of the following:
- (Open Link) to open the link in a new tab.
- (Edit Link) to edit the link URL or display text.
- (Unlink) to remove the link.
If you edit or remove an uploaded file link in a Manual, the file isn’t removed from Course Manager as long as it is referenced in any current published Manual, any current draft Manual, or any Manual being accessed by a lab end user.
Switching to code view
To view and edit the HTML for content in the rich text editor, click  (Code View). Click (Code View) again to switch back to the rich text editor.
Inserting a placeholder
Use a placeholder to personalize content for each recipient.
To insert a placeholder using the rich text editor
- Select the text or move the cursor where you want to insert the placeholder.
- Click
 (Insert Placeholder).
 - Select one of the available placeholders from the drop-down menu. Course Manager inserts the corresponding placeholder code.
Keyboard shortcuts
| Rich text editor effect | Windows keyboard shortcut | macOS keyboard shortcut |
|---|---|---|
| Bold | Ctrl+B | ⌘+B |
| Italic | Ctrl+I | ⌘+I |
| Underline | Ctrl+U | ⌘+U |
| Strikethrough | Ctrl+S | ⌘+S |
| Increase quote indentation | Ctrl+’ | ⌘+’ |
| Decrease quote indentation | Ctrl+Shift+’ | ⌘+Shift+’ |
| Insert link | Ctrl+K | ⌘+K |
| Insert image | Ctrl+P | ⌘+P |