Using the request portal – a guide for Lab and Event Manager users
Lab and Event Manager users can sign in to Course Manager to request, access, manage, and delete lab environments but have limited access to other Course Manager features.
The term Lab in the Course Manager interface is configurable for your account and may be replaced by another term such as Demo.
Contents
Using the Labs page
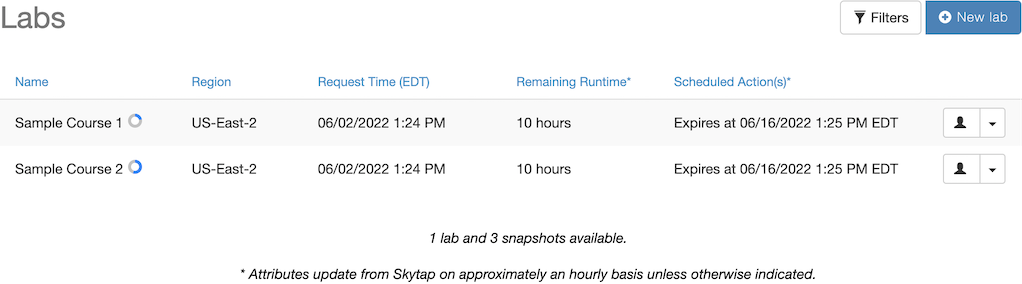
When you sign in to Course Manager, the Labs page displays the labs you have requested and how many are still available for request.
Requesting a lab
-
From the Course Manager Labs page, click
 (New lab). The Request Lab page displays.
If the
(New lab) button isn’t enabled, you may have used all of the available lab slots. -
From the Course drop-down menu, select a course.
Notes
- If you select a course that contains a description, the description displays.
- You may see additional filter menus to help you find the course you need.
-
From the Template drop-down menu, select a template.
Notes
Depending on how your organization's Course Manager account is set up, you may have additional fields to complete when requesting a lab:
- You may be able to apply tags to the lab.
- Other information such as customer name or lab purpose may be required.
-
Click
 (Request lab). The Labs page displays the requested lab.
If the
 (Processing) message displays, the lab is being provisioned. When the (Processing) message is no longer visible, the lab is available.
Accessing a lab
From the Course Manager Labs page, click  next to the lab you want to access, and then click Open Lab. The Course Manager Learning Console displays in a new tab. If Learning Console access is disabled, the Kyndryl Cloud Uplift sharing portal for the lab environment displays.
Notes
- If your lab environment is initially in a suspended or shut down state, click
 (Run VM(s)) in the Kyndryl Cloud Uplift sharing portal to start it.
 - The banner at the top of the Kyndryl Cloud Uplift sharing portal displays the remaining runtime and expiration date and time for the lab environment.
Making more lab requests
The number of available labs is displayed at the bottom of the Course Manager Labs page. If all of the lab slots have been used, you must delete an existing environment before you can request a new lab.
For information about deleting a lab, see Deleting a lab.
Managing snapshots
You can take a snapshot of a lab environment and use the snapshot to provision future labs from the same course. The number of available snapshots is displayed at the bottom of the Course Manager Labs page. If all of the snapshot slots have been used, you must delete an existing snapshot before you can create a new one.
Notes
- Snapshots may be disabled by your administrator.
- Your administrator determines whether unused snapshots are automatically deleted after a period of time. Provision a lab from a snapshot to prevent the snapshot from being deleted.
- Your administrator determines whether you receive a warning email before an unused snapshot is deleted.
To create a snapshot
- From the Course Manager Labs page, click next to the lab you want to use to create the snapshot, and then click Create snapshot. A dialog box displays.
- Type a Name for the snapshot.
-
Click Create snapshot.
If the lab environment is currently running, it will be suspended to create the snapshot.
To delete a snapshot
- From the Course Manager navigation bar, click Snapshots. The Snapshots page displays.
-
Choose one of the following:
- Click next to the snapshot you want to delete, and then click Delete.
- Click
 next to the snapshot you want to delete.
- Click
- In the dialog box, click Delete.
Extending a lab
The banner at the top of the Kyndryl Cloud Uplift sharing portal for a lab displays the remaining runtime and expiration date and time for the lab environment. You can request a limited number of runtime and expiration extensions for each lab environment. Each extension increases the runtime or expiration by the original duration configured for the lab environment.
Runtime or expiration extensions may be disabled by your administrator.
To extend the runtime for a lab
- From the Course Manager Labs page, click next to the lab you want to extend, and then click Extend runtime. A dialog box displays.
- Click Request runtime extension.
To extend the expiration for a lab
- From the Course Manager Labs page, click next to the lab you want to extend, and then click Extend expiration. A dialog box displays.
- Click Request expiration extension.
Reprovisioning a lab
You can reset a lab environment to its initial state, or to the initial state of another template available in the course, by reprovisioning the lab environment.
To reprovision a lab
-
From the Course Manager Labs page, click
next to the lab you want to reprovision, and then click Reprovision.- Your environment may be reprovisioned from a template in the course.
- Your environment may be reprovisioned from a snapshot in the course.
The source list displays only the templates and snapshots that are in the same region as the lab.
-
Click Reprovision.
Sorting and filtering labs
To sort labs
- From the Course Manager Labs page, click the name of the column you want to sort. The page updates with the column values sorted in ascending order.
- To sort in descending order, click the name of the column again.
To filter lab data
- From the Course Manager Labs page, click
 (Filters) on the upper right corner of the page. The filter options display.
 - Select the values you want to filter on, and click Filter. The page reloads with the filtered values.
- To reset the filter and display all the lab data again, open the filter options and click Reset.