Managing account-wide settings
Click Manage > Settings to change the default settings for your account.
Contents
Account contacts
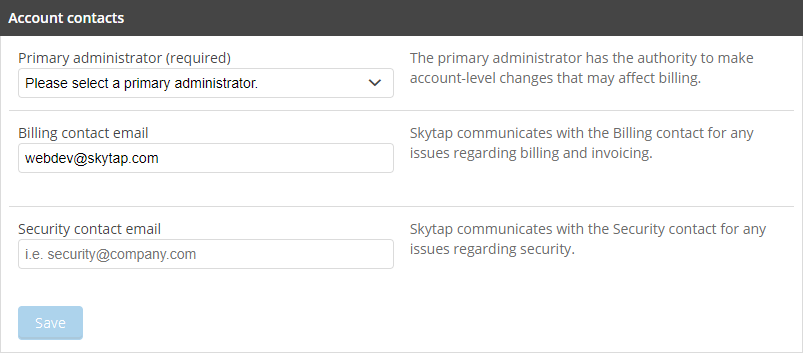
Every Kyndryl Cloud Uplift account must have a primary administrator. You can also designate separate email addresses for billing and security contacts.
Primary administrator
Select from the list of administrators in your account. The Primary administrator has the authority to make account-level changes—including anything that may affect billing.
You must designate a new primary administrator before you can disable or delete the user account of the current primary administrator.
Billing contact
Optionally provide an email address to contact with billing or invoicing questions. If no billing contact is specified, billing questions are sent to the primary administrator.
Security contact
Optionally provide an email address to contact about security issues. If no security contact is specified, security questions are sent to the primary administrator.
Critical notification contact
Optionally provide an email address to contact about system maintenance or critical activity events. Additionally, all administrators are notified about critical activity events.
Tips
- The billing, security, and critical notification contacts don't have to be Kyndryl Cloud Uplift users.
- If you want billing, security, or critical notifications sent to multiple people, you can use email distribution lists on your company's email server.
Auto-shutdown policy
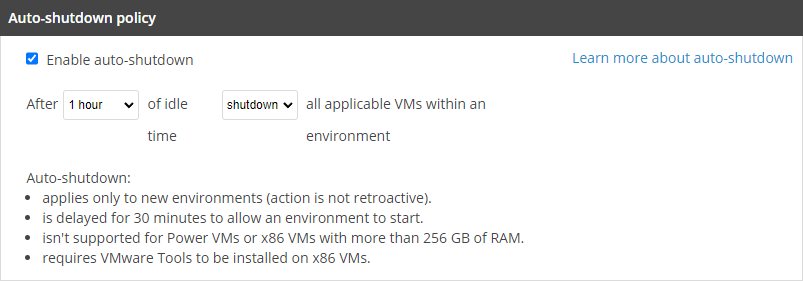
Auto-shutdown policies let you to specify the maximum amount of time that VMs in an environment can sit idle. The environment is shut down or suspended after the idle time has elapsed. For more information, see How auto-shutdown works.
Notes
- The suspend action works only for x86 VMs with 256 GB or RAM or less. Neither Power A CPU architecture that supports IBM i, AIX, and Linux (on Power) in Kyndryl Cloud Uplift. VMs nor x86 VMs with more than 256 GB of RAM can be suspended.
- The shut down action works for Power VMs and for x86 VMs that have VMware Tools installed.
Enable auto-shutdown
To set a global default auto-shutdown policy
- Check Enable auto-shutdown.
- Choose how long environments can sit idle.
- Choose the power option that will be applied.
The default auto-shutdown policy settings automatically apply to all new environments in the account. To enable auto-shutdown for existing environments, edit the power option settings for those environments. For instructions, see Enabling auto-shutdown for an environment.
Usage limits
Usage and account limits are on the Usage & Limits page. To view and change current usage, reserved capacity, and account limits by region, see Setting usage limits and viewing usage.
Sharing portals
Configure account-wide settings for sharing portals.
This section is visible only if sharing portals are enabled for your account.
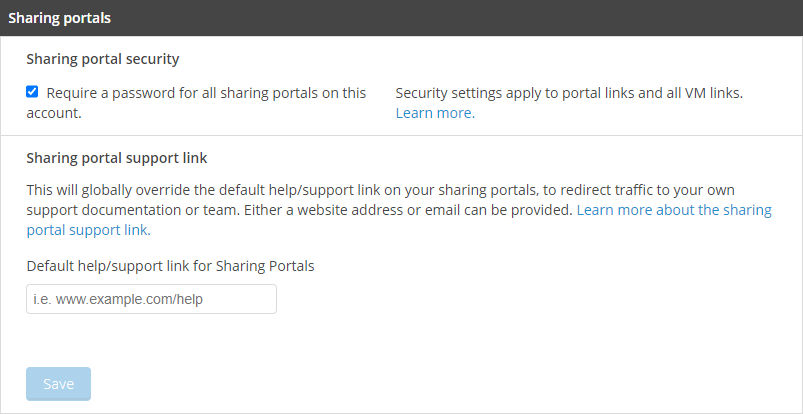
Sharing portal security
Require a password for all sharing portals on this account. – If this box is checked, all new sharing portals will require setting a password when they are created.
Sharing portal passwords aren’t supported for Kyndryl Cloud Uplift Course Manager courses or events.
Sharing portal support link
Set a default link for new sharing portals.
To edit the default link that appears in a sharing portal
-
Type an http: site, https:// site, or mailto: email address (for example, http://www.example.com, https://www.example.com, or mailto:support@example.com).
If you don’t specify a custom URL or email address, sharing portal users will be directed to the Kyndryl Cloud Uplift help site when they click Help.
-
Click Save.
When you edit this setting, you’re changing the global default for your account. When users add new sharing portals, they can override this default by providing a different URL or email address in the sharing portal’s Support contact options section.
Features
Administrators can enable additional features for all account users.
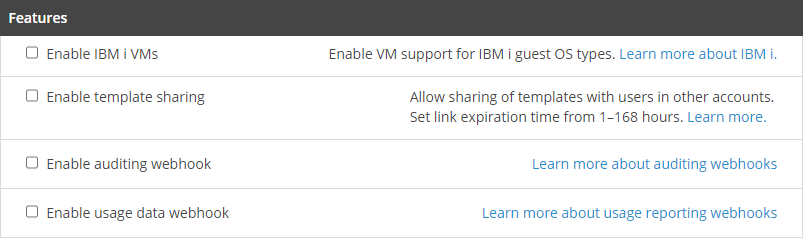
Enable IBM i VMs
Check this box to enable IBM i for VMs.
Notes
- IBM i licenses incur additional cost.
- If you want to disable IBM i, all IBM i VMs must first be removed from your account. Administrators can see a list of all environments that contain IBM i VMs and a list of all templates that contain IBM i VMs.
Enable template sharing
Check this box to share templates with users in a different Kyndryl Cloud Uplift account.
You must specify a default expiration time for sharing links. Valid expiration times are from 1 hour to 168 hours (one week).
Enable auditing webhook
Check this box to stream real-time auditing data.
Enable usage data webhook
Check this box to stream real-time usage data.
To configure webhooks
- Type the URL where the data will be sent. All events for the account will be sent to the destination URL.
-
If the destination site is configured to use TLS encryption (optional, but strongly recommended), type or paste the public Certificate.
Tip
You can use OpenSSL to retrieve the TLS public key with the following command:
openssl s_client -showcerts -connect {webhookserver}:{port} </dev/null 2>/dev/null\|openssl x509 -outform PEM
-
Click Save.
If the destination URL isn’t available or stops responding, the webhook service will attempt to reconnect once per minute for up to six hours or 200 attempts. If it can’t reconnect, the webhook service will be disabled until you reconfigure it.
For more details about webhooks, see Configuring the webhook service for audit data and Configuring the webhook service for usage data.