Adding and extending virtual disks for a VM
See how this works in the Customizing VMs and Environments course at Kyndryl Cloud Uplift Polytechnic.
If you think you’ll need to shrink a virtual disk later, add a second disk that you can delete, instead of expanding your primary disk. You can’t shrink a Kyndryl Cloud Uplift virtual disk.
Contents
Editing the disk settings in Kyndryl Cloud Uplift
The current virtual disks for the VM are displayed in the Storage section of the VM Hardware page.
- Navigate to the environment that contains the VM you want to edit.
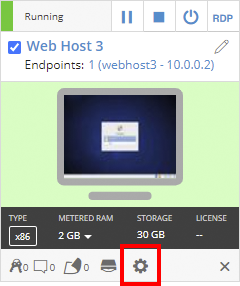
Click
(Settings).
If the Settings button isn’t visible, you don’t have permission to edit the VM settings. Work with your instructor or Kyndryl Cloud Uplift administrator to edit these settings.
- The VM Settings page displays. Click the Hardware tab.

- The VM must be powered off to add, edit, or delete virtual disks.
- Before making hardware changes to your VM, we recommend saving it as a template that you can restore if something goes wrong.
To add a virtual disk
- Click
 .
. -
Type a Valid disk size for the new disk.
See Kyndryl Cloud Uplift service limits for maximum disk sizes for all regions and compute types.
- Click Save.
- Depending on the VM guest OS, you may also need to format or extend the disk so that the VM OS recognizes it. The method to do this varies, depending on the VM OS. You may need to use in-guest OS settings or third-party software such as Partition Magic. For help, see Changing the disk partition settings in the VM guest OS.
To edit an existing virtual disk
- Click
 .
. -
Type a Valid disk size for the disk.
Notes- You can't shrink an existing virtual disk.
- You can expand only the primary disk of an IBM i LPAR.
- Click Save.
- Depending on the VM guest OS, you may also need to format or extend the disk so that the VM OS recognizes it. The method to do this varies, depending on the VM OS. You may need to use in-guest OS settings or third-party software such as Partition Magic. For help, see Changing the disk partition settings in the VM guest OS.
Changing the disk partition settings in the VM guest OS
This section describes additional steps you may need to take to format or extend a disk so that the VM operating system recognizes it.
Operating system
Notes
Windows
- From the Start screen, type
Disk Management(or press Windows Key + R and then typediskmgmt.msc). The Disk Management console displays the VM virtual disks. -
To add a new virtual disk, right-click the disk name, and select Online.
To extend the virtual disk, there are two options:
- To extend the current partition into the new unallocated space, right-click the drive, and select Extend Volume.
-
To create a secondary partition, right-click the new unallocated space and select the option for a secondary partition on this disk. Right-click the disk name, and select Online.
Notes
- Depending on the VM administrative policies, you may need to sign in as an administrator and set this disk to Online before you can format it.
- After you change the disk size, Windows performs a disk integrity check to make sure that the file system was not corrupted.
Linux
Different Linux distributions and filesystem types might have different steps.
Common Linux file system adjustment procedures
- Command line – See Extending a logical volume in a virtual machine running Red Hat.
- Ubuntu Desktop UI – See Adjust the size of a filesystem.
After you add a disk to an IBM i VM, you must use Dedicated Service Tools to add it to the LPAR.
We recommend Add, which can be significantly faster than Add and balance to initialize disks.
In the command line of the running AIX VM:
- Type
cfgmgr. - Use chvg -g {volumeGroup} to examine the disks in the volume group for changes. See chvg Command.
- Use
chfs -a size=+{size} {Mount Point}to expand the disk{Mount Point}by{size}. See chfs Command.

