- Overview of Kyndryl Cloud Uplift
- Access requirements
- Creating environments
- Importing VMs
- Preparing Power LPARs for import
- Preparing x86 VMs and vApps for import
- Importing VMs using the VM Imports page
- Importing Power LPARs
- Importing IBM i workloads using NIS
- Importing IBM i workloads using IBM Cloud Storage Solutions for i (ICC)
- Importing IBM i workloads using direct transfer
- Creating an AIX VM from a mksysb image
- Creating a mksysb from an AIX VM in Kyndryl Cloud Uplift
- Downloading and importing IBM-hosted AIX VMs
- Additional ways to import Power LPARs
- Testing imported VMs
- Resolving import errors
- Running and stopping VMs
- Accessing VMs
- Accessing VM desktops from a browser
- Testing access requirements with Connectivity Checker
- Using audio with a VM
- Using an SSH connection in a browser client session
- Copy and paste text between the local machine and a VM
- Insert text into a Power VM
- Keyboard shortcuts for browser client views
- Improving browser client performance
- Optional URL parameters for sharing an SRA browser client view
- Accessing VMs with RDP
- Accessing VM desktops from a browser
- Transferring files to a VM
- Editing environments and environment networks
- Editing VMs
- Hardware settings for IBM i VMs
- Hardware settings for AIX and Linux on Power VMs
- Hardware settings for x86 VMs
- Editing vCPUs and RAM for x86 VMs
- Enabling nested virtualization
- Upgrading VM hardware versions
- Using an international keyboard layout with a VM
- Editing VM BIOS clock sync settings
- Enabling audio for a VM
- Adding or extending a virtual disk
- Deleting a virtual disk
- Enabling SSH on a VM for use in SRA browser client sessions
- VM network settings
- Storing VM credentials
- Licensing the guest OS
- Installing and upgrading VMware Tools - Linux
- Installing and upgrading VMware Tools - Windows
- Improving operating system or application performance within the VM
- Adding containers and container hosts
- Managing networks
- Network overview
- Viewing the network topology for an environment
- Using multiple networks in an environment
- Networking between environments
- Editing an automatic network
- Connecting an environment network to a VPN or Private Network Connection
- Manually configuring domain name servers
- Exposing and blocking public Internet access to VMs
- Accessing VMs with published services
- Using public IP addresses
- Attaching a static public IP address to a VM
- Adding a managed DNS name and public IP address to a VM
- Editing a managed VM DNS name
- How does Kyndryl Cloud Uplift generate the VM DNS name?
- Detaching a static public IP address or DNS name from a VM
- What is the difference between static public IP addresses and dynamic public IP addresses with DNS?
- Troubleshooting issues connecting to a public IP address or managed DNS name
- Issue - I can’t access the public Internet from my VM.
- Deleting a network
- Moving a VM to a different environment
- Deleting VMs
- Sharing VMs and environments with sharing portals
- Sharing resources with projects
- Adding a shared template to your account
- Saving an environment as a template
- Understanding regions
- Managing your account settings
- Viewing your current usage and usage limits
- Best practices
- Automating VMs and environments
- CI/CD reference architectures
- IBM i Data Protection and Resiliency Solutions
- Creating recovery copies of VMs and environments
- Disaster recovery reference architectures
- Monitoring your usage with email notifications
- Organizing resources with labels and tags
- Security best practices
- Using Kyndryl Cloud Uplift for demos
- Using Kyndryl Cloud Uplift for training classes
- Knowledge base
- Security improvements: Deprecation and end of life (EOL) notices
- How to add notes to VMs, environments, templates, and assets
- How to change the name of a VM
- How to change the name or description of an environment
- How to check VM hardware version
- How to connect to a VM from an iPad or iPhone
- How to connect to Kyndryl Cloud Uplift using a private WAN connection
- How to delete environments
- How to export a list of environments, templates, or assets
- How to export VMs
- How to find the ID for a VM, VPN, environment, or template
- How to find the Instance URL for a Kyndryl Cloud Uplift on Azure account
- How to find the IP addresses for a VM
- How to find the network gateway IP address
- How to find your user name and API security token
- How to generate an API security token for your account
- Guide to the Dashboard
- Protecting a VM that is exposed to the internet or compromised
- Time zones and UTC offsets
- Understanding storage
- Using search
- Using Windows in Kyndryl Cloud Uplift
- Using Power VMs in Kyndryl Cloud Uplift
- Differences between Power and x86 VMs
- IBM i FAQ
- Viewing system reference codes for an IBM i VM
- Applying PTFs to an IBM i VM in Kyndryl Cloud Uplift
- Manually refreshing IBM i licenses
- Refreshing IBM i licenses with LICKEY
- Booting an AIX VM into maintenance mode
- Configuring TCP/IP network settings for an AIX VM
- Connecting to an AIX VM with X Windows
- Importing Power VM
- Known issues for Power VMs
- Preserving AIX disk numbering with ghostdev
- Overview of Assure MIMIX™ Software
- Editing VMs outside of Kyndryl Cloud Uplift
- Troubleshooting connections to a VM from a Windows 10 computer?
- Troubleshooting
How to create custom HTML content for a sharing portal
You can create custom content that will display on the Resources tab of a sharing portal. For example, you can provide instructions, examples, downloads, links to other pages, or other light customization.
To add a custom content tab
- From the environment you want to share, click the Sharing Portals tab. A list of sharing portals displays.
- Click the sharing portal you want to change. The Sharing Portal Options page displays.
- Under Portal Customization, click Enable custom content tab.
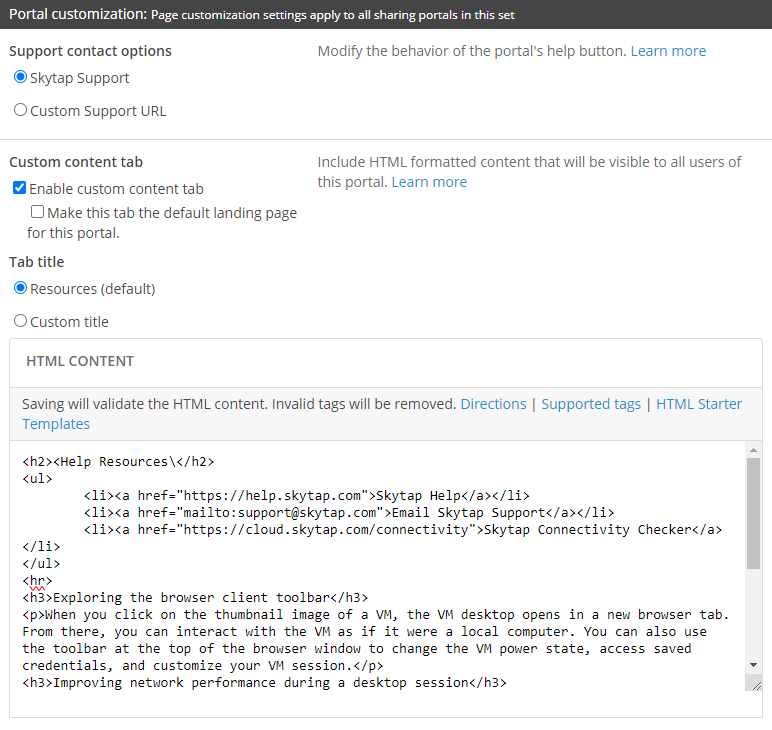
- If you want the sharing portal to open to this tab by default, click Make this tab the default landing page for this portal.
-
To customize the tab name, select Custom title and enter the name of the tab as you want it to appear in the sharing portal page.
- The tab name is limited to 32 characters.
- If you don’t provide a tab name, the default value: Resources is used.
-
Enter your custom HTML Content. For examples, see Examples for custom HTML content.
Notes
- Kyndryl Cloud Uplift limits the HTML tags and attributes you can use (see Allowed HTML in custom content). Unsupported HTML tags are removed when you save your custom content.
- HTML text must be less than 32kB.
- Each sharing portal can have its own custom content.
See also
Sharing VMs and environments with sharing portals