Enabling audio for a VM
Kyndryl Cloud Uplift Windows Server VMs can be configured to allow audio over a special RDP connection type in the Secure Remote Access (SRA) browser client. Audio input and output work with the microphone and speakers attached to your local computer.
Generally, there are two groups of VM settings that need to be enabled for audio to work:
- The Kyndryl Cloud Uplift Windows Server VM settings must be edited to allow an RDP connection via the browser client and to allow either audio input/output or audio output.
- The Windows operating system settings must be properly configured to support RDP and audio input/output.
This feature must be enabled for your customer account.
After your customer account has been granted access to this feature, each VM can be optionally configured to support VM audio.
- To check whether you have access to this feature, follow the instructions in Step 1 to view the Connection types on the VM Hardware Settings page.
- If you’re a primary administrator, contact support@skytap.com to enable this feature across your account. Include your name, email address, and the name of your organization.
- If you’re a standard user or administrator, work with your primary administrator to request this feature.
Contents
Requirements
Operating system
Currently, audio is supported for only the following operating systems:
- Windows Server 2016 Standard
- Windows Server 2012 R2 Standard
- Windows Server 2012 Standard
- Windows Server 2008 R2 Standard
- Windows Server 2008 Standard
Windows Server 2008 supports only audio playback.
VM hardware
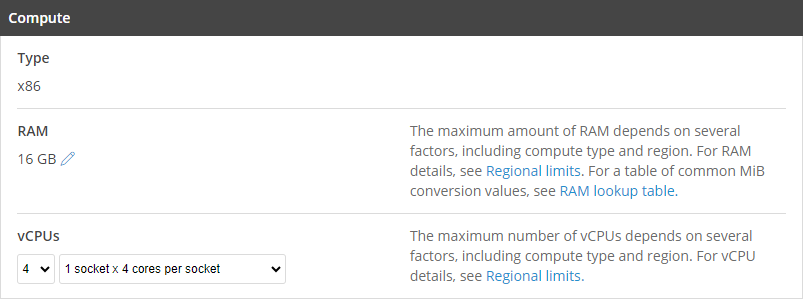
The minimum recommended VM hardware configuration is two CPU cores and 2048 MB RAM.
If you need a single environment with multiple audio-enabled VMs, first configure a single VM using the audio setup steps below, and then add copies of the configured VM to the same environment.
VM network settings
The VM must be connected to an automatic network. To view the current VM network connections, navigate to the VM Settings > Network Adapters page.
- Navigate to the environment that contains the VM you want to edit.
-
Click
 (Settings). The VM Settings page displays.
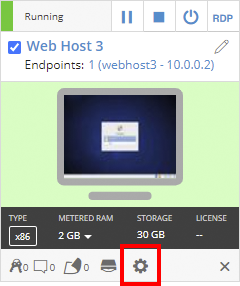
If the Settings button isn’t visible, you don’t have permission to edit the VM settings. Work with your instructor or Kyndryl Cloud Uplift administrator to edit these settings.
- Click the Network Adapters tab.
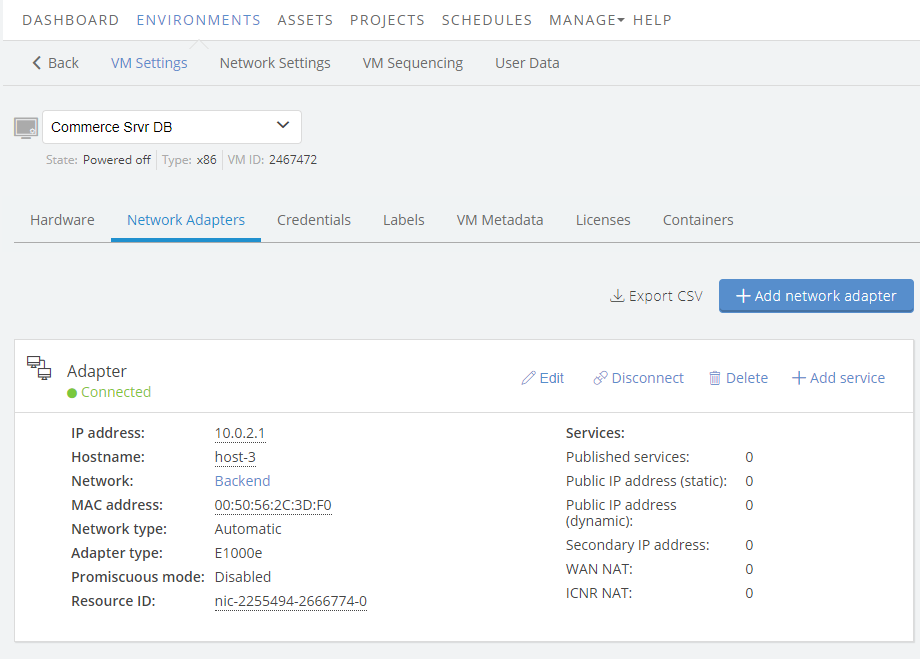 If the VM isn’t connected to an automatic network, see Attaching VMs to networks.
Step 1: Editing the VM hardware settings to support audio
You must configure the VM hardware settings to support audio connections over the SRA browser client.
To enable VM audio
-
Make sure the VM is powered off.
-
Navigate to the VM Settings > Hardware page.
- Navigate to the environment that contains the VM you want to edit.
-
Click
(Settings).If the Settings button isn’t visible, you don’t have permission to edit the VM settings. Work with your instructor or Kyndryl Cloud Uplift administrator to edit these settings.
- The Hardware tab of the VM Settings page displays.
-
Next to Alternative connection types, click
 . The Alternative connection types section expands.
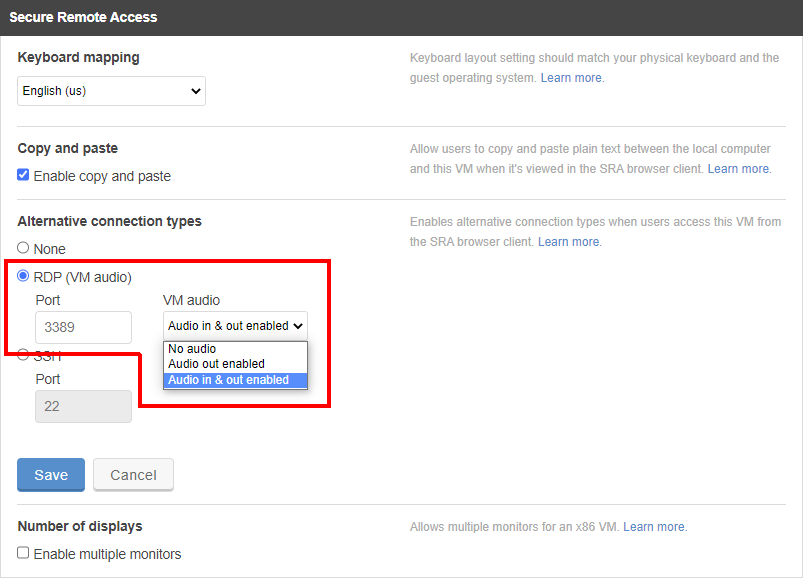
If you can't edit Alternative connection types, this option isn't enabled for your account.
- If you're a primary administrator, contact support@skytap.com to enable this feature across your account. Include your name, email address, and the name of your organization.
- If you're a standard user or administrator, work with your primary administrator to request this feature.
- Select RDP (VM audio).
- (Optional) Set a custom port for the RDP connection. RDP uses port 3389 by default. Don’t edit this setting unless you’ve customized the Windows VM to use an alternate port for RDP.
- From the VM audio drop-down, select the audio mode you need:
- None – no audio in or out but the display uses RDP features, instead of the default Kyndryl Cloud Uplift display server.
- Audio out enabled – audio from the VM will play through the browser client.
- Audio in and out enabled – audio from the VM will play through the browser client and the VM will receive audio from the microphone connected to your local computer.
- Click Save.
-
Run the VM.
Because the RDP session runs from within the guest OS, allow extra time for the VM to boot and the RDP service to start before you try to connect with a browser client. If you see an ‘upstream server’ error, wait, and then refresh the browser to try the connection again.
Step 2: Configuring the VM operating system
Expand the section below that matches the VM operating system and follow the instructions to configure RDP services and related permissions for audio on the VM.
Enabling RDP
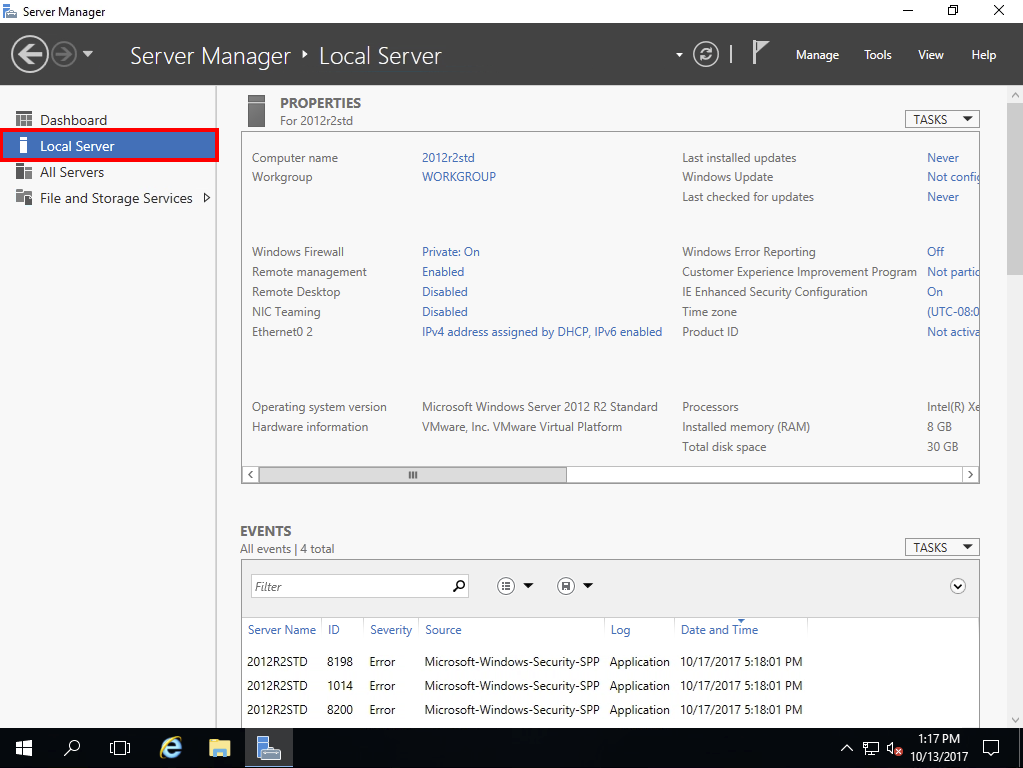
- Sign in to Windows Server as a local administrator and open Server Manager from the desktop Task Bar or Start Screen.
- In the left pane of Server Manager, click Local Server.
- Wait for the information about the local server to update in the right pane. In the Properties section of the right pane you should see the status of Remote Desktop, which is Disabled by default.
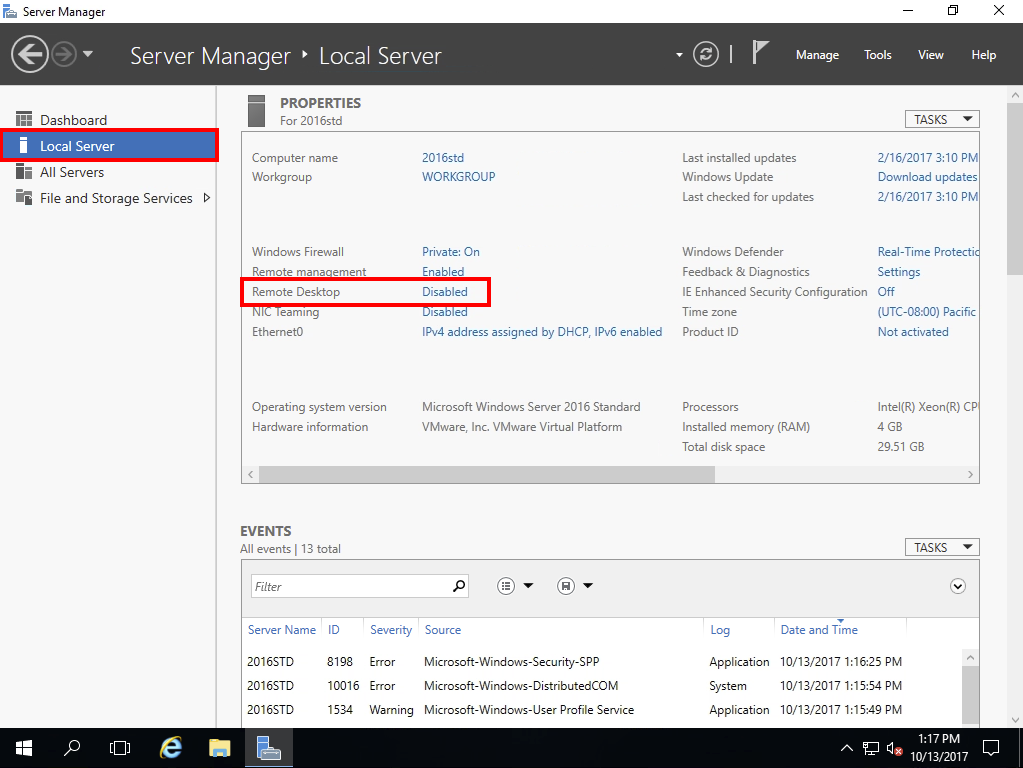
- Click the link to enable Remote Desktop. The Remote tab of the Systems Properties dialog displays.
-
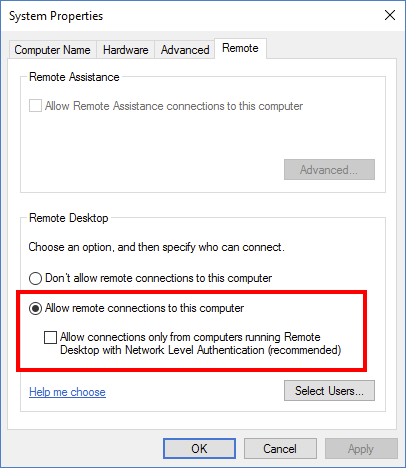
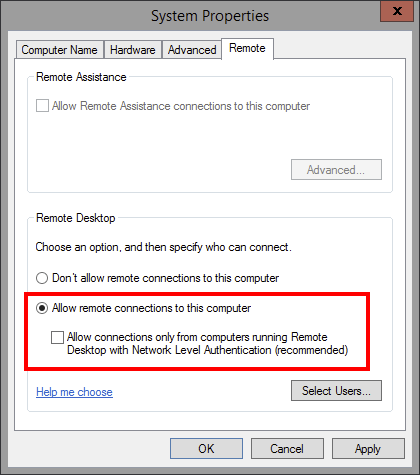
Under Remote Desktop, select Allow remote connections to this computer and clear the checkbox next to Allow connections only from computers running Remote Desktop with Network Level Authentication (recommended).
 You must configure the Remote Desktop properties twice: at the beginning and at the end of this section.
 - Click OK.
Enabling Remote Desktop Services
If you need only audio out, skip to Enabling audio.
-
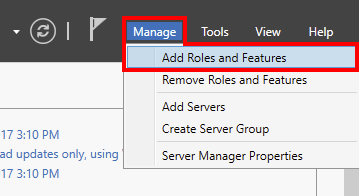
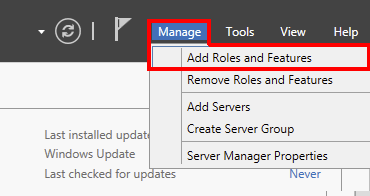
In the Server Manager navigation bar, click Manage > Add Roles and Features.
 The Add Roles and Features Wizard displays. Click Next to advance to the Installation Type screen.
 -
On the Installation Type screen, select Role-based or feature-based installation, and then click Next twice to advance to the Server Roles screen.

-
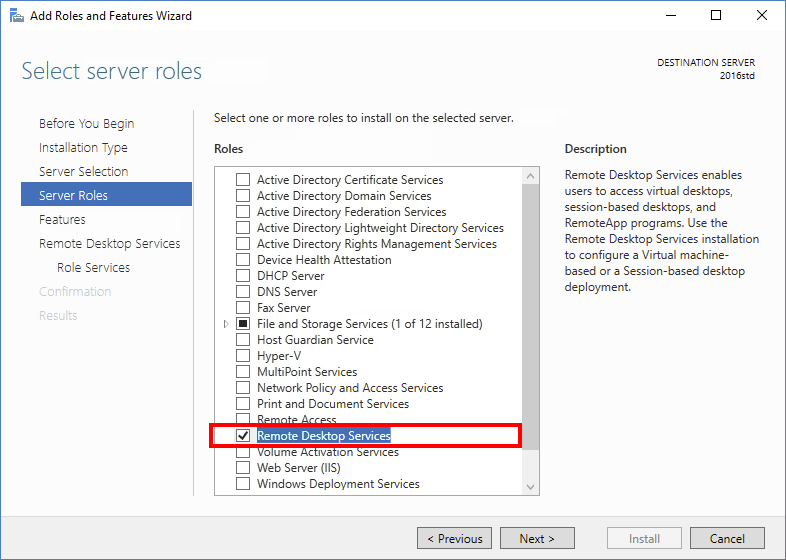
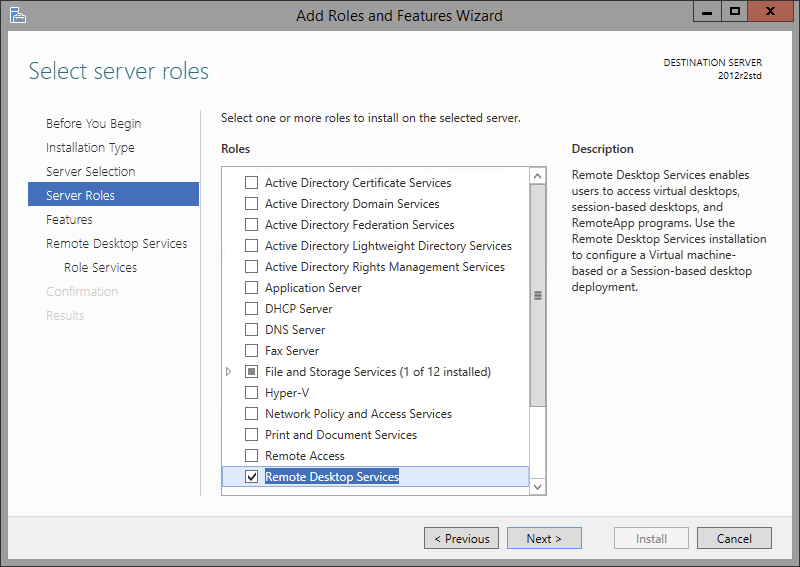
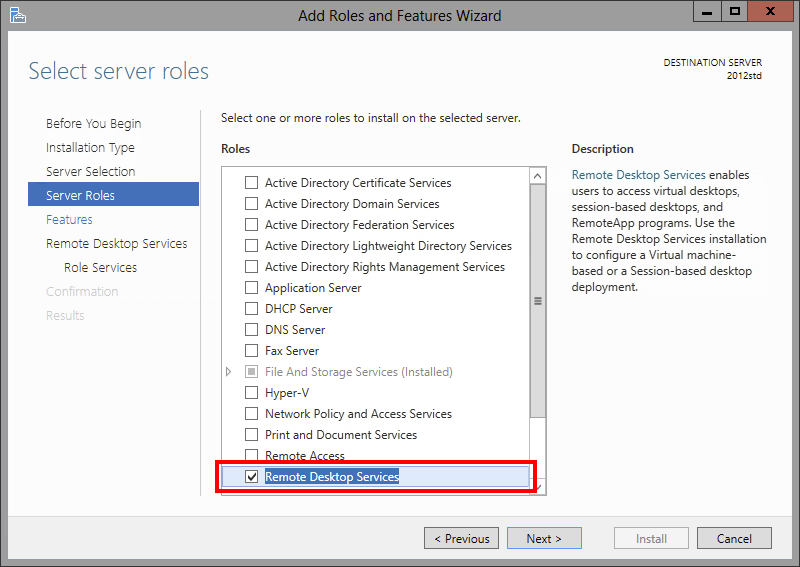
On the Server Roles screen, check the box next to Remote Desktop Services, and then click Next.
-
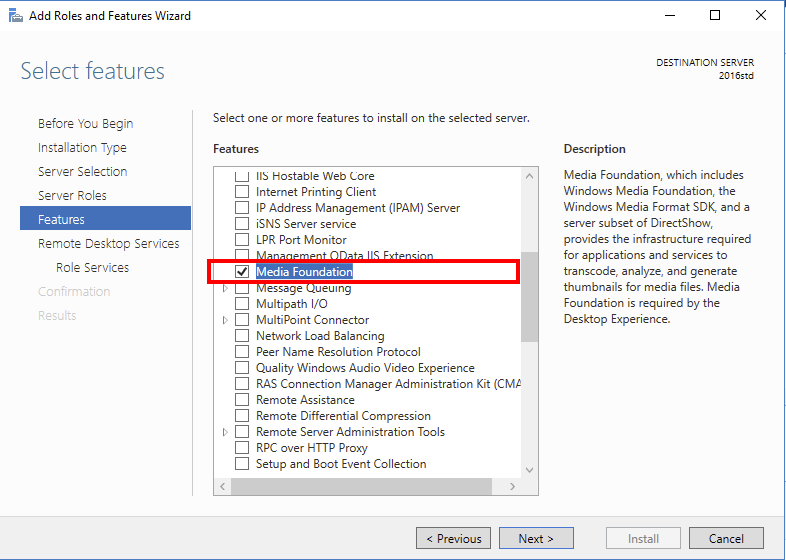
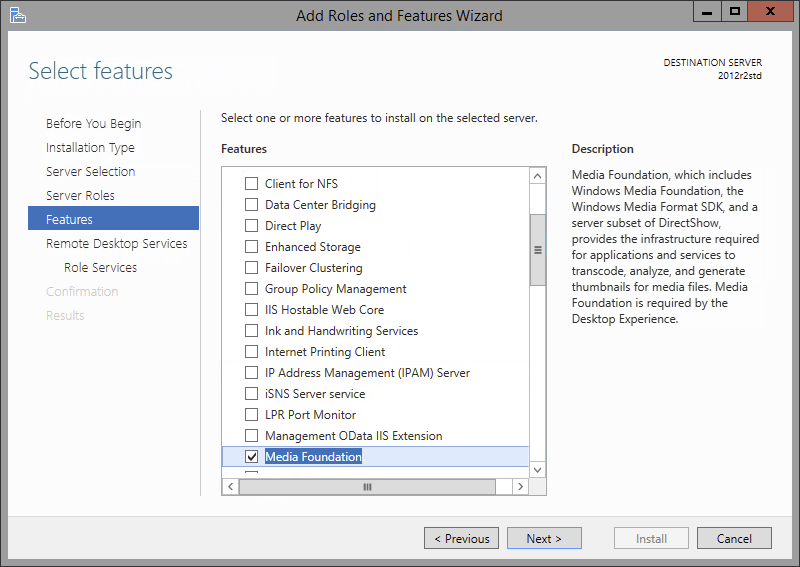
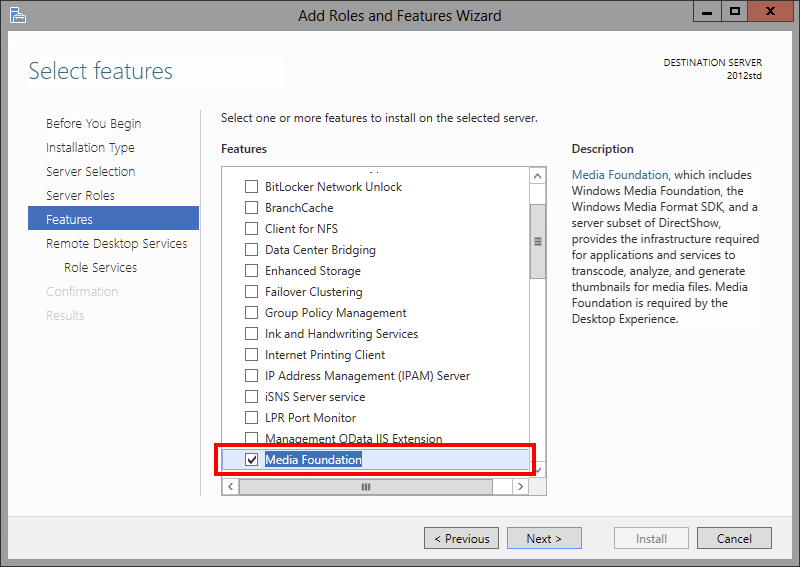
On the Features screen, check the box next to Media Foundation.
-
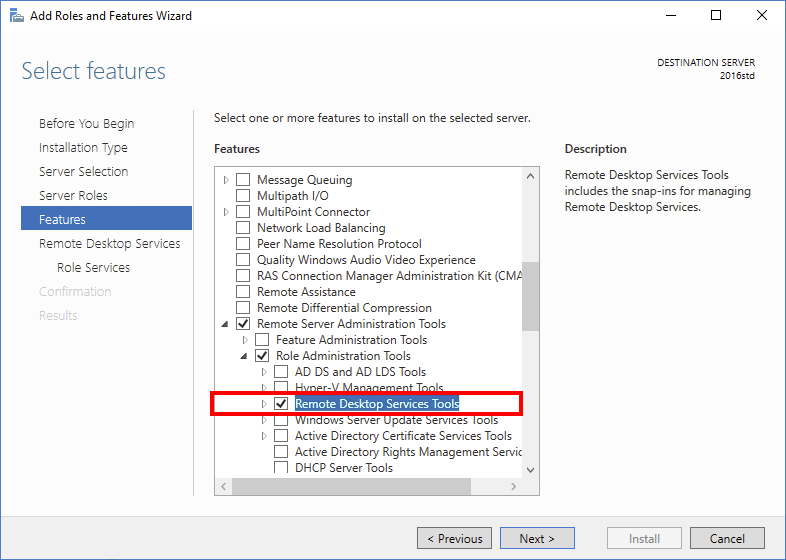
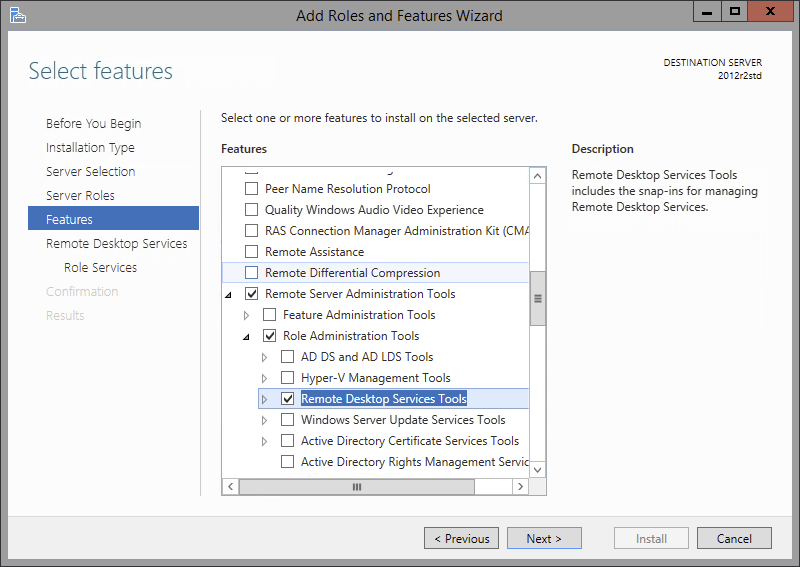
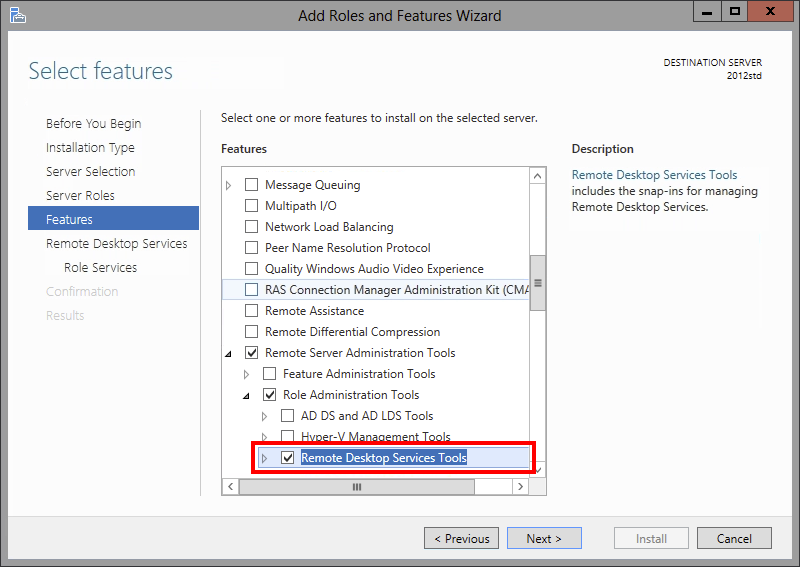
Expand Remote Server Administration Tools/Role Administration Tools, check the box next to Remote Desktop Service Tools, and then click Next twice to advance to the Role Services screen.
-
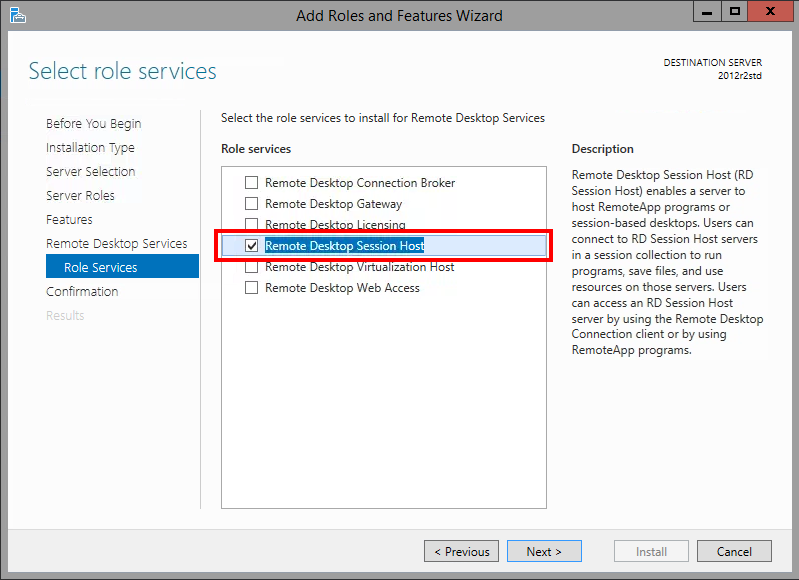
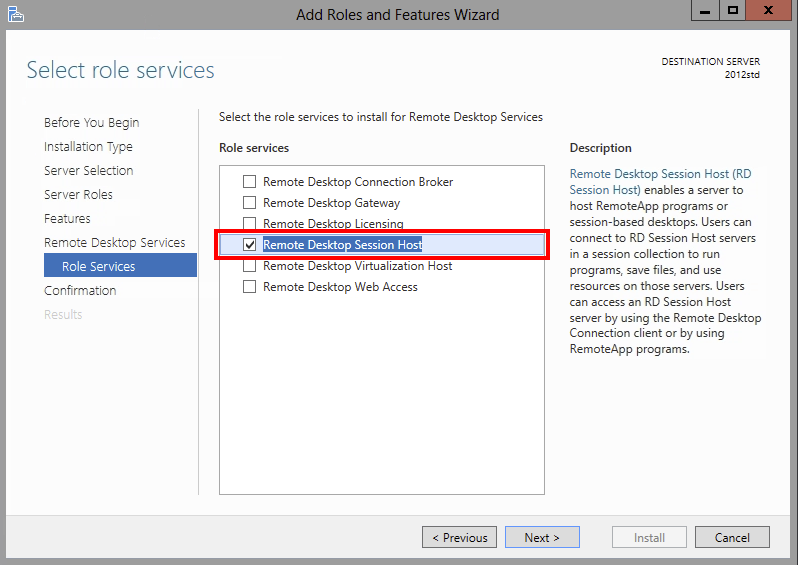
On the Role Services screen check the box next to Remote Desktop Session Host. If additional features are required for Remote Desktop Session Host, a dialog displays. Click Add Features. Click Next.

- Review the information in the Confirmation screen, and then click Install.
- Restart the VM.
Enabling audio
- Right-click Start > Run, type
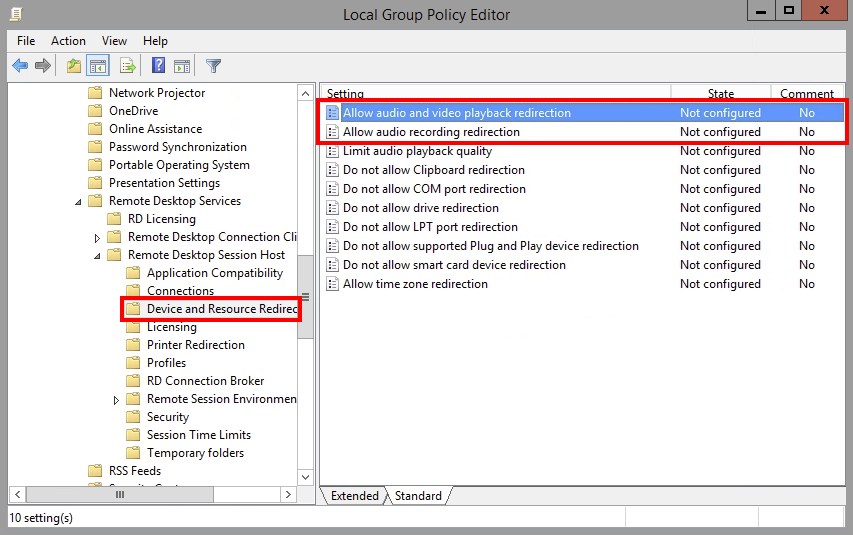
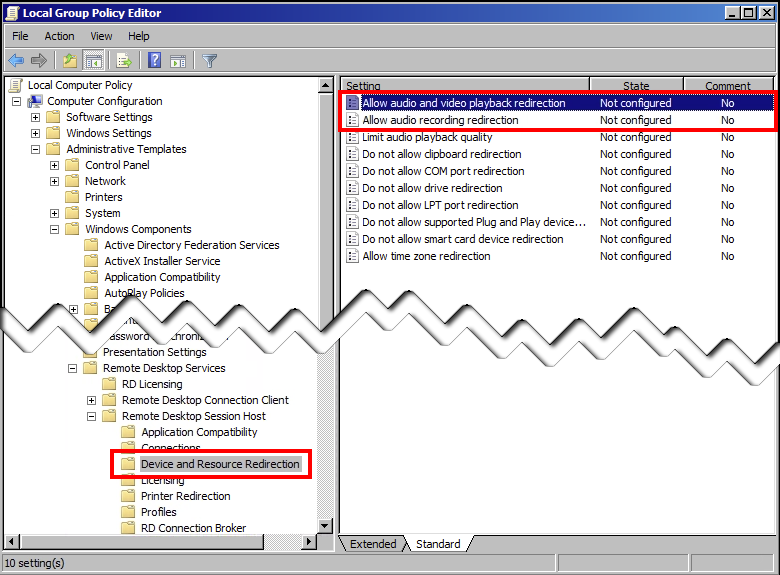
gpedit.msc, and then click OK. The Local Group Policy Editor displays. - Expand Local Computer Policy/Computer Configuration/Administrative Templates/Windows Components/Remote Desktop Services/Remote Desktop Session Host.
-
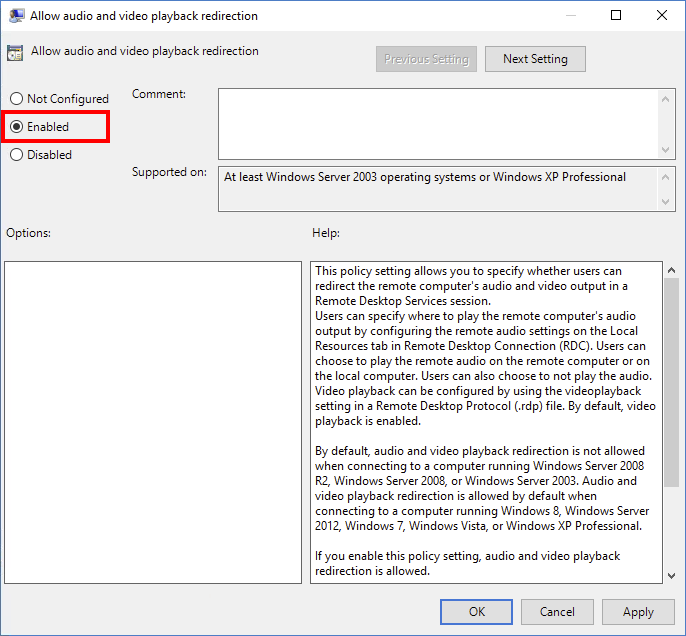
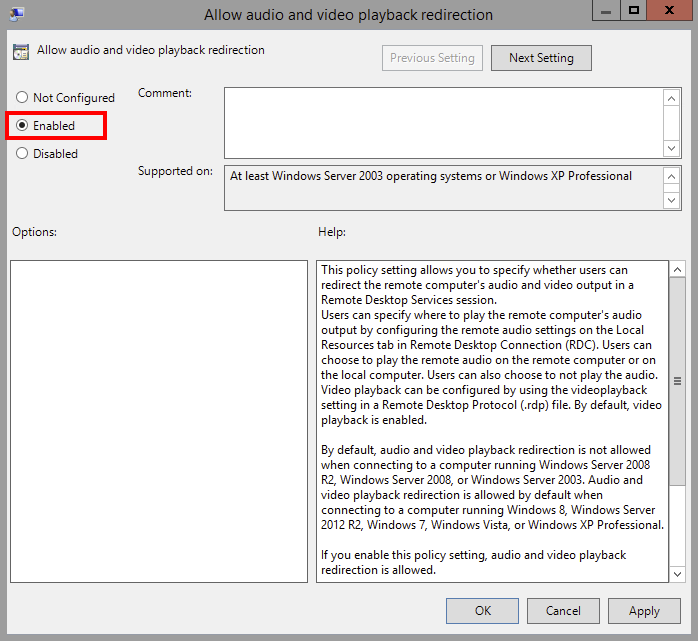
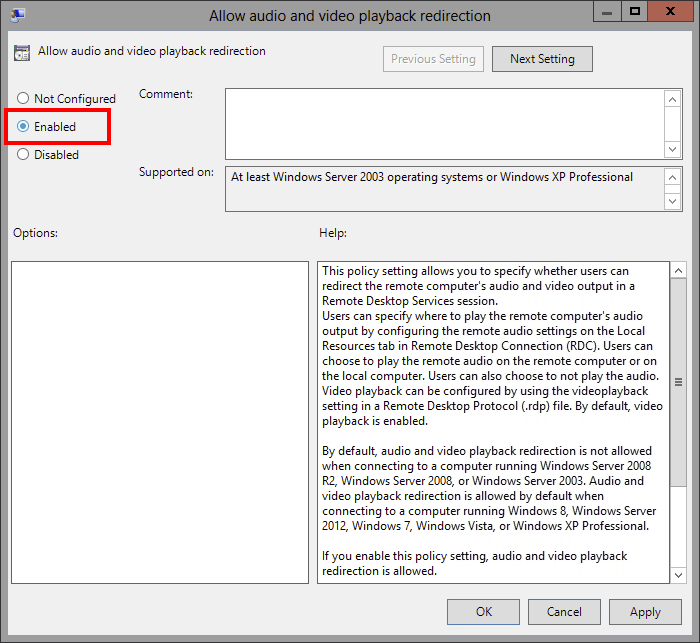
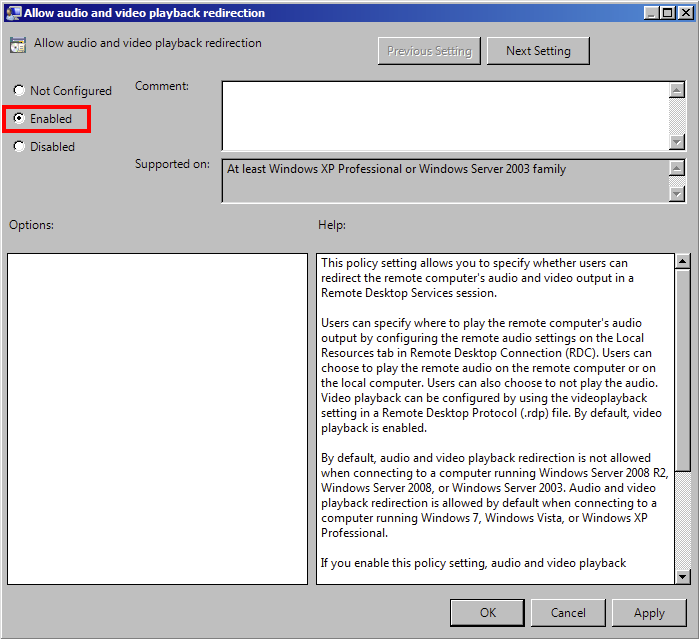
In Device and Resource redirection, double-click Allow Audio and Video Playback Redirection. The Allow Audio and Video Playback Redirection dialog displays.

-
Click Enabled, and then click OK.
-
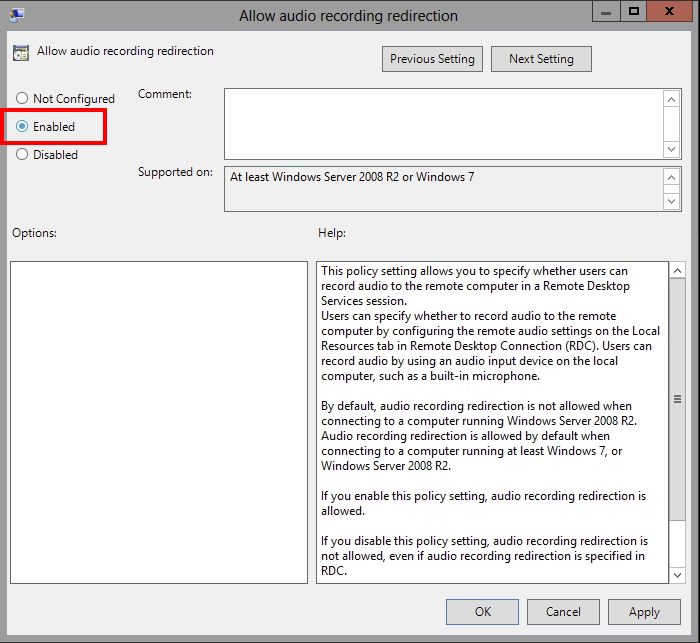
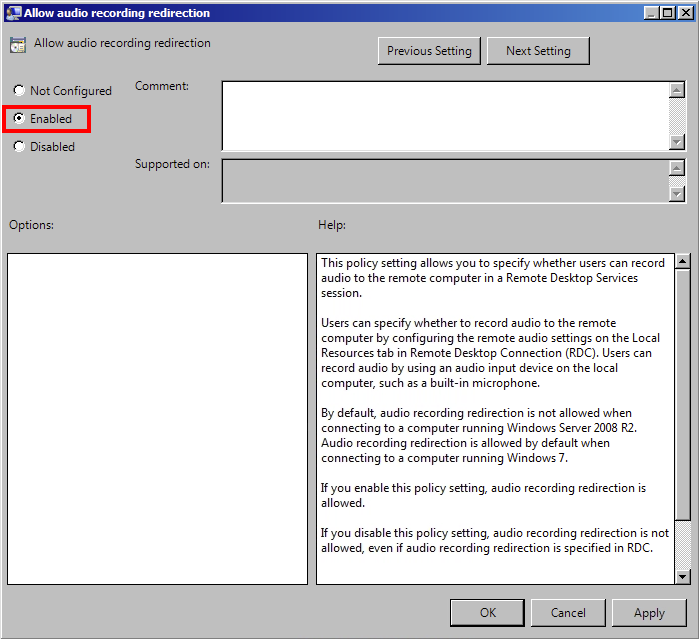
Double-click Allow audio recording redirection. The Allow audio recording redirection dialog displays.
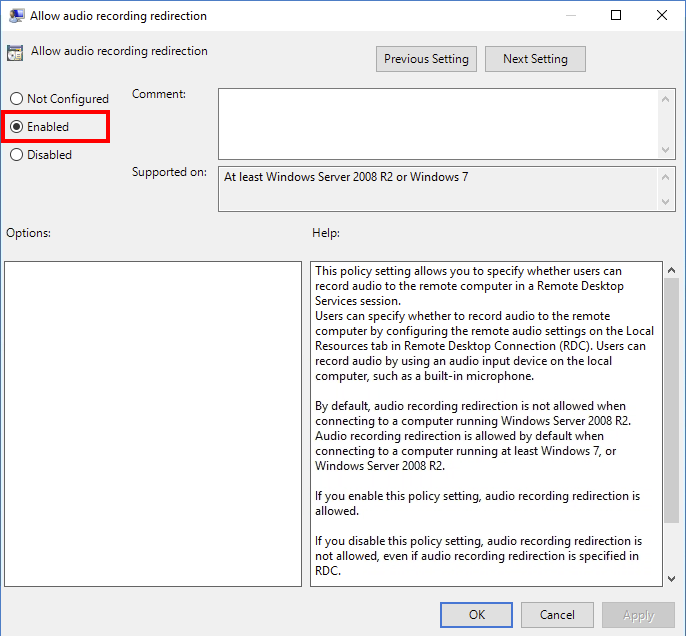
- Click Enabled, and then click OK.
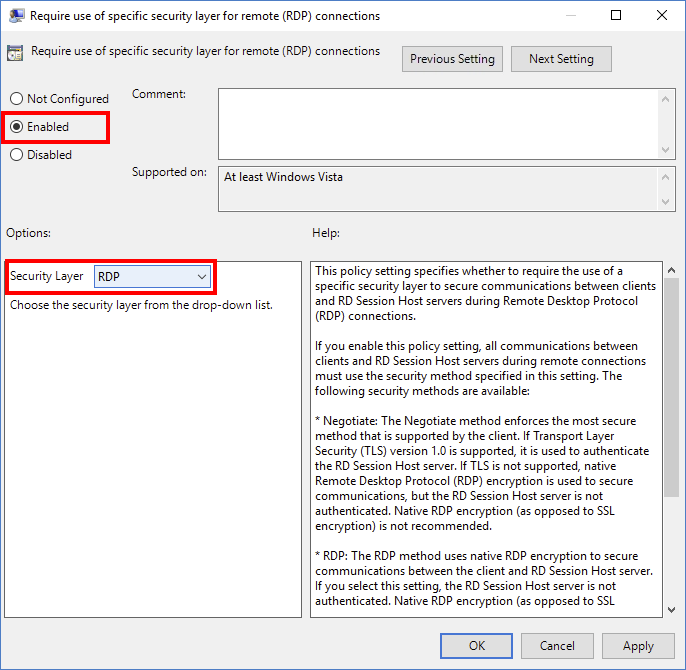
-
In Security, double-click Require use of specific security layer for remote (RDP) connections. The Require use of specific security layer for remote (RDP) connections dialog displays.
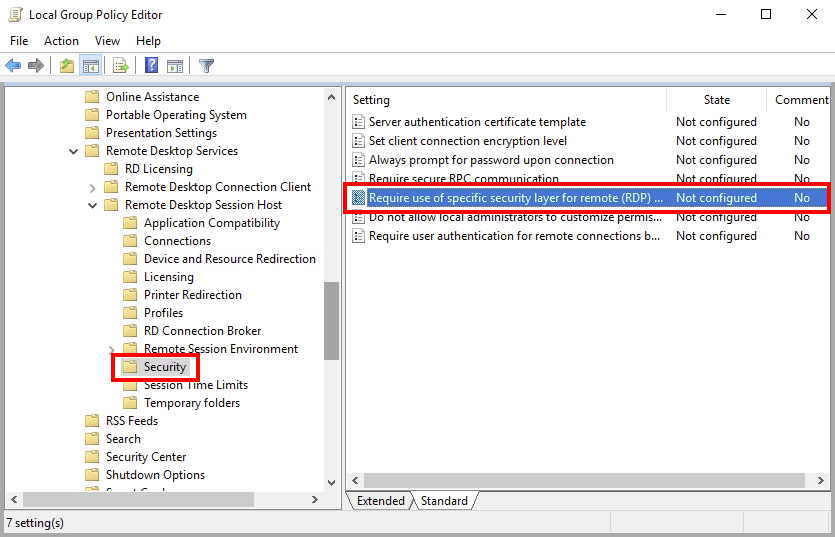
-
Click Enabled, make sure Security Layer in the Options section is set to RDP, and then click OK.
- Restart the VM.
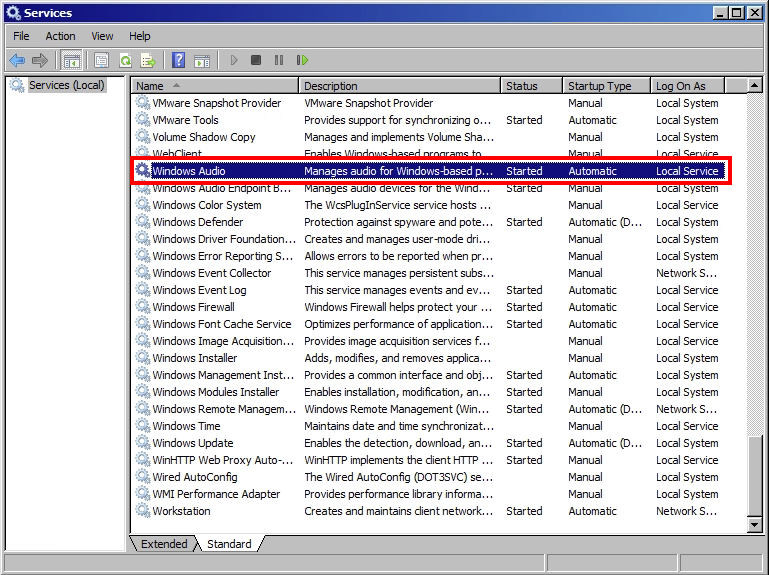
Configuring the Windows Audio service
-
Right-click Start > Run, type
services.msc, and then press Enter. The Services console displays.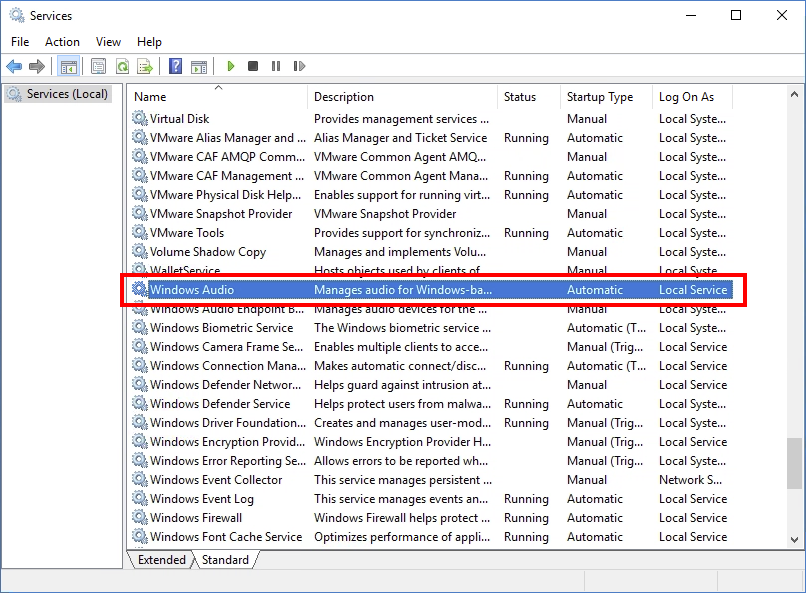
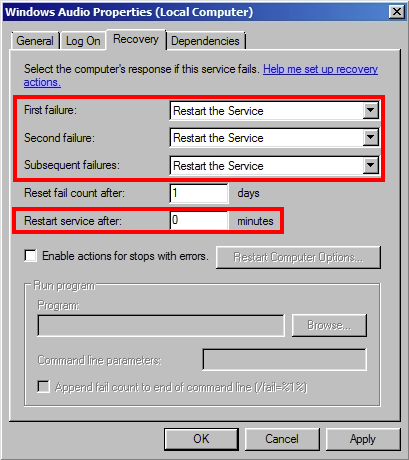
- Double-click Windows Audio. The Windows Audio Properties dialog displays.
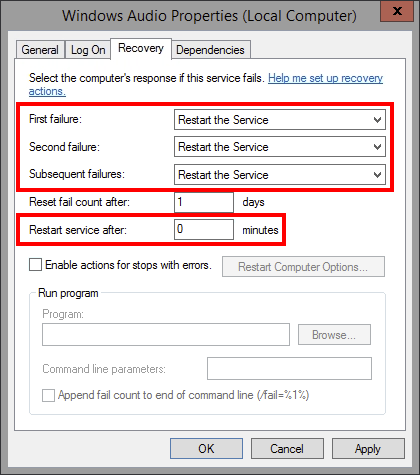
- Make sure Startup type is set to Automatic.
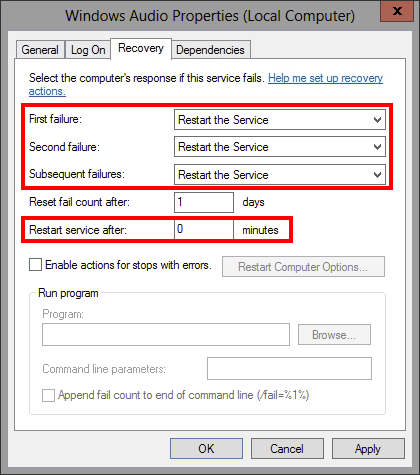
- Click the Recovery tab.
-
For all three failure drop-down menus (First failure, Second failure, and Subsequent failures), select Restart the Service.
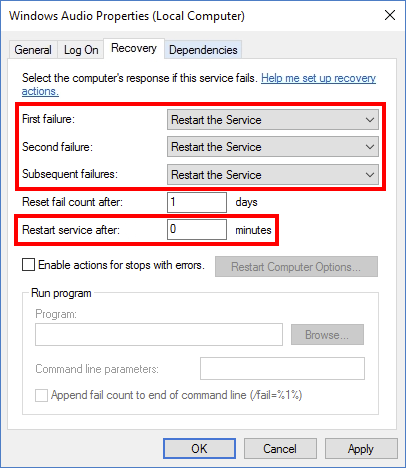
- For the Restart service after field, type
0. - Click OK, and then close the Services console.
Disabling Network Level Authentication for RDP
- Right-click Start > Run, type
sysdm.cpl, and then press Enter. The System Properties dialog displays. -
Click the Remote tab.
- Under Remote Desktop, select Allow remote connections to this computer.
- Clear the checkbox next to Allow connections only from computers running Remote Desktop with Network Level Authentication (recommended).
- Click OK.
Enabling RDP
- Sign in to Windows Server as a local administrator and open Server Manager from the desktop Task Bar or Start Screen.
- In the left pane of Server Manager, click Local Server.
-
Wait a few seconds for the information about the local server to update in the right pane. In the Properties section of the right pane you should see the status of Remote Desktop, which is Disabled by default.
- Click the link to enable Remote Desktop. The Remote tab of the Systems Properties dialog displays.
-
Under Remote Desktop, select Allow remote connections to this computer.
You will configure the Remote Desktop properties again later in this process.
- Clear the checkbox next to Allow connections only from computers running Remote Desktop with Network Level Authentication (recommended).
- Click OK.
Enabling Remote Desktop Services
If you need only audio out, skip to Enabling audio.
-
In the Server Manager navigation bar, click Manage > Add Roles and Features. The Add Roles and Features Wizard displays.
Click Next to advance to the Installation Type screen.
-
On the Installation Type screen, select Role-based or feature-based installation.

Click Next twice to advance to the Server Roles screen.
-
On the Server Roles screen, check the box next to Remote Desktop Services
Click Next to advance to the Features screen.
-
On the Features screen, check the box next to Media Foundation.
-
On the same screen, expand Remote Server Administration Tools/Role Administration Tools, and check the box next to Remote Desktop Service Tools.
-
On the same screen, expand User Interfaces and Infrastructure and check the box next to Desktop Experience.
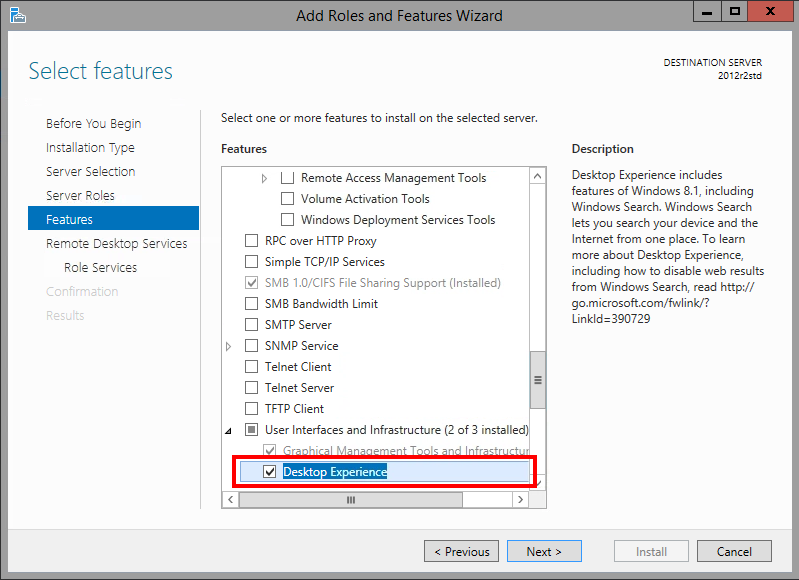
Click Next twice to advance to the Role Services screen.
-
On the Role Services screen check the box next to Remote Desktop Session Host. If additional features are required for Remote Desktop Session Host, a dialog displays. Click Add Features.
Click Next.
-
Review the information in the Confirmation screen, and then click Install.
Enabling audio
- From the Start screen of the VM, type
gpedit.msc, and then press Enter. The Local Group Policy Editor displays. - Expand Local Computer Policy/Computer Configuration/Administrative Templates/Windows Components/Remote Desktop Services/Remote Desktop Session Host.
-
In Device and Resource redirection, double-click Allow Audio and Video Playback Redirection. The Allow Audio and Video Playback Redirection dialog displays.
-
Click Enabled, and then click OK.
-
Double-click Allow audio recording redirection. The Allow audio recording redirection dialog displays.

- Click Enabled, and then click OK.
- Restart the VM.
Configuring the Windows Audio service
-
From the Start screen of the VM, type
services.msc, and then press Enter. The Services console displays.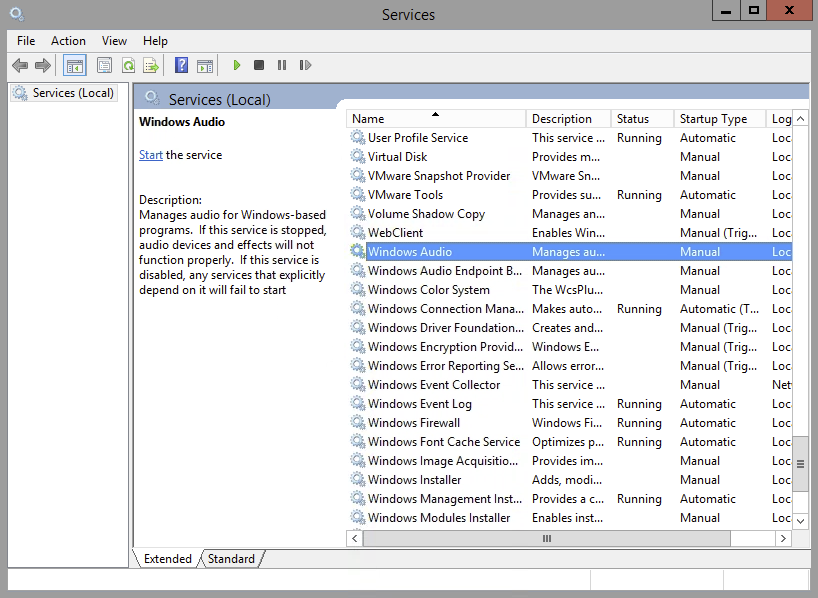
- Double-click Windows Audio. The Windows Audio Properties dialog displays.
- Make sure Startup type is set to Automatic.
- Click the Recovery tab.
-
For all three failure drop-down menus (First failure, Second failure, and Subsequent failures), select Restart the Service.
- For the Restart service after field, type
0. - Click OK, and then close the Services console.
Disabling Network Level Authentication for RDP
- From the Start screen of the VM, type
sysdm.cpl, and then press Enter. The System Properties dialog displays. - Click the Remote tab.
- Under Remote Desktop, select Allow remote connections to this computer.
-
Clear the checkbox next to Allow connections only from computers running Remote Desktop with Network Level Authentication (recommended).
- Click OK.
Enabling RDP
- Sign in to Windows Server as a local administrator and open Server Manager from the desktop Task Bar or Start Screen.
- In the left pane of Server Manager, click Local Server.
-
Wait a few seconds for the information about the local server to update in the right pane. In the Properties section of the right pane you should see the status of Remote Desktop, which is Disabled by default.
- Click the link to enable Remote Desktop. The Remote tab of the Systems Properties dialog displays.
- Under Remote Desktop, select Allow remote connections to this computer.
-
Clear the checkbox next to Allow connections only from computers running Remote Desktop with Network Level Authentication (recommended).
You will configure the Remote Desktop properties again later in this process.
- Click OK.
Enabling Remote Desktop Services
-
In the Server Manager navigation bar at the top of the screen, click Manage > Add Roles and Features.
The Add Roles and Features Wizard displays.
-
On the Installation Type screen, select Role-based or feature-based installation.
Click Next twice to advance to the Server Roles screen.
-
On the Server Roles screen, check the box next to Remote Desktop Services.
Click Next to advance to the Features screen.
-
On the Features screen, check the box next to Media Foundation.
-
On the same screen, expand Remote Server Administration Tools/Role Administration Tools, and check the box next to Remote Desktop Service Tools.
Click Next twice to advance to the Role Services screen.
-
On the Role Services screen check the box next to Remote Desktop Session Host.
If additional features are required for Remote Desktop Session Host, a dialog displays. Click Add Features.
Click Next.
-
Review the information in the Confirmation screen, and then click Install. When the installation completes, restart the VM.
Enabling audio
- From the Start screen of the VM, type
gpedit.msc, and then press Enter. The Local Group Policy Editor displays. -
Expand Local Computer Policy/Computer Configuration/Administrative Templates/Windows Components/Remote Desktop Services/Remote Desktop Session Host.

- In Device and Resource redirection, double-click Allow Audio and Video Playback Redirection. The Allow Audio and Video Playback Redirection dialog displays.
-
Click Enabled, and then click OK.
- Double-click Allow audio recording redirection. The Allow audio recording redirection dialog displays.
-
Click Enabled, and then click OK.
- Restart the VM.
Configuring the Windows Audio service
-
From the Start screen of the VM, type
services.msc, and then press Enter. The Services console displays.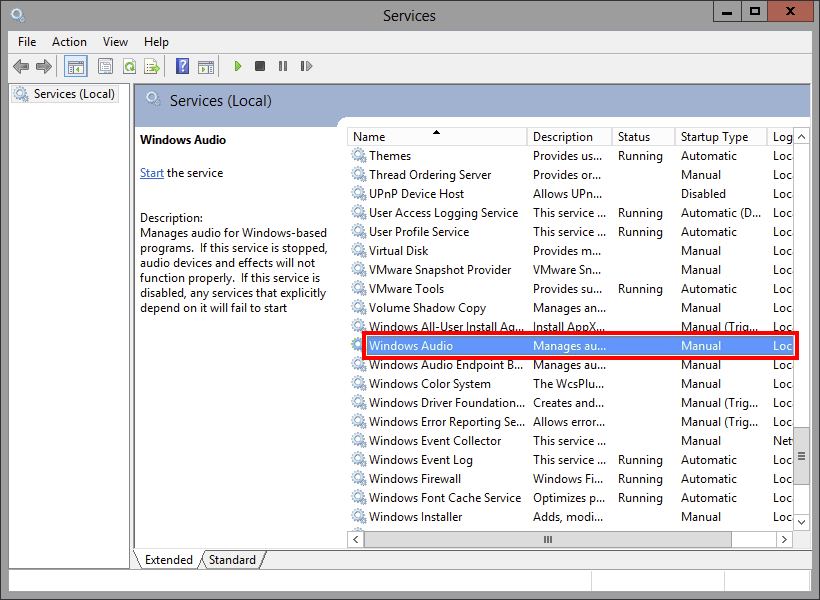
- Double-click Windows Audio. The Windows Audio Properties dialog displays.
- Make sure Startup type is set to Automatic.
-
Click the Recovery tab. For all three failure drop-down menus (First failure, Second failure, and Subsequent failures), select Restart the Service.
- For the Restart service after field, type
0. - Click OK, and then close the Services console.
Disabling Network Level Authentication for RDP
- From the Start screen of the VM, type
sysdm.cpl, and then press Enter. The System Properties dialog displays. - Click the Remote tab.
-
Under Remote Desktop, select Allow remote connections to this computer.
- Clear the checkbox next to Allow connections only from computers running Remote Desktop with Network Level Authentication (recommended).
- Click OK.
Enabling RDP
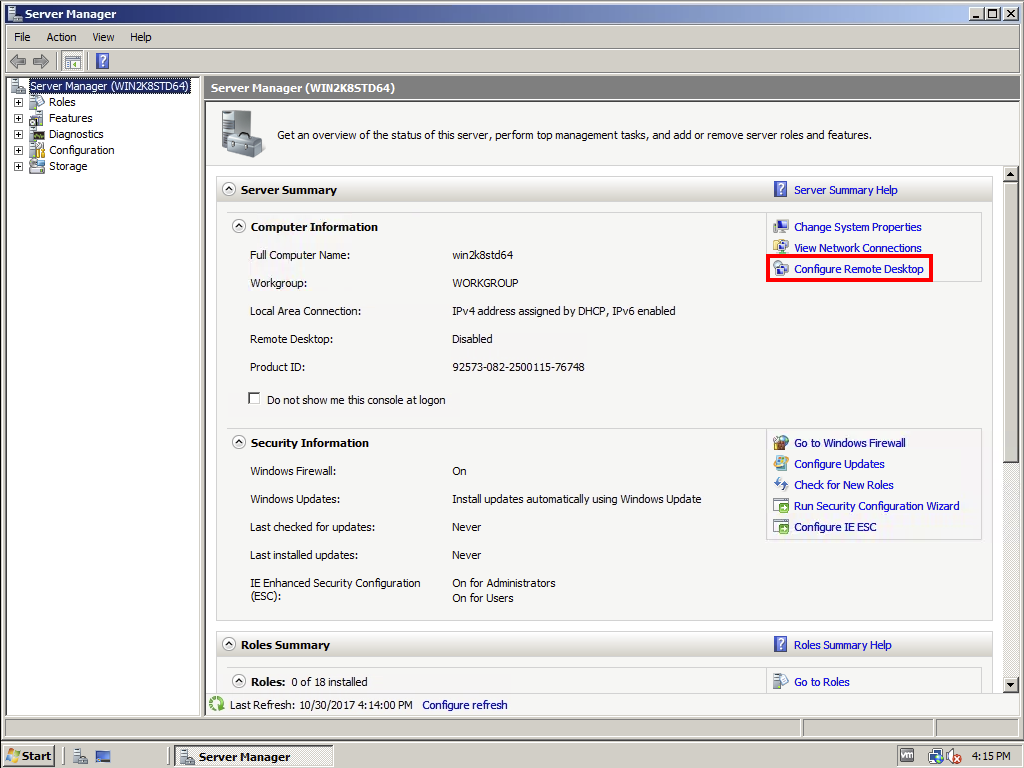
- Open Server Manager. To open Server Manager, click Start > Administrative Tools > Server Manager.
-
In Computer Information, click Configure Remote Desktop.
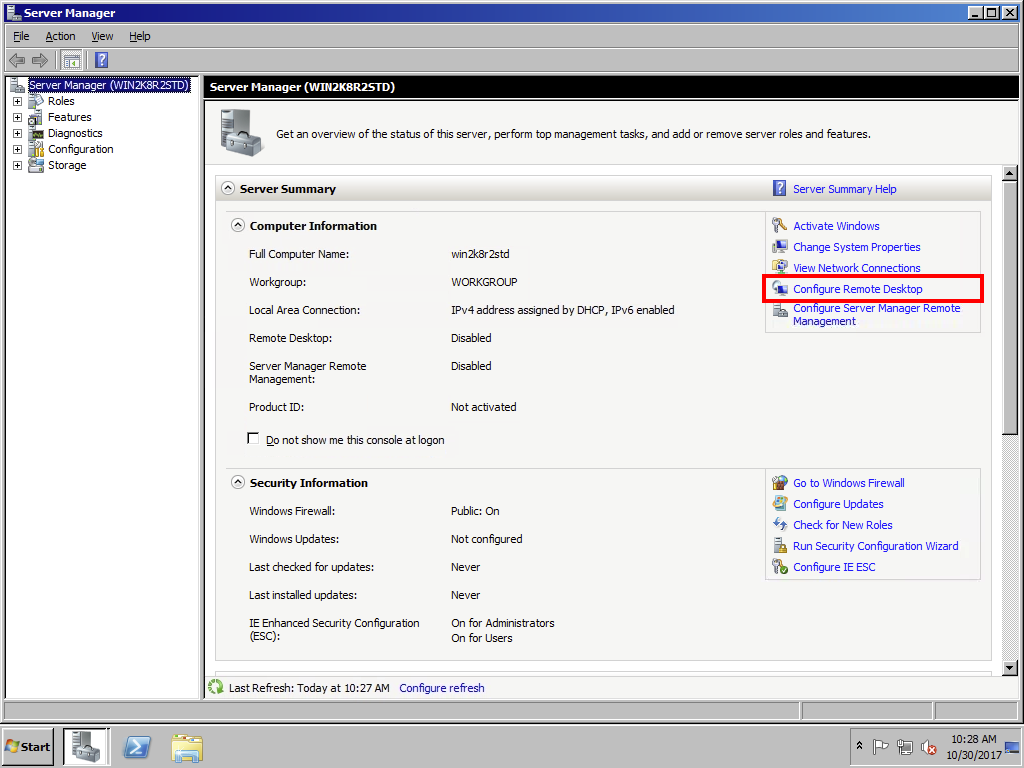
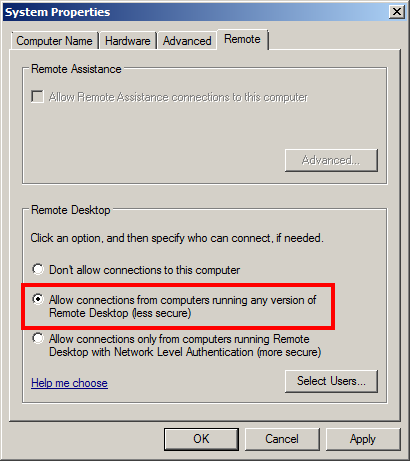
-
In the System Properties dialog, under Remote Desktop, click Allow connections from computers running any version of Remote Desktop (less secure).
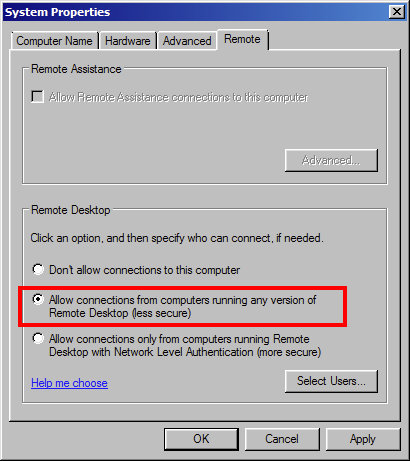
You will configure the Remote Desktop properties again later in this process.
- Review the information in the Remote Desktop dialog, and then click OK twice.
Enabling Remote Desktop Services
If you need only audio out, skip to Enabling audio.
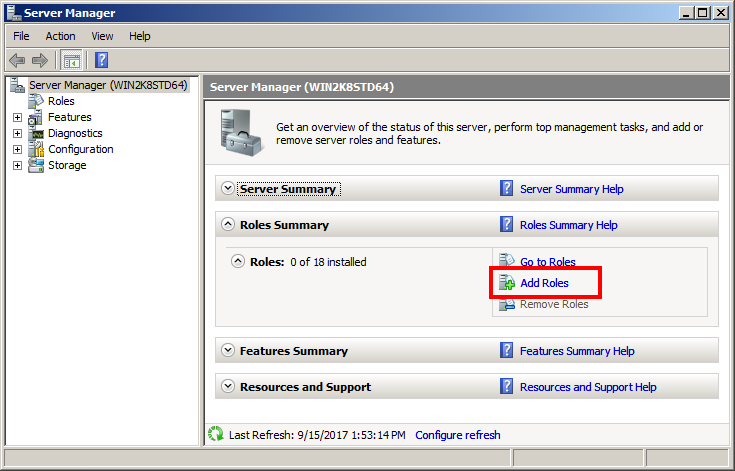
- Open Server Manager. To open Server Manager, click Start > Administrative Tools > Server Manager.
-
In Roles Summary, click Add Roles.
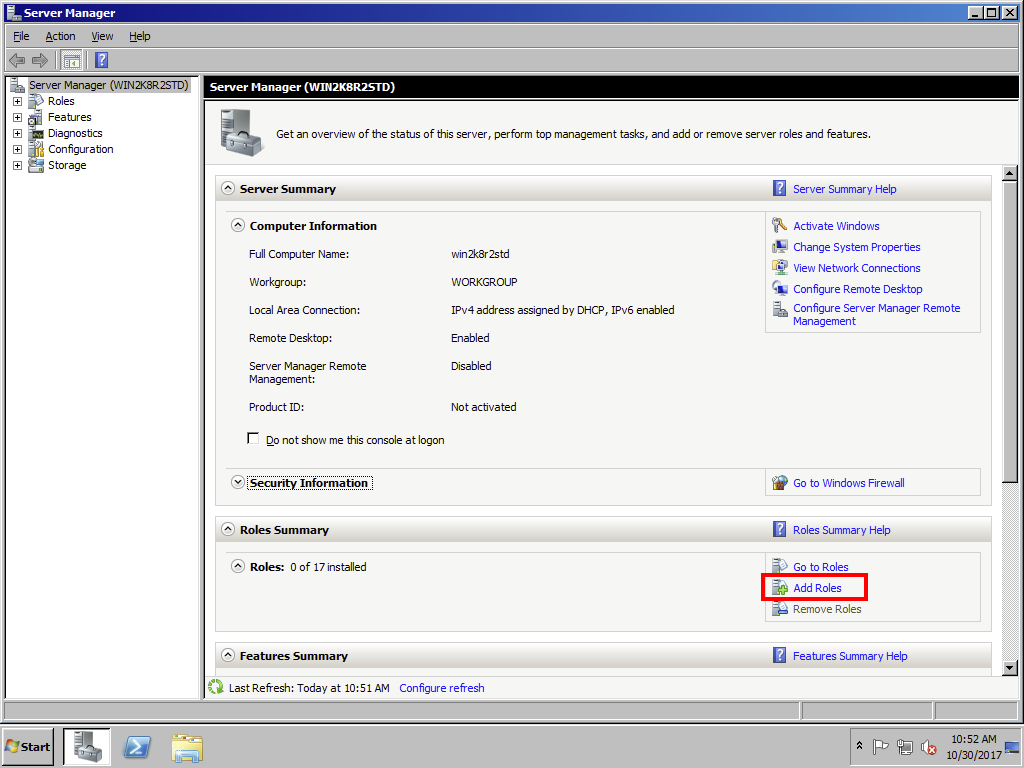
The Add Roles Wizard displays.
-
On the Server Roles screen, check Remote Desktop Services.

Click Next twice to advance to the Role Services screen.
-
On the Role Services screen, select Remote Desktop Session Host
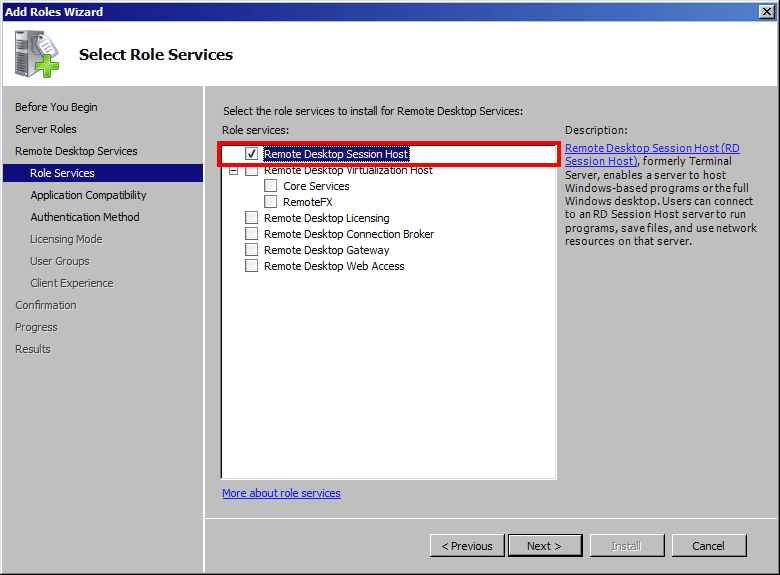
Click Next twice to advance to the Authentication Method screen.
-
Select Do not require Network Level Authentication
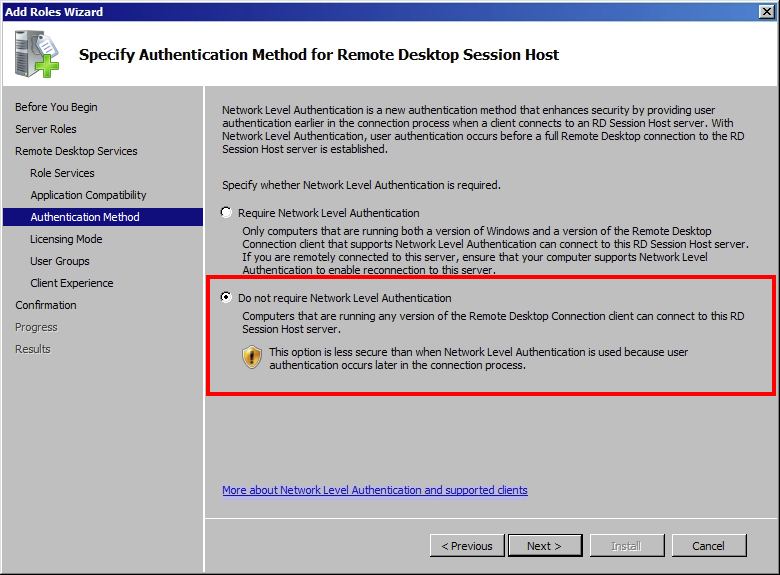
Click Next three times to advance to the Client Experience screen.
-
Select Audio and video playback and Audio recording redirection
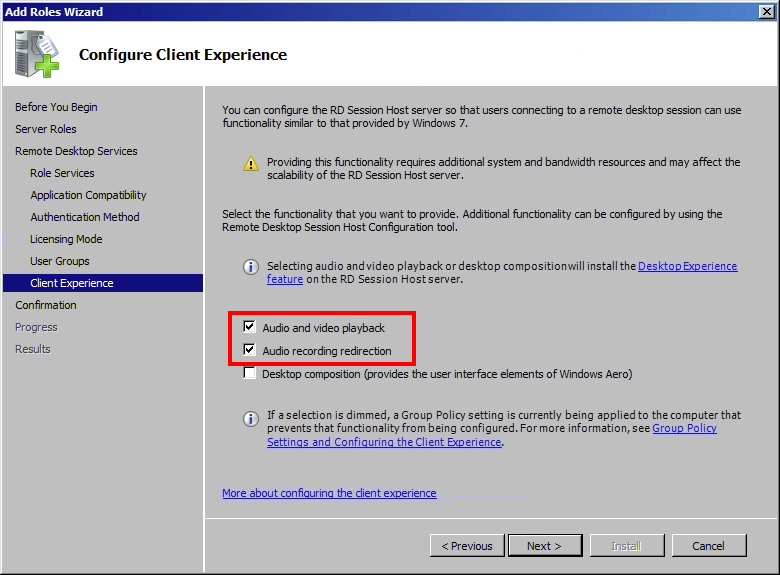
Click Next to advance to the Confirmation screen.
- Review the information in the Confirmation screen, and then click Install.
- Restart the VM.
Enabling audio
-
Click Start > Run, type
gpedit.msc, and then click OK.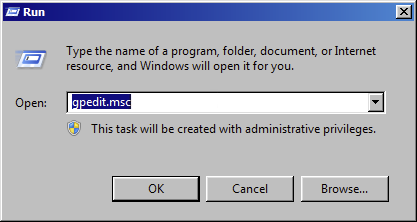
The Local Group Policy Editor displays.
-
Expand Local Computer Policy/Computer Configuration/Administrative Templates/Windows Components/Remote Desktop Services/Remote Desktop Session Host.
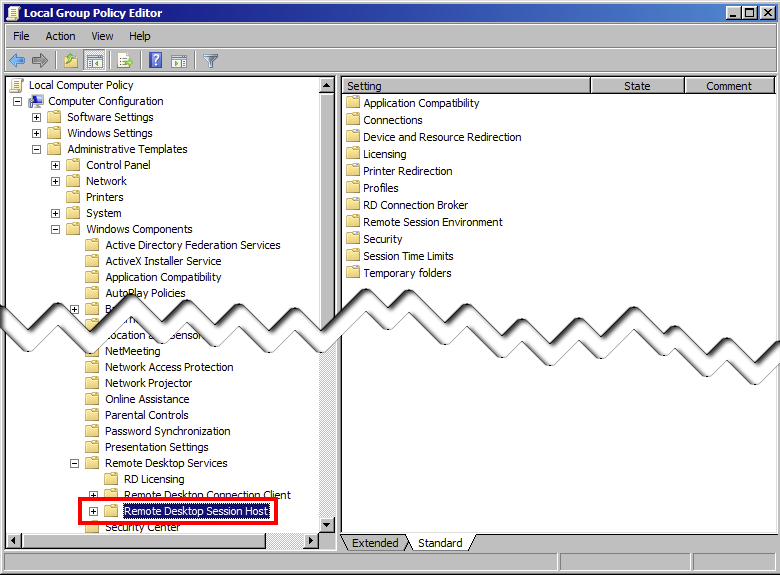
-
In Device and Resource redirection, double-click Allow Audio and Video Playback Redirection.
The Allow Audio and Video Playback Redirection dialog displays.
- Click Enabled, and then click OK.
-
Double-click Allow audio recording redirection. The Allow audio recording redirection dialog displays.
- Click Enabled, and then click OK.
- Close the Local Group Policy Editor console, and then restart the VM.
Configuring the Windows Audio service
-
Click Start > Administrative Tools > Services. The Services console displays.
- Double-click Windows Audio. The Windows Audio Properties dialog displays.
- Make sure Startup type is set to Automatic.
-
Click the Recovery tab.
-
For all three failure drop-down menus (First failure, Second failure, and Subsequent failures), select Restart the Service.
- For the Restart service after field, type
0. - Click OK, and then close the Services console.
Disabling Network Level Authentication for RDP
- Click Start > Run, type
sysdm.cpl, and then press Enter. The System Properties dialog displays. - Click the Remote tab.
-
Under Remote Desktop, click Allow connections from computers running any version of Remote Desktop (less secure).
- Click OK.
Windows Server 2008 supports only audio playback. If you need audio input, choose a Windows Server 2008 R2, Windows Server 2012, Windows Server 2012 R2, or Windows Server 2016 VM.
Enabling RDP
- Open Server Manager. To open Server Manager, click Start > Administrative Tools > Server Manager.
-
In Customize This Server, click Configure Remote Desktop.
The Remote tab of the System Properties dialog displays.
-
In the Remote Desktop section, click Allow connections from computers running any version of Remote Desktop (less secure).
You will configure the Remote Desktop properties again later in this process.
- Review the information in the Remote Desktop dialog, and then click OK twice.
Enabling Remote Desktop Services
To add the Terminal Services role
-
In the Server Manager, under Roles Summary, click Add Roles.
The Add Roles Wizard displays.
-
On the Server Roles screen, select Terminal Services.
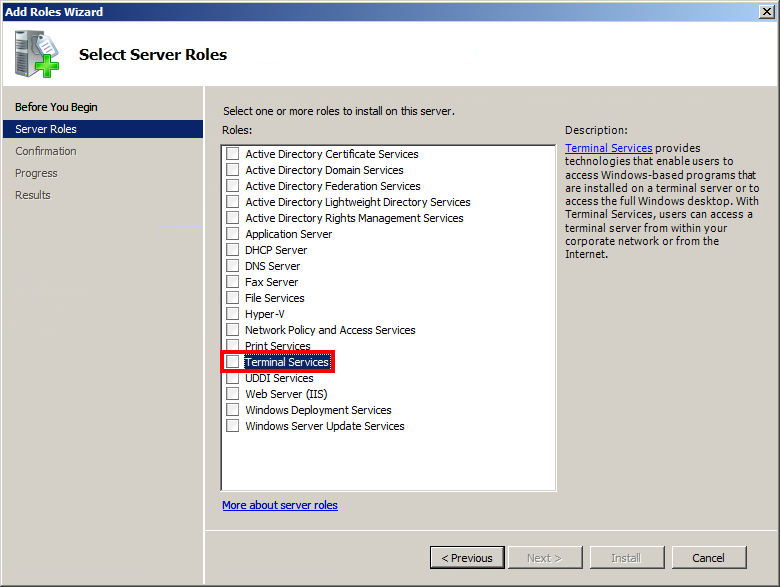
Then click Next twice to advance to the Role Services screen.
-
On the Role Services screen, select Terminal Server.
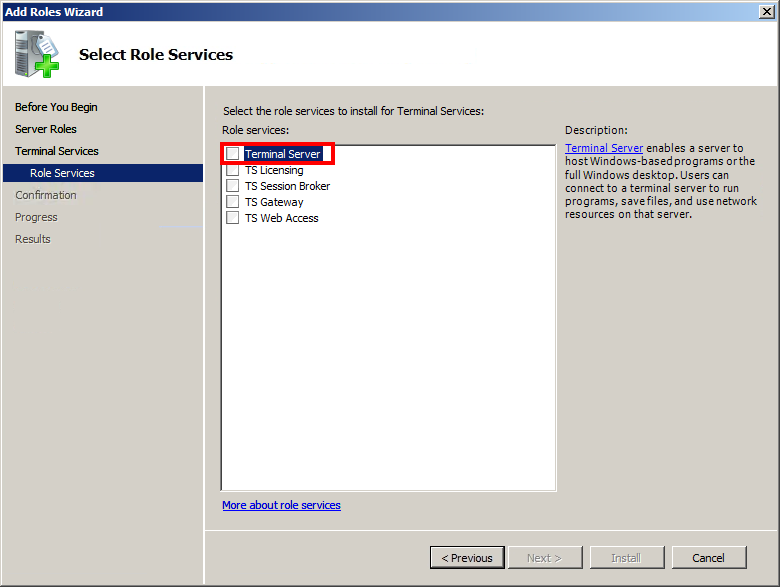
Then click Next twice to advance to the Authentication Method screen.
-
Select Do not require Network Level Authentication.
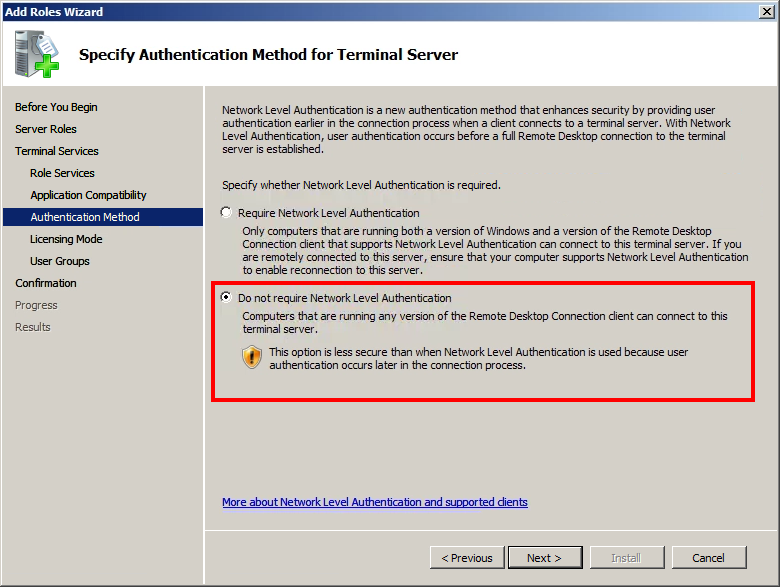
Then click Next three times to advance to the Confirmation screen.
- Review the information in the Confirmation screen, and then click Install.
- Restart the VM. The Configuration completes the installation process.
To add the Desktop Experience feature
- Open Server Manager. To open Server Manager, click Start > Administrative Tools > Server Manager.
- In Customize This Server, click Add Features. The Add Features Wizard displays.
-
Select Desktop Experience.
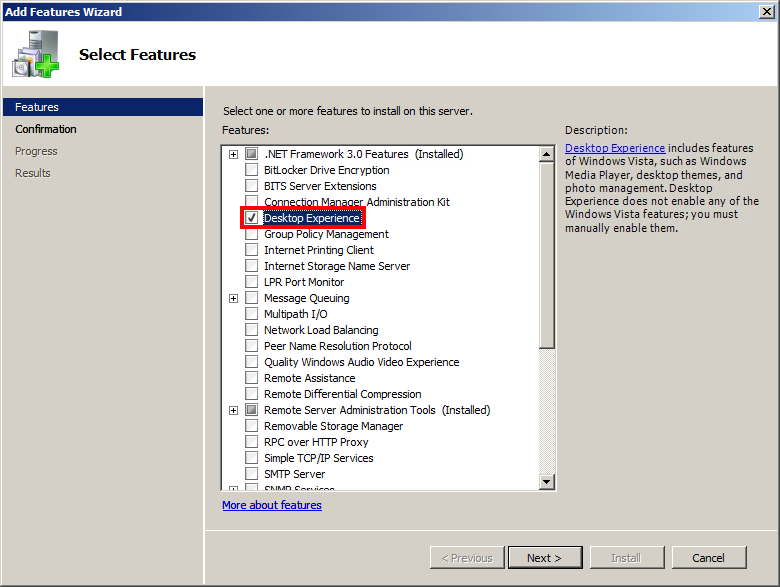
Then click Next.
- Review the information in the Confirmation screen, and then click Install.
- Restart the VM.
Enabling audio
- Click Start > Run, type
gpedit.msc, and then click OK. The Local Group Policy Editor displays. -
Expand Local Computer Policy/Computer Configuration/Administrative Templates/Windows Components/Terminal Services/Terminal Server.
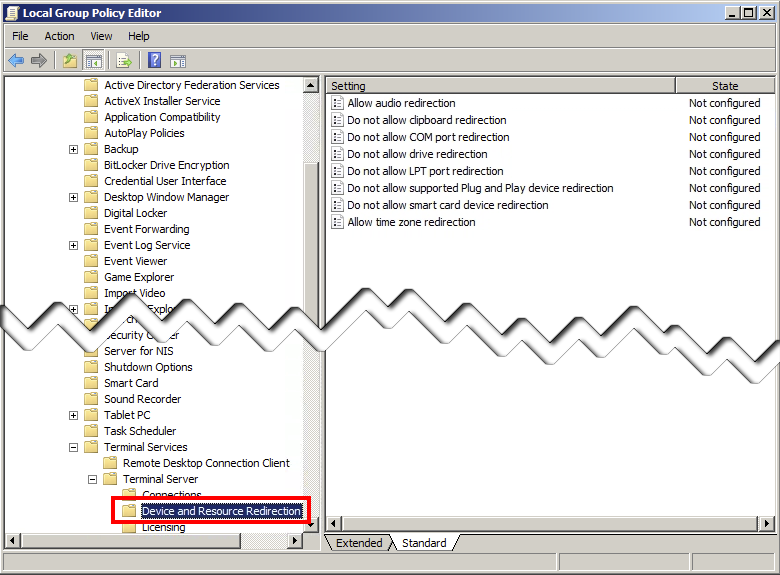
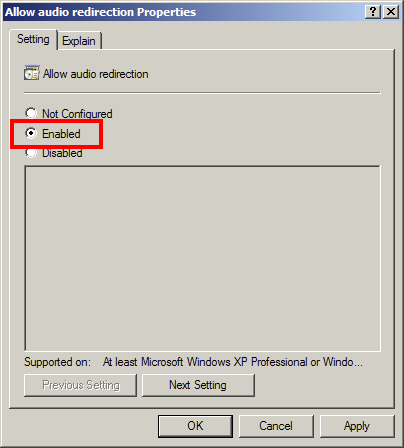
- In Device and Resource Redirection, double-click Allow audio redirection. The Allow audio redirection Properties dialog displays.
-
Click Enabled, and then click OK.
- Restart the VM.
Configuring the Windows Audio service
-
Click Start > Administrative Tools > Services. The Services console displays.
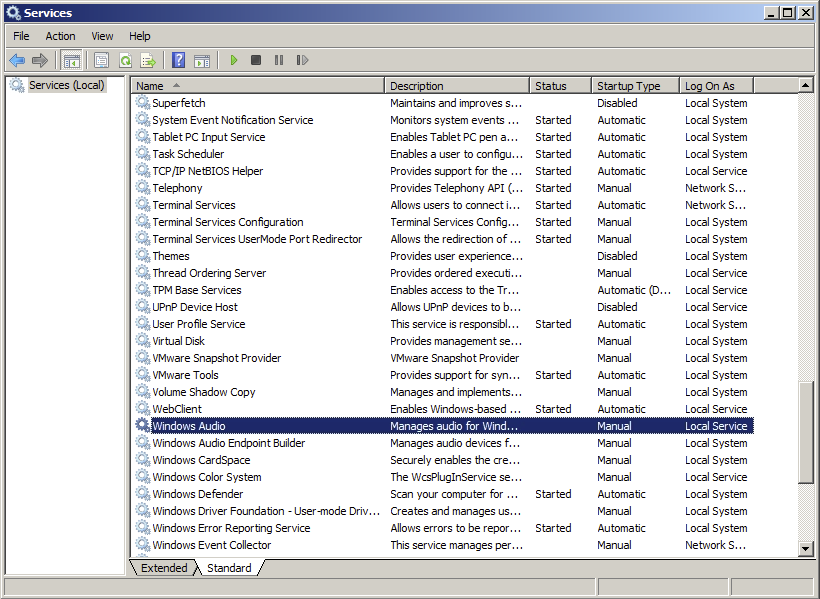
- Double-click Windows Audio. The Windows Audio Properties dialog displays.
- Make sure Startup type is set to Automatic.
- Click the Recovery tab.
-
For all three failure drop-down menus (First failure, Second failure, and Subsequent failures), select Restart the Service.
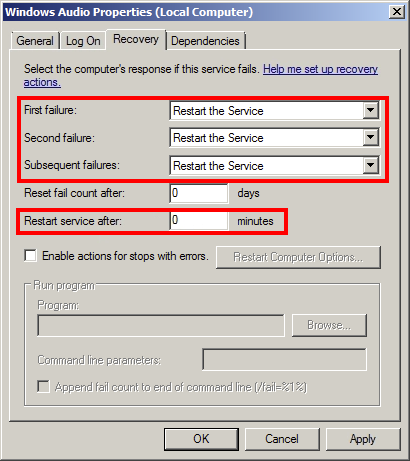
- For the Restart service after field, type
0. - Click OK, and then close the Services console.
Disabling Network Level Authentication for RDP
- Click Start > Run, type
sysdm.cpl, and then press Enter. The System Properties dialog displays. - Click the Remote tab.
-
Under Remote Desktop, click Allow connections from computers running any version of Remote Desktop (less secure).
- Click OK.
Step 3: Verify audio in and out
Follow the steps in the Using audio for the first time article to connect to the VM and verify that audio input and output are working.
For troubleshooting help, see Troubleshooting VM audio.
Step 4: Save as a template
So that you don’t have to complete all of the steps above for each VM you deploy, save the environment as a template and deploy new environments with audio-enabled VMs as needed.
To save the environment as a template, see Saving an environment as a template.