Importing Power LPARs
Kyndryl Cloud Uplift provides tools to help you export your on-premises Power A CPU architecture that supports IBM i, AIX, and Linux (on Power) in Kyndryl Cloud Uplift. LPARs to disk images that you can then import into Kyndryl Cloud Uplift environments. The toolset consists of a pair of scripts that you copy to an empty hard disk on the same LPAR that you want to import into Kyndryl Cloud Uplift. The scripts make disk images of the hard disks that you specify and then create an OVF file that contains an index of all the hard disk images. Then you use the Kyndryl Cloud Uplift VM Import tool to create a VM from the OVF file and disk images.
Notes
- Power VMs must enabled for your account to import Power LPARs.
- In most cases, we recommend Importing VMs using the VM Imports page, which can import VMs from Microsoft Azure Blob Storage, IBM Cloud Object Storage, or via FTP.
- Other options include Importing VMs or LPARs using IBM Cloud Object Storage and Importing IBM i workloads into Kyndryl Cloud Uplift using direct transfer.
- For instructions about exporting your IBM i LPAR and importing it to Kyndryl Cloud Uplift, see Importing IBM i workloads into Kyndryl Cloud Uplift using NIS, Importing IBM i workloads into Kyndryl Cloud Uplift using IBM Cloud Storage Solutions for i (ICC), or Importing IBM i workloads into Kyndryl Cloud Uplift using direct transfer.
Contents
Requirements
Things to consider when you export a Power LPAR:
- Kyndryl Cloud Uplift supports IBM i, AIX, and several Linux distributions on Power. For a complete list, see Supported operating systems for Kyndryl Cloud Uplift VMs.
- The combined file size of the LPAR hard disk image files must be less than 4 TB.
- The export process creates full-sized disk image files(.img) for all of the hard disks that you specify. Because Kyndryl Cloud Uplift import for AIX VMs doesn’t support compressed files, each .img file is the full allocated size of the source hard disk—including empty space.
- Though all of the hard disks that you specify will be imported, the order of the disks can vary.
-
Workloads on the LPAR should be at minimal activity. See Quiescing VM activity.
Recommended for AIX: Deactivate the volume groups to be exported, using the
varyoffvgcommand. For details, see the varyoffvg Command reference help. -
The disk image files are created on a hard disk that you specify. Make sure you have enough space to store all of the disk image files that the Kyndryl Cloud Uplift tool creates.
The amount of free space on the destination disk must be larger than the combined sizes of all of the disks that you will export.
Step 1: Export the LPAR
-
On the LPAR you intend to export, make sure that
/etc/security/limitscontains the following settings:default: fsize = -1 root: data = -1 fsize = -1 - Prepare rootvg for export using
alt_disk_copy. For details, see the alt_disk_copy Command reference help. - Download the Kyndryl Cloud Uplift aix-export tool from GitHub: https://github.com/skytap/aix-export.
- On the LPAR you want to import to Kyndryl Cloud Uplift, copy the scripts to the target disk where the disk images will be saved. Make sure the target disk has enough space to accommodate all of the hard disks that you plan to export.
-
Create the export package with the following command:
/export_lpar.ksh hdisk1 [hdisk2] … [hdiskn]
If there are multiple hard disks, be sure to specify the bootable hard disk first. In the example above,
hdisk1is the bootable disk.Don’t include the hard disk where the export scripts are running. For example, if you copied the scripts to
hdisk4, don’t includehdisk4in theexport_lpar.kshcommand line.- Disk image (.img) files are created for all of the hard disks that you specified in the command, in the same directory where you ran
export_lpar.ksh. - Then,
export_lpar.kshautomatically creates<hostname>.ovf, which contains an index of the .img files that were exported byexport_lpar.ksh. -
Optional: To reduce SFTP file transfer times when you import the LPAR into Kyndryl Cloud Uplift, you can combine
<hostname>.ovfand its indexed .img files into a single, compressed .ova file with the following command:tar -cvf - <hostname>.ovf <hostname>-disk1.img [<hostname>-disk2.img] … [<hostname>-diskn.img] | gzip > <hostname>.ova
The combined, uncompressed file size of the LPAR hard disk image files must be less than 4 TB. If the collection of files to be imported exceeds 4 TB, contact Kyndryl Cloud Uplift Support at support@skytap.com to enable import of larger LPAR file sets.
- Disk image (.img) files are created for all of the hard disks that you specified in the command, in the same directory where you ran
Step 2: Create Import job
Create single import job for each LPAR that you want to upload. The import job will specify the .ovf and associated .img files or a single .ova (if you combined the files using tar).
To create an import job
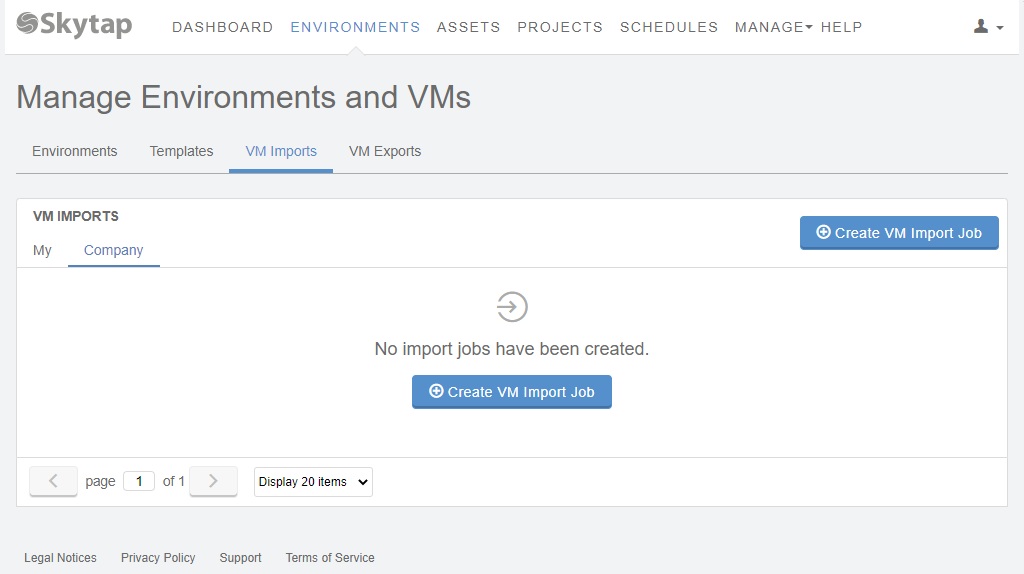
- From the Navigation bar in Kyndryl Cloud Uplift, click Environments.
-
Click the VM Imports tab.
The VM Imports tab notifies you if you don’t have permission to import VMs. If needed, work with your account administrator to gain access.
- Click
 (Create VM Import Job).
 -
Provide details about the import, including:
- The Environment name (maximum 255 characters).
- The Data source for the VMs. Choose FTP server.
- The Destination region where the environment will be added.
-
Optional: An MD5 Hash Value. For more information, see Creating MD5 hash values for VM imports.
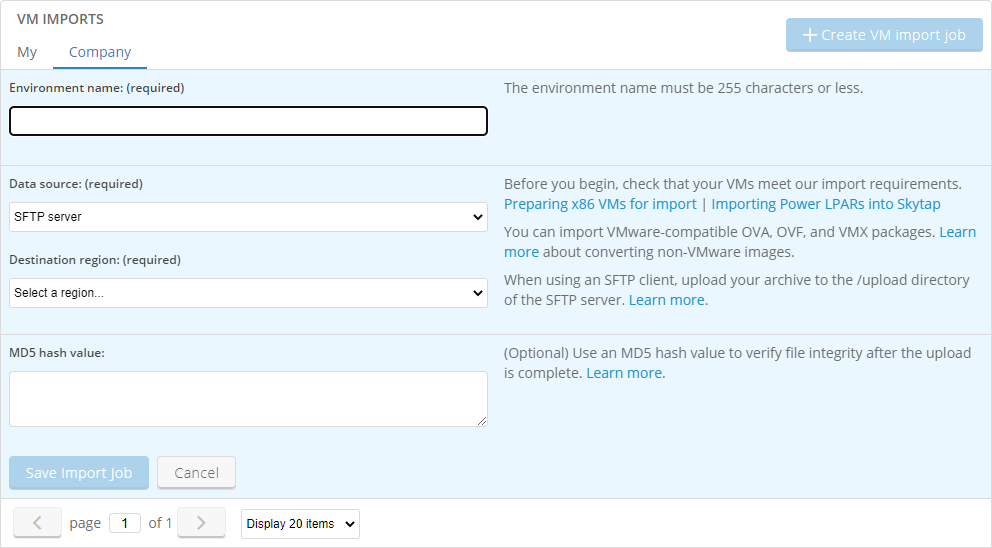
- Click Save Import Job.
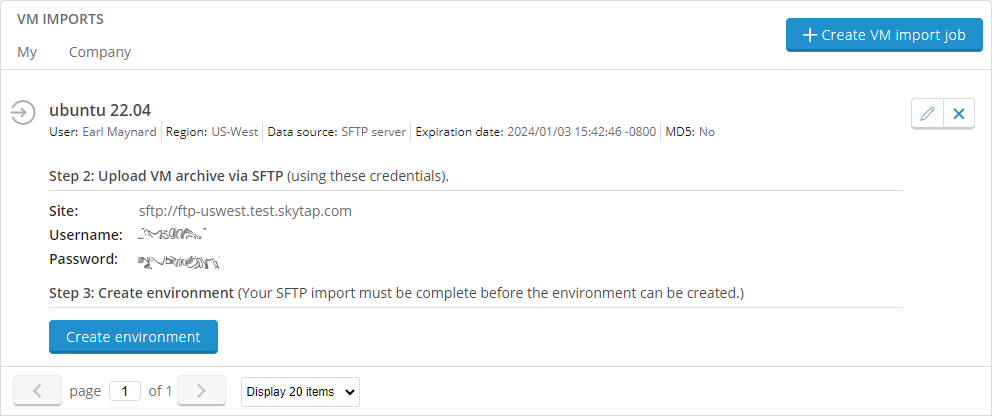
Step 3: Upload VM files to the Kyndryl Cloud Uplift FTP server
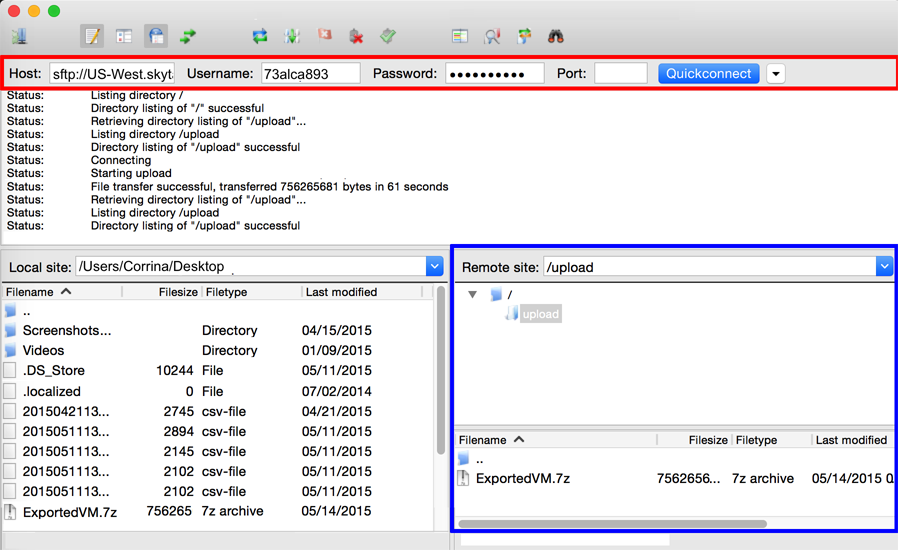
-
Upload your VM files to the Kyndryl Cloud Uplift FTP server
Use an SFTP client that supports automatically resuming uploads, such as WinSCP or Transmit to upload your VM files. Kyndryl Cloud Uplift provides you with the hostname, and temporary FTP account credentials for a Kyndryl Cloud Uplift SFTP site.
Upload import files to the upload directory.
-
Optional: Include an MD5 Hash Value. For more information, see Creating MD5 hash values for VM imports.
Important
- If you have a choice for transfer method, choose binary transfer.
- Don't put compressed files in nested directories inside the /upload directory.
- The temporary FTP account expires after 10 days.
- You must use SFTP – Kyndryl Cloud Uplift doesn't support unsecured FTP connections.
Step 4: Start the import process
When the SFTP upload is complete, click Create environment on the Kyndryl Cloud Uplift Import page. Kyndryl Cloud Uplift imports the VM file and create your new environment.
Kyndryl Cloud Uplift notifies you via email when the import completes. If the import is successful, Kyndryl Cloud Uplift provides a link to the new environment; if the import fails, Kyndryl Cloud Uplift provides an error message (see Resolving import errors).