Connecting multiple environments
Inter-Configuration Network Routing (ICNR) lets you connect multiple environments together. VMs in one environment can communicate with VMs in another environment, or VMs in multiple environments can communicate with shared services in dedicated environments.
Notes
- It's possible to create up to 100 ICNR connections for an environment but multiple active connections can significantly slow power-state changes for the connected environments.
- Environments must be in the same region to connect using ICNR.
Contents
ICNR overview
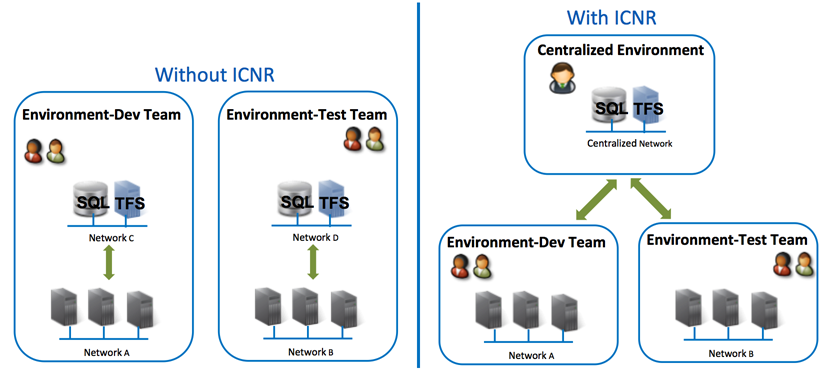
By default, each environment is isolated from other environments in your account. ICNR connects the networks in multiple Kyndryl Cloud Uplift environments, which allows VMs on those networks to communicate with one another. It can also be used to split large environments up into smaller environments so that you can restrict access to sets of servers.
When you set up ICNR, be sure to avoid IP overlap between networks. Either enable Network Address Translation (NAT) on the Kyndryl Cloud Uplift networks or manually design environment networks to avoid overlaps (see Avoiding overlapping IP address spaces).
The figure below shows the conceptual view of the environments with and without ICNR.
Enabling ICNR
Step 1: Create a visible network in the environment with your centralized servers
By default, a network in an environment isn’t visible to networks outside of the environment.
To make a network visible to other networks
-
Navigate to the Network Settings tab of the Settings page. The Network Settings page displays.
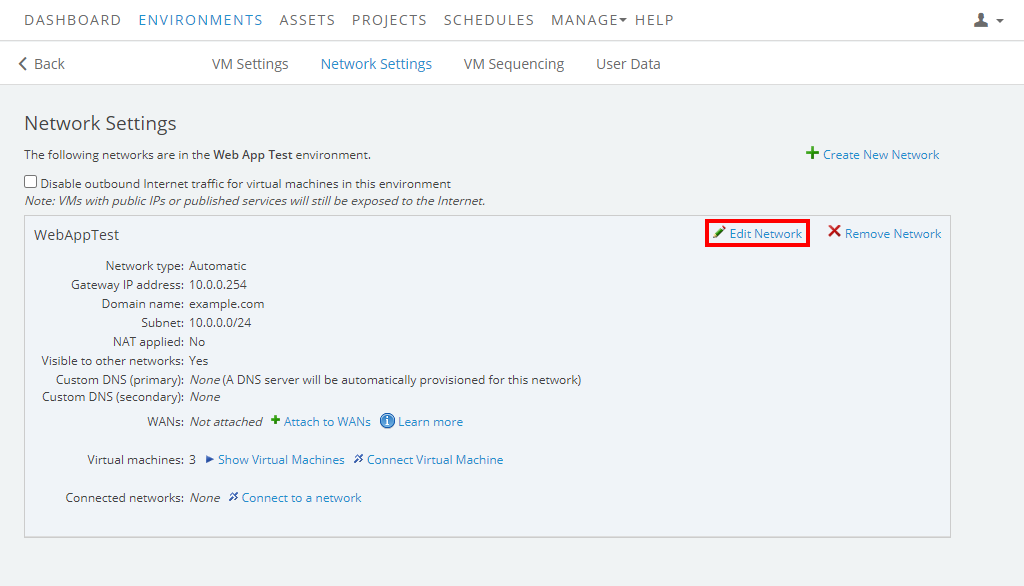
- Click the Edit Network button next to the network. The Edit network window displays.
-
Check the Visible to other networks checkbox.
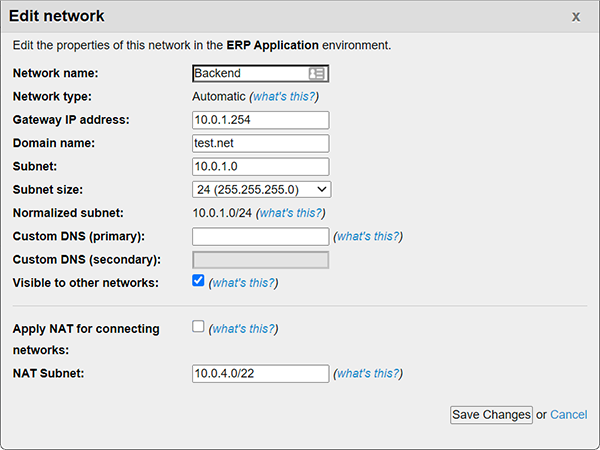
- While you’re editing the network, you may also want to enable Network Address Translation (NAT), detailed in the next step. Otherwise, click Save Changes.
Step 2: Enable Network Address Translation (optional)
Network Address Translation (NAT) is a process that maps each internal Kyndryl Cloud Uplift network address (such as 192.168.1.1) in a network to an external network address (such as 172.16.25.12). Other networks detect and send data to the external network addresses. Enabling NAT means that you don’t have to manually change the subnets of connecting networks to avoid overlaps. For more information, see Using Network Address Translation (NAT) to avoid IP address conflicts.
NAT can only be enabled for automatic networks that have been made visible to other networks (as in Step 1, above).
To enable NAT
-
In the Edit network window, click the checkbox labeled Apply NAT for connecting networks.
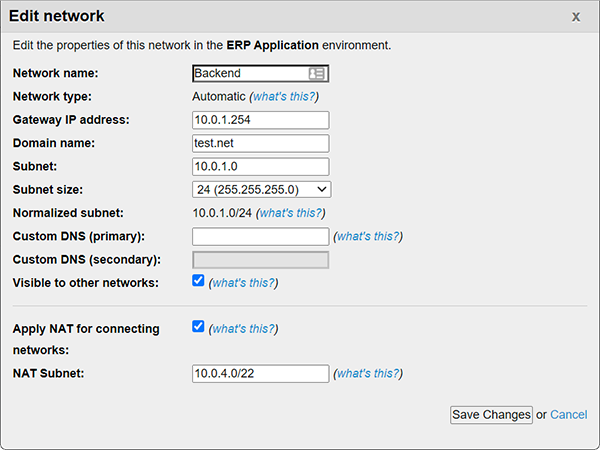
- The NAT Subnet field is automatically filled with a subnet that has no overlaps with any other networks that you have access to. When you use ICNR, this prevents overlap between connected networks, as even networks with identical IP addresses are assigned separate, unique addresses. You can manually enter a NAT subnet of your choosing.
- Click Save Changes.
Step 3: Connect the networks in other environments to the visible network
To connect a network to visible network in another environment
- Navigate to the Network Settings page of the environment you want to connect to the centralized servers.
-
Click on the Connect to a network link for the network you want to connect (Network 1 in the example below).
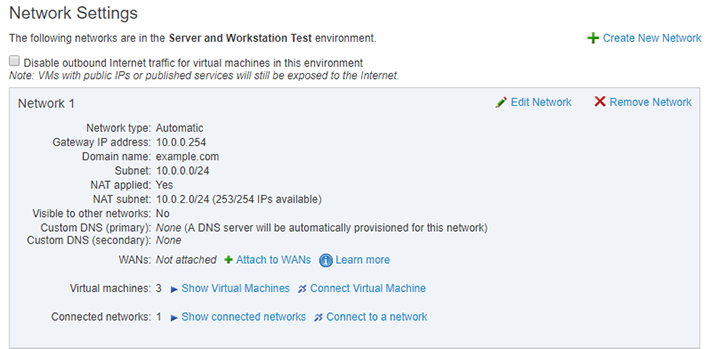
-
A dialog box displays that contains all visible networks in the same region. In this example, it’s the network in the centralized environment:
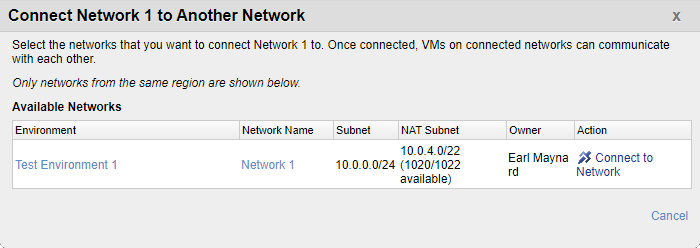
- Click the Connect to Network button. The networks are connected to each other and able to exchange data.
-
Repeat this process for each additional environment you want to connect using ICNR.
Networks in an environment are automatically connected to each other. You don’t need to do anything to connect networks in the same environment. You can control whether traffic flows through a connection between networks in the same environment with the Allow all traffic between networks in this environment setting. For more information, see Routing between networks in the same environment.
Viewing network connections
To help you keep track of your network connections, you can see a list of all the networks a network is connected to.
To view a list of network connections
- Navigate to the Network Settings page.
-
Click on the Show connected networks link to display all of the networks that connect to this network.
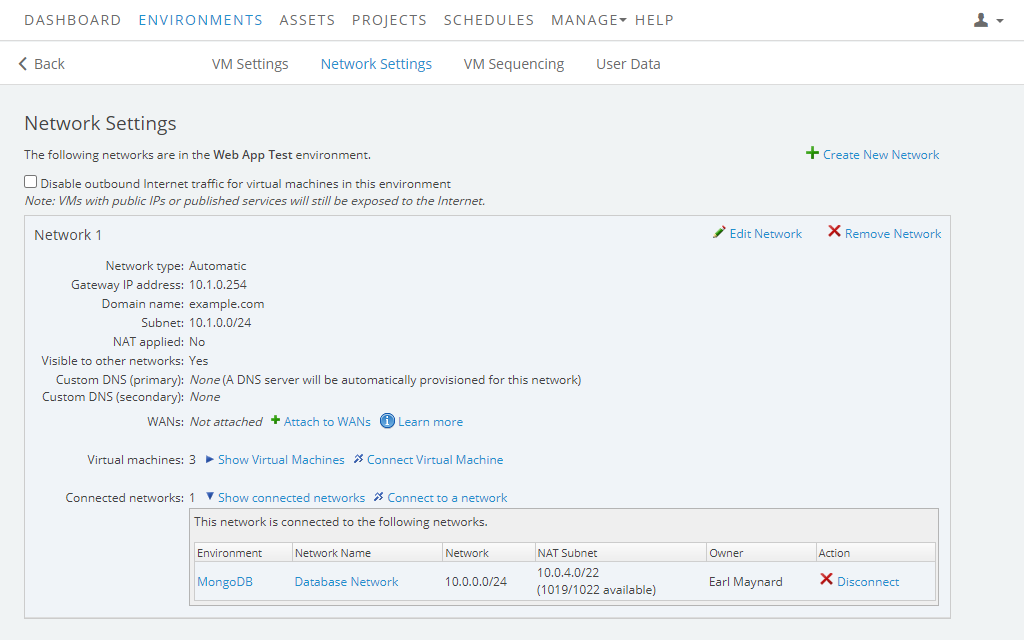
Deleting a network connection
To delete a connection between a network in your environment and another network
- Navigate to the Network Settings page in your environment.
-
Click on the Show connected networks link for the network want to change.

- Click
 Disconnect next to the network connection you want to remove.
Avoiding overlapping IP address spaces
Enable NAT to prevent IP address space overlap. The information below applies only if you’re not using NAT on your linked environments.
A connection between networks doesn’t work if their IP address spaces overlap. Overlapping IP address spaces may prevent traffic from being routed to the correct network. In this case, Kyndryl Cloud Uplift prevents you from creating the connection.
There are two ways IP address spaces can overlap:
- The address spaces are identical. For instance, the IP address
10.0.0.0with subnet size of16(written in CIDR Classless Inter-Domain Routing – a compact representation of an IP address and its associated routing prefix. notation as10.0.0.0/16) can’t be connected to another network with the IP address of10.0.0.0and a subnet mask of16. - One of the network address spaces is fully contained within the address space of another network. For instance, the address space
10.0.0.0/24is fully contained within10.0.0.0/16(the/24subnet represents a portion of the address space available in the/16subnet).
Kyndryl Cloud Uplift checks for overlap whenever you edit a network, create a new network, or create a connection between networks using ICNR. When you connect networks from different environments together, Kyndryl Cloud Uplift checks that none of the networks connected to either environment have IP address overlaps. This means that additional networks connected to one of the two connecting networks can cause the connection to fail if its IP address overlaps. If Kyndryl Cloud Uplift detects an overlap, it displays an error message. Examples of the most likely errors, and recommended steps to fix them, are described below.
Network connection error types
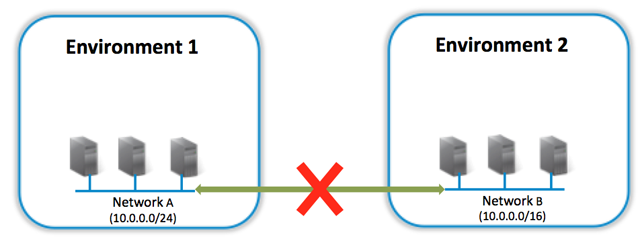
Error type 1: Direct overlap
Network A (10.0.0.0/24) has overlapping address space with Network B (10.0.0.0/16).
Possible resolution
Change the IP address space of Network A or Network B (for example, to 9.0.0.0).
Error type 2: Indirect overlap with a network in the same environment
Network A (10.0.0.0/24) has overlapping address space with Network C (10.0.0.0/16), which is in the same environment as Network B. Networks in the same environment are automatically connected to each other.
Possible resolution
Change the IP address space of Network A or Network C
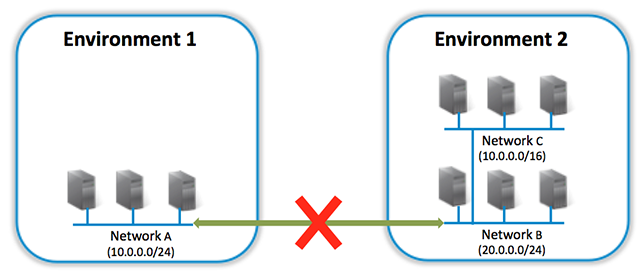
Error type 3: Indirect overlap with a network in another environment
Network A (10.0.0.0/24) has overlapping address space with Network C (10.0.0.0/16), which is in a third environment that is already connected to Network B.
Possible resolution
- Change the IP address space of Network A or Network C
- Disconnect Network C from Network B

Error type 4: Editing a network
Networks within an environment are already connected to each other. While editing a network you can encounter errors if you choose an IP address space that overlaps with that of another network in the same environment; a network in another environment that is connected to the network you’re editing; or a network in another environment that is connected to another network in the this environment
Possible resolution
Choose a different, non-overlapping, IP address space for the network you’re editing.
Error type 5: Overlap with network across a VPN connection
This error condition occurs when trying to connect networks that are connected to other networks over a VPN connection. The figure below illustrates the error condition.
Network B is connected to the corporate network over the VPN connection. Remote network, Network C has the address space 10.0.0.0/16. When you try to connect Network A to Network B in Kyndryl Cloud Uplift, Network A overlaps with Network C.
Possible resolution
Change the subnet of Network A and attempt the connection again

