Importing IBM i workloads using direct transfer
We recommend using IBM Cloud Object Storage to import large VMs. For details, see Importing VMs or LPARs using IBM Cloud Object Storage.
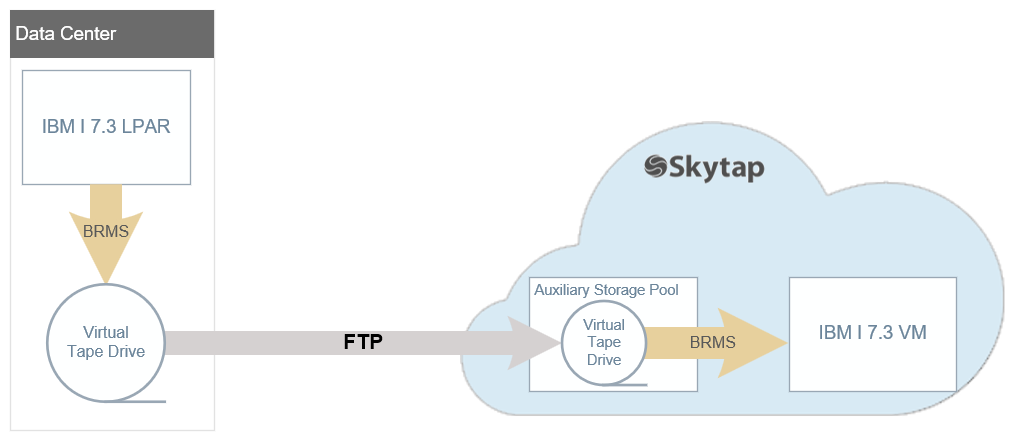
You can also use IBM Backup, Recovery and Media Services (BRMS) to migrate the workload (user data) of an on-premises LPAR to Kyndryl Cloud Uplift.
Power A CPU architecture that supports IBM i, AIX, and Linux (on Power) in Kyndryl Cloud Uplift. VMs must enabled for your account to import IBM i LPARs.
Contents
Requirements
Things to consider when you export an IBM i LPAR:
- Currently, the following are the versions of IBM i that Kyndryl Cloud Uplift supports:
- IBM i 7.2
- IBM i 7.3
- IBM i 7.4
Step 1: Create an IBM i VM in Kyndryl Cloud Uplift
Before you begin, create an environment in Kyndryl Cloud Uplift.
- Make sure the VM has the same OS version as the LPAR you’re backing up.
- Make sure the storage for the VM is large enough to hold the restored data.
-
Make sure the template has a large enough auxiliary storage pool (ASP) to hold the backup files.
For more information about auxiliary storage pools, see Working with auxiliary storage pools
-
Configure a published service for SFTP (For more information about published services, see Accessing VMs with published services).
Because a published service exposes a port to the public internet, we strongly recommend that you review Exposing and blocking public Internet access to VMs and Protecting a VM that is exposed to the internet or compromised.
-
(Optional) If you prefer, you can configure the VM to use a VPN connection on a Public IP address.
Step 2: Export the workload to virtual tape
Follow the instructions in Backup, Recovery, and Media Services (BRMS), Backing up your entire system to back up your system to virtual tape.
Step 3: Transfer the workload to Kyndryl Cloud Uplift
Using the FTP server on the Kyndryl Cloud Uplift IBM i VM that you created in Step 1 (see Configuring the File Transfer Protocol server), transfer the virtual tape backup to the Kyndryl Cloud Uplift IBM i VM.
Step 4: Restore the workload to the Kyndryl Cloud Uplift IBM i VM
For an overview of the restore process, see Restore the user data and related system data to the target system.
Restore the workload to the Kyndryl Cloud Uplift IBM i VM with the following steps:
Configure the workload backup
-
Create the image catalog:
CRTIMGCLG IMGCLG(‘VTAPOL01’) DIR(‘/myfs/backup/images’) CRTDIR(*NO) IMPORT(*YES) TYPE(*TAP)
-
Load image catalog entries:
- Load each image file as an entry one by one.
-
Load the image catalog:
LODIMGCLG IMGCLG(‘VTAPOL01’) DEV(TAPV01)
Restore the workload backup to the Kyndryl Cloud Uplift IBM i VM
-
Restore user profile data:
ENDSBS (*IMMED)
RSTUSRPRF USRPRF(*ALL) DEV(TAPV01)
WRKUSRPRF USRPRF(QSECOFR)
-
Restore libraries and objects:
RSTLIB SAVLIB(*IBM) DEV(TAPV01) ENDOPT(*LEAVE) MBROPT(*ALL) ALWOBJDIF(*ALL)
RSTLIB LIB(*ALLUSR) DEV(TAPV01) ENDOPT(*LEAVE) ALWOBJDIF(*COMPATIBLE) FRCOBCVN(*NO)
RSTDLO DLO(*ALL) SAVFLR(*ANY) DEV(TAPV01) ENDOPT(*LEAVE)
RST DEV(‘/QSYS.LIB/TAPVO1.DEVD) OBJ((‘/*’) (‘/QSYS.LIB’ *OMIT) (‘/QDLS’ *OMIT)) ENDOPT(*REWIND) ALWOBJDIF(*ALL) OPTION(*NEW)
-
Restore private authorities to user profiles:
RSTAUT
After the LPAR is restored to the Kyndryl Cloud Uplift VM
-
You may need to re-IPL (reboot) the Kyndryl Cloud Uplift VM a few times to make sure everything works correctly:
PWRDWNSYS *IMMED RESTART(*YES)
-
You may also need to re-balance auxiliary storage pools:
STRASPBAL ASP(1) TIMLMT(*NOMAX) TYPE(*CAPACITY)