- Overview of Kyndryl Cloud Uplift
- Access requirements
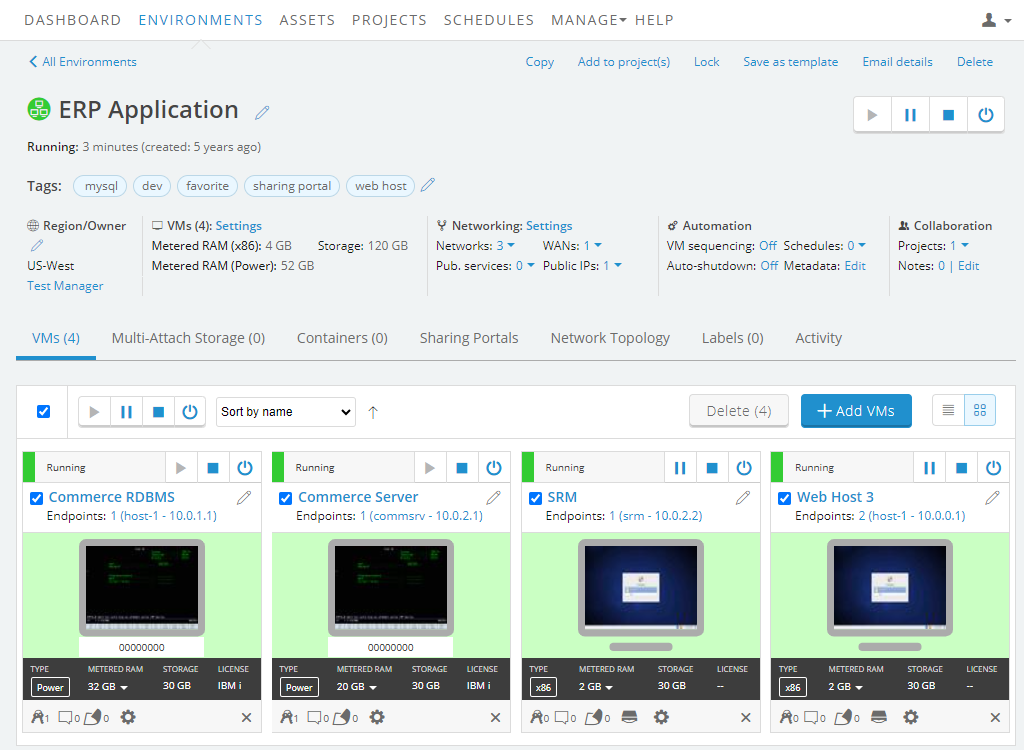
- Creating environments
- Importing VMs
- Preparing Power LPARs for import
- Preparing x86 VMs and vApps for import
- Importing VMs using the VM Imports page
- Importing Power LPARs
- Importing IBM i workloads using NIS
- Importing IBM i workloads using IBM Cloud Storage Solutions for i (ICC)
- Importing IBM i workloads using direct transfer
- Creating an AIX VM from a mksysb image
- Creating a mksysb from an AIX VM in Kyndryl Cloud Uplift
- Downloading and importing IBM-hosted AIX VMs
- Additional ways to import Power LPARs
- Testing imported VMs
- Resolving import errors
- Running and stopping VMs
- Accessing VMs
- Accessing VM desktops from a browser
- Testing access requirements with Connectivity Checker
- Using audio with a VM
- Using an SSH connection in a browser client session
- Copy and paste text between the local machine and a VM
- Insert text into a Power VM
- Keyboard shortcuts for browser client views
- Improving browser client performance
- Optional URL parameters for sharing an SRA browser client view
- Accessing VMs with RDP
- Accessing VM desktops from a browser
- Transferring files to a VM
- Editing environments and environment networks
- Editing VMs
- Hardware settings for IBM i VMs
- Hardware settings for AIX and Linux on Power VMs
- Hardware settings for x86 VMs
- Editing vCPUs and RAM for x86 VMs
- Enabling nested virtualization
- Upgrading VM hardware versions
- Using an international keyboard layout with a VM
- Editing VM BIOS clock sync settings
- Enabling audio for a VM
- Adding or extending a virtual disk
- Deleting a virtual disk
- Enabling SSH on a VM for use in SRA browser client sessions
- VM network settings
- Storing VM credentials
- Licensing the guest OS
- Installing and upgrading VMware Tools - Linux
- Installing and upgrading VMware Tools - Windows
- Improving operating system or application performance within the VM
- Adding containers and container hosts
- Managing networks
- Network overview
- Viewing the network topology for an environment
- Using multiple networks in an environment
- Networking between environments
- Editing an automatic network
- Connecting an environment network to a VPN or Private Network Connection
- Manually configuring domain name servers
- Exposing and blocking public Internet access to VMs
- Accessing VMs with published services
- Using public IP addresses
- Attaching a static public IP address to a VM
- Adding a managed DNS name and public IP address to a VM
- Editing a managed VM DNS name
- How does Kyndryl Cloud Uplift generate the VM DNS name?
- Detaching a static public IP address or DNS name from a VM
- What is the difference between static public IP addresses and dynamic public IP addresses with DNS?
- Troubleshooting issues connecting to a public IP address or managed DNS name
- Issue - I can’t access the public Internet from my VM.
- Deleting a network
- Moving a VM to a different environment
- Deleting VMs
- Sharing VMs and environments with sharing portals
- Sharing resources with projects
- Adding a shared template to your account
- Saving an environment as a template
- Understanding regions
- Managing your account settings
- Viewing your current usage and usage limits
- Best practices
- Automating VMs and environments
- CI/CD reference architectures
- IBM i Data Protection and Resiliency Solutions
- Creating recovery copies of VMs and environments
- Disaster recovery reference architectures
- Monitoring your usage with email notifications
- Organizing resources with labels and tags
- Security best practices
- Using Kyndryl Cloud Uplift for demos
- Using Kyndryl Cloud Uplift for training classes
- Knowledge base
- Security improvements: Deprecation and end of life (EOL) notices
- How to add notes to VMs, environments, templates, and assets
- How to change the name of a VM
- How to change the name or description of an environment
- How to check VM hardware version
- How to connect to a VM from an iPad or iPhone
- How to connect to Kyndryl Cloud Uplift using a private WAN connection
- How to delete environments
- How to export a list of environments, templates, or assets
- How to export VMs
- How to find the ID for a VM, VPN, environment, or template
- How to find the Instance URL for a Kyndryl Cloud Uplift on Azure account
- How to find the IP addresses for a VM
- How to find the network gateway IP address
- How to find your user name and API security token
- How to generate an API security token for your account
- Guide to the Dashboard
- Protecting a VM that is exposed to the internet or compromised
- Time zones and UTC offsets
- Understanding storage
- Using search
- Using Windows in Kyndryl Cloud Uplift
- Using Power VMs in Kyndryl Cloud Uplift
- Differences between Power and x86 VMs
- IBM i FAQ
- Viewing system reference codes for an IBM i VM
- Applying PTFs to an IBM i VM in Kyndryl Cloud Uplift
- Manually refreshing IBM i licenses
- Refreshing IBM i licenses with LICKEY
- Booting an AIX VM into maintenance mode
- Configuring TCP/IP network settings for an AIX VM
- Connecting to an AIX VM with X Windows
- Importing Power VM
- Known issues for Power VMs
- Preserving AIX disk numbering with ghostdev
- Overview of Assure MIMIX™ Software
- Editing VMs outside of Kyndryl Cloud Uplift
- Troubleshooting connections to a VM from a Windows 10 computer?
- Troubleshooting
Changing a Kyndryl Cloud Uplift-managed VM DNS name
To change a Kyndryl Cloud Uplift-managed VM DNS name
-
Navigate to the VM Settings > Network Adapters page for the VM you want to edit.
Where is that?
-
Navigate to the environment.
-
Click
 (Settings) for the VM you want to edit.
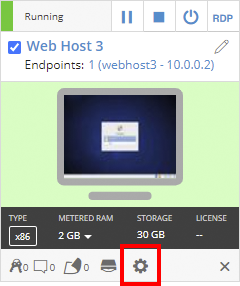
If the Settings button isn’t visible, you don’t have permission to edit the VM settings. Work with your instructor or Kyndryl Cloud Uplift administrator to edit these settings.
-
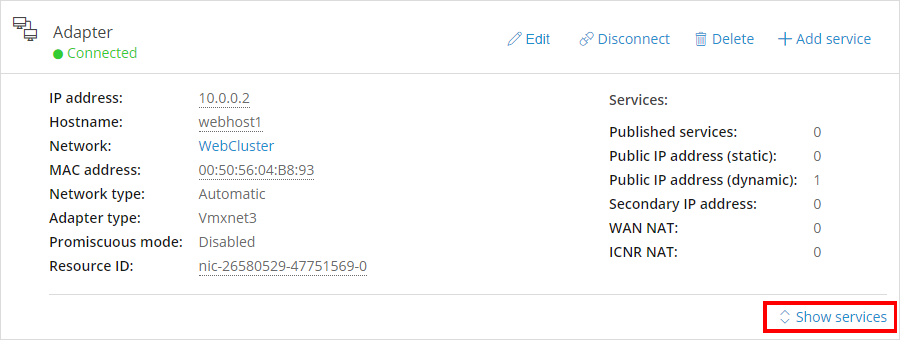
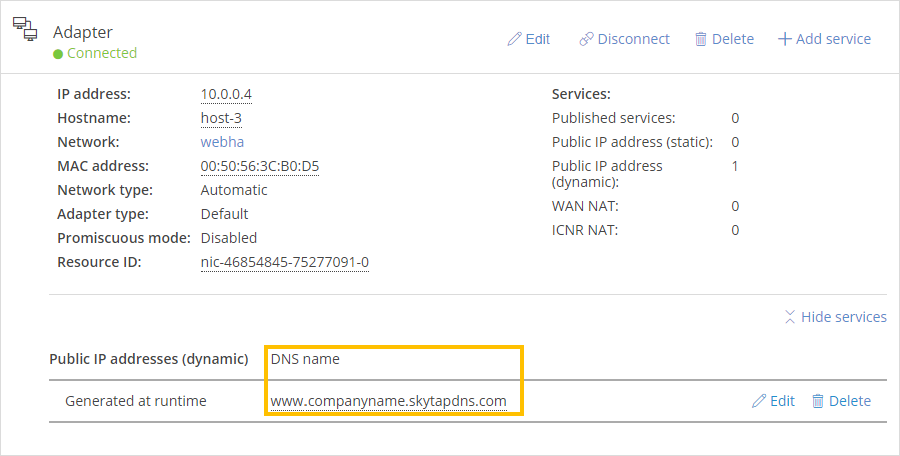
The VM Settings page displays. Click the Network Adapters tab.
-
- Click Show show services to display the DNS name for the VM.
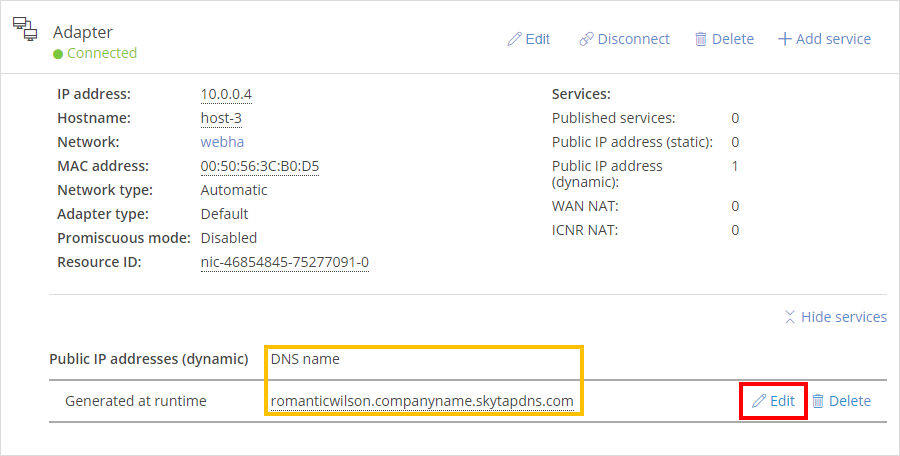
- Click
 . The services section for the network adapter expands.
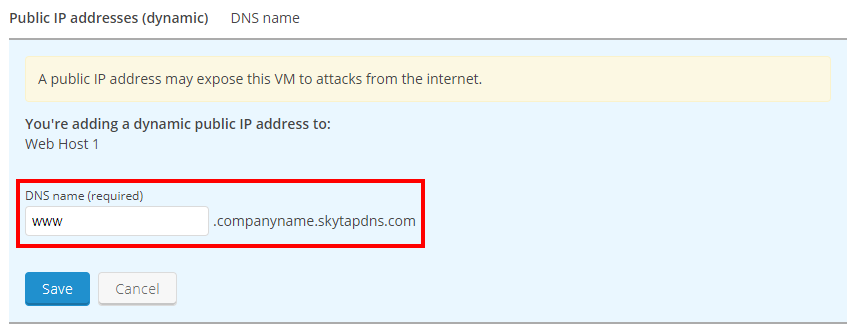
- Type a new, unique Hostname for the first segment of the fully-qualified domain name (FQDN) for the VM.
-
Click Save.
Notes
- A valid Hostname must meet these requirements:
- Can contain only lowercase letters, numbers, and hyphens.
- Must begin and end with either a letter or a number.
- Can have a maximum of 32 characters.
- What you're actually editing here is only the <uniquename> segment of the overall DNS name (the complete DNS name uses the following format: <uniquename>.<accountsubdomain>.skytapdns.com). For more information about these different sections of the DNS name, see How does Kyndryl Cloud Uplift generate the VM DNS name?
- This hostname applies to only the public-facing, Kyndryl Cloud Uplift-managed DNS name. To edit the VM hostname on the private network, see Editing a VM hostname or primary IP address.
- A valid Hostname must meet these requirements: