Adding a new schedule to an environment or template
Add new schedules to control environments and templates.
To add a new schedule
-
From the navigation bar, click Schedules, and then, in the Schedules window, click
 . The New Schedule window displays.
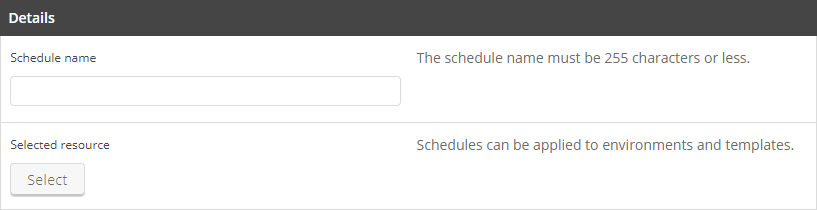
- In the Details section, type a Schedule Name to identify the schedule on the Schedules page.
- Click
 to choose an existing environment or template that the schedule will use.
- Environment – Start with an existing environment.
- Template – Create an environment from an existing template and then apply the schedule actions to that environment.
To narrow the list of results, use the filter menus or type directly into a filter box.
-
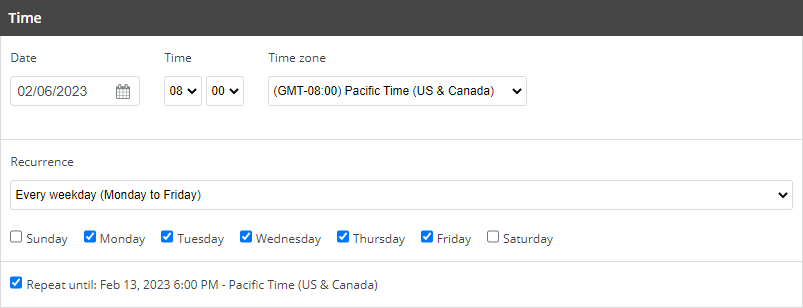
In the Time section, select the Date and Time when the schedule will start. You can also change the Time Zone (the default is Pacific Time).
The schedule will start at the Date and Time specified for the schedule, regardless of what days are selected in Recurrence.
- Add optional settings:
- Recurrence – Choose how frequently the schedule should run.
- Does not repeat – By default, a schedule will run once and then delete itself.
- Daily – The schedule will run
- Every weekday (Monday to Friday)
- Weekly
- Custom – Choose which days of the week the schedule should run.
-
Repeat until – Check and select the date and time that the schedule will cease to run or leave unchecked to have the schedule repeat indefinitely.
A schedule that creates or deletes an environment or template won’t repeat indefinitely. including templates that create environments or that have Notification and Automatically delete the environment on… options enabled.
- Recurrence – Choose how frequently the schedule should run.
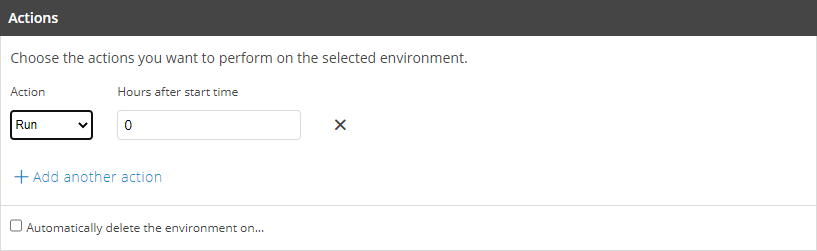
- Choose an Action and (optionally) specify the number of hours that the action should be delayed after the schedule starts (the default is 0).
- Run – Starts all of the VMs in the environment or resumes the suspended VMs in the environment. If the Selected resource for the schedule is a template, then the schedule creates an environment from that template and starts it.
-
Power Off – Immediately powers off all of the VMs in the environment.
If the schedule deletes the environment, choose the faster Power Off action, rather than Shut Down.
-
Save – Saves the environment as a template, with the title “{environment name} - created for schedule {schedule name}.”
Notes
- To Save an environment that contains running Power VMs or x86 VMs with more than 256 GB of RAM, we recommend that you include an action to Shut Down running machines before the Save action to help make sure the schedule creates a crash-consistent template.
- If you choose to Save running VMs, the source VMs will remain running.
-
Shut Down – Gracefully shuts down all of the VMs in the environment.
Notes
- The Shut down action works only for Power VMs and for x86 VMs that have VMware Tools installed.
- Shut down for Power VMs is equivalent to immediate shutdown. To prevent possible data corruption, we recommend that you shut down the VM from the guest OS.
-
Suspend – Preserves the running state of the VM by writing the contents of RAM (including running programs and active data) to the disk. When you run a suspended VM, the RAM state is restored from disk.
The Suspend action is available only for x86 VMs with 256 GM or RAM or less. For additional details about supported power states for x86 and Power VMs, see Power options.
-
To add additional actions to the schedule, click + Add another action. For example, you can set an environment to Run at the beginning of the day, and then Shut Down, Suspend, or Power Off (so that the environment doesn’t run indefinitely).
A single schedule can perform up to 20 actions.
- To delete an action, click
 .
.
- To delete an action, click
-
Automatically delete the environment on – Check and enter a date and time to automatically delete an environment.
Notes
- If you're using a template, Delete environment will delete the environment but leave the template.
- The date and time use the same time zone that you specified in the Time section above.

-
Notify user when each action is completed – Check to send email notifications about your schedule’s progress, including details of the event, whether the event succeeded or failed, and any errors that occurred.

- Click Save to save the schedule.