Adding containers to a container host
You can add containers to your container host from container registries that your administrator defines.
Even if your administrator hasn’t configured any container registries in Kyndryl Cloud Uplift, you can add containers from Docker registries using Docker commands. For more information about pulling images with Docker commands, see The Docker commands
To add a container from the Kyndryl Cloud Uplift container registry
- From the Environment Details page, click the VMs tab.
-
On the VM tile for the container host VM, click Add.
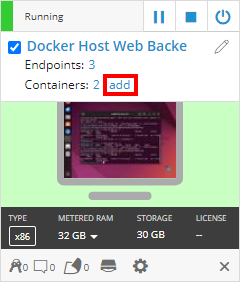
The Container options dialog on the Add container page displays.
-
Choose options for the new container.
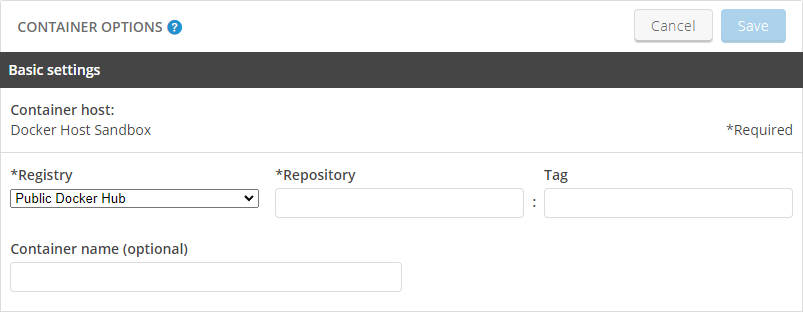
Basic settings
-
From the Registry drop-down menu, select a Registry.
Registries are configured by your administrator. If you need a registry that isn’t in this list, contact your administrator.
-
Under Repository, type the name of the Repository for the Docker image that you want to install.
A Docker repository is a set of related Docker images, such as mongodb or websphere-liberty. For more information about Docker repositories, see Repositories on Docker Hub.
- Under Tag, type the identifying tag for the image you want to install, such as webProfile8.
-
Type a friendly name for the container. If you don’t type a name, Kyndryl Cloud Uplift automatically creates a unique name for the container.
Valid container names can contain only the following characters:
a-z,A-Z,0-9, and_.-(the first character must be a letter or a number).
-
-
Optionally, you can configure additional settings:
Config settings
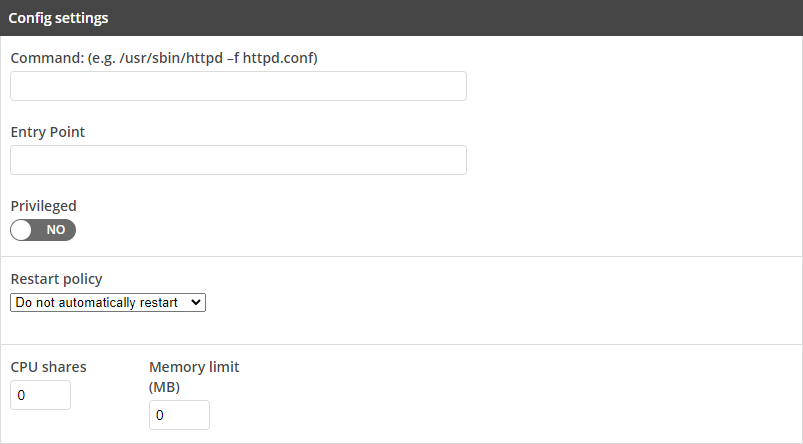
Command – Type arguments that will be fed to the Entry Point. For more information, see CMD (default command or options).
Entry Point – Enter any command that is always be executed when this container starts. For more information, see ENTRYPOINT (default command to execute at runtime).
Privileged – Turn on to run the container in privileged mode. Privileged mode lets the container do almost everything that the host can do. Use this for special cases, such as running Docker within Docker. For more information, see Runtime privilege and Linux capabilities.
Restart Policy – Choose what happens if the container stops:
- Do not automatically restart – If the container stops, it doesn’t restart.
- Restart on failure – If the container stops unexpectedly, it automatically restarts.
- Always restart – The container restarts automatically, regardless of why it stopped.
- Restart unless stopped – If the container is stopped manually or programmatically, it doesn’t restart.
For more information, see Restart policies (-restart).
CPU shares – Enter a value that sets the priority of this container relative to other containers for CPU resources. Higher values indicate higher priority. For more information, see CPU share constraint.
Memory limit – Enter the maximum amount of memory that the container can use. A value of 0 indicates that this container has no memory limit. For more information, see User memory constraints.
For more information about Docker config settings, see docker run in the Docker documentation.
Network settings
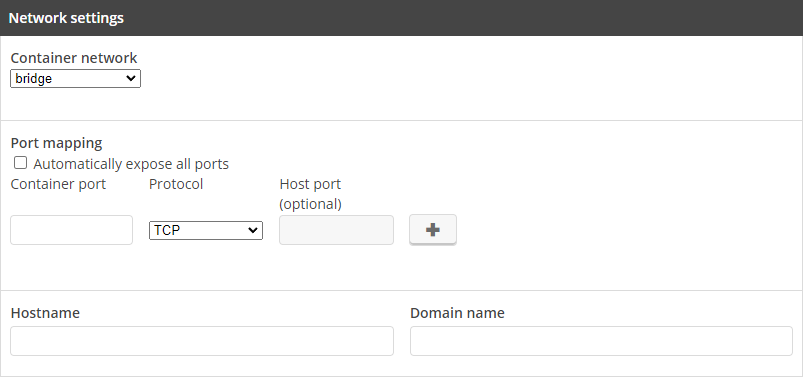
Container network – Choose which of the Docker networks the container connects to:
- host – The container uses a network configuration identical to the Docker host.
- bridge – The container uses isolated network within the Docker host. Containers that use bridge can communicate with other containers in the bridge network (default).
- none – The container has no network interface.
- (custom) – Any custom network that you’ve defined on the container host.
For more information about Docker network types, see Default Networks.
Port mapping – Use port mapping to make individual containers in a bridge network available to an outside network. For more information about Docker port mapping, see Bind container ports to the host.
If you’ve mapped one or more container ports to host ports, you can use Kyndryl Cloud Uplift published services to enable connections to the container from external networks. For more information about published services, see Accessing VMs with published services.
- Automatically expose all ports – Check this box to automatically expose all ports on the container. For more information, see EXPOSE (incoming ports).
- Container port – Specify the container port through which to route traffic.
- Protocol – Choose TCP or UDP.
- Host port (optional) – You can specify the host port that is be mapped to the container port. If you don’t specify the host port, Docker assigns an open high port from the container host.
- Click
 to add additional port mappings to this container.
 - Click
 to remove a port mapping from this container.
Hostname – Specify a hostname for this container.
Domain name – Specify the domain names that are used to resolve an unqualified hostname.
For more information about Container DNS, see Configure container DNS.
For additional information about Docker networking, see Docker container networking. For more information about Docker config settings, see docker run in the Docker documentation.
Volumes
Volumes provide data stores that can be shared by multiple containers and that persist even when all the containers connected to the volume are deleted. You can mount up to 25 volumes to a container.

Source (host path or volume name) – The path on the Docker engine host that will be mounted on the container path as a shared data volume.
- Specify a fully qualified path or a volume name to connect to an existing volume.
- If you specify a volume name but the volume doesn’t exist, Docker creates the volume in the default location.
- If you leave Source blank, Docker creates an empty volume on the container host.
Container path – The path on the container that will be mounted as a data volume. All data volumes must have a container path (required for all data volumes).
Writable – Turn on to make the volume writable from this container.
Multiple containers writing to a shared volume may cause data corruption.
Click
to add additional data volumes to this container.Click
to remove a data volume from this container.For more information about Docker volumes, see Manage data in containers
Other settings
You can add environment variables and Docker metadata labels for a container.
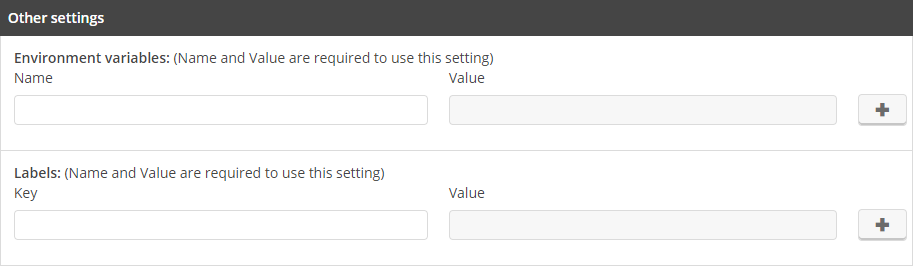
Environment variables – Add a simple environment variable for this container. For more information, see Set environment variables (-e, –env, –env-file).
Labels – Add a Docker metadata label for this container. For more information, see Set metadata on container (-l, –label, –label-file).
- Click to add additional environment variables or labels.
- Click to remove an environment variable or label from this container.
Blank entries (no name and no value) are ignored.
- Click
 (Save). The container image is pulled from the registry and installed on the container host.