Saving an environment as a template
When you save an environment as a template, you preserve a copy of the environment in a read-only state. The template can contain all, or some, of the environment VMs and networks, as well as the environment settings and the state of an environment.
The template lets you quickly recreate the environment from a known state at a later time.
For example, if you want help troubleshooting an application error, you can save an environment as a template while the application is in an error state and give a copy of the template to a developer. When an environment is created from this template, it will start to the state it was in when you saved it as a template.
Contents
How to save an environment as a template
To save an environment as a template
-
Navigate to the Environment.
Notes
- If the environment contains multiple VMs, Save as Template may generate an error. If this happens, shut down the environment and try again.
- Power A CPU architecture that supports IBM i, AIX, and Linux (on Power) in Kyndryl Cloud Uplift. VMs and x86 VMs with more than 256 GB of RAM can't be suspended. You must either shut them down before you copy the environment or choose Copy VMs while they're running.
- If you choose to copy VMs while they're running, we strongly recommend that you reduce application activity—particularly database activity—to a minimum for all running VMs before you copy the environment.
- When you choose to copy VMs while they're running, the source VMs will remain running.
-
Click Save as Template.

The New Templates page displays.
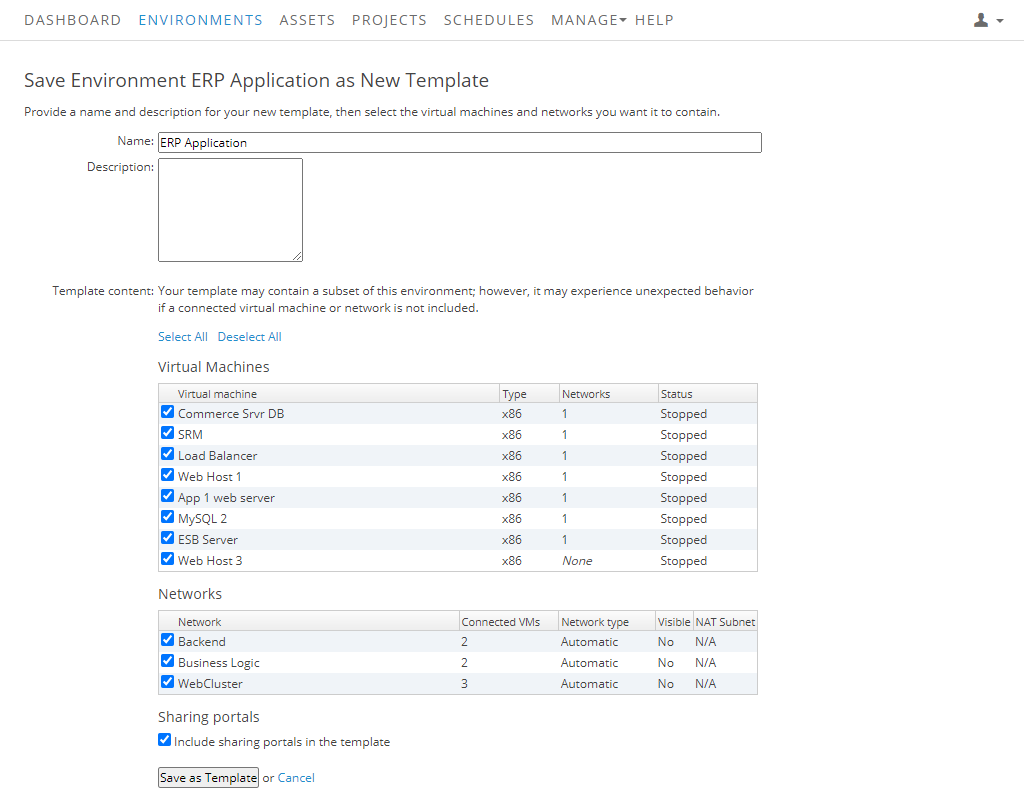
-
Either type a different name and description for the template or use the defaults.
The default description lists the disk size, architecture (32 or 64 bit), administrator password (if any), and any applications installed.
- Select the VMs to include in the environment. By default, all VMs are included.
-
Select the networks to include. By default, all networks are included.
If you select a network but not the machines connected to the network, a select all connected VMs link displays next to the network. Hover over the link to highlight the machines connected to the network. If you select a machine but not the networks that machine is on, a select all connected networks displays.
- If the environment has Multi-Attach Storage disk sets, select which disk sets to include in the template. By default, all Multi-Attach Storage disk sets are included.
- If the environment has sharing portals, select whether to include sharing portals in the template.
- Click Save as Template.
The template is stored on the templates page. You can create environments from it or share it with other users using Sharing resources with projects.
Settings saved with a template
When you save an environment as a template, most environment and VM settings are saved with the template and are restored with any environment created from the template.
VM operating system and applications
The state of each VM operating system is saved, including user accounts, application settings, data stored on the VM, etc. Suspended VMs also include the active state of any applications or services that were running when the VM was suspended.
Environment and VM settings
| Settings that are saved | Learn more about these |
|---|---|
| VM credentials | See Storing VM credentials |
| VM and environment metadata | See Accessing the VM metadata service (and metadata fields) from within the VM |
| VM and environment labels | See Adding and removing labels for VMs and other resources |
| VM and environment tags | See Adding and removing tags for environments |
| VM and environment notes | See Leaving notes on VMs, environments, templates, and assets |
| VM sequencing settings | See VM sequencing |
Network and VM network adapter settings
| Settings that are saved | Notes |
|---|---|
| Outbound public Internet access | For more information about this setting, see Exposing and blocking public Internet access to VMs |
| Static public IP addresses | When you create a new environment from the template, the VM in the new environment has the same public IP attached to it. When the same static public IP is attached to multiple VMs, only one of these VMs can run at a time. For more information about static public IP addresses, see Attaching a static public IP address to a VM. |
| Dynamic public IP addresses with Kyndryl Cloud Uplift-managed DNS names | When you create a new environment from the template, Kyndryl Cloud Uplift automatically generates a new, unique domain name for the VM in the new environment. When the VM is run, Kyndryl Cloud Uplift automatically deploys an available public IP address. For more information about this feature, see Adding a Kyndryl Cloud Uplift-managed DNS name and public IP address to a VM. |
| Published services | When you create a new environment from the template, Kyndryl Cloud Uplift creates a new published service that maps the same internal port to a new external port address. For example: Port 80 open at services-uscentral.skytap.com:12345changes to:Port 80 open at services-uscentral.skytap.com:78901For more information about published services, see Accessing VMs with published services. |
| Secondary IP addresses | If a VM uses secondary IP addresses, only the number of secondary IP addresses is stored. When you create a new environment from the template, Kyndryl Cloud Uplift allocates IP addresses from the available collection. If there aren’t enough IP addresses to allocate all of the secondary IP addresses, the VM is created with no secondary IP addresses. For more information, see Adding secondary IP addresses. |
| WANs | The attachment and connection status for VPNs and Private Network Connections (WANs) are saved with the template. If the network is connected to the WAN, new environments created from the template are automatically connected to the WAN. |
Sharing portals
If an environment has sharing portals, they can be optionally included in the template.
When an environment is created from a template with sharing portals, Kyndryl Cloud Uplift creates new sharing portals with the same access settings, but with new, unique access URLs. Expiration date and times are automatically adjusted, as described below.
Sharing portal expiration date settings
The expiration date and time is saved with the sharing portal. When a new environment is created from a template with sharing portals, the expiration date for the new sharing portal is adjusted so that the new sharing portal has the same amount of remaining time available as the original sharing portal.
For example:
- A sharing portal that expires on January 20 at 12PM is saved to a template on January 10 at 10AM. The sharing portal has 10 days and 2 hours remaining.
- If a new environment is created from that template on February 1 at 12 PM, the new sharing portal expires at February 11 at 2 PM. The new sharing portal also has 10 days and 2 hours remaining.